This page includes release notes for both Mac and iPad/iPhone editions of TimeStory, in reverse chronological order, back to TimeStory for Mac v1.0 in 2019. (The two editions often, but not always, release in sync.)
This update contains a fix for TimeStory’s date chooser on iOS 26 and iPadOS 26. On those versions, when you opened the month list, in some cases the month names would draw on top of the calendar grid.
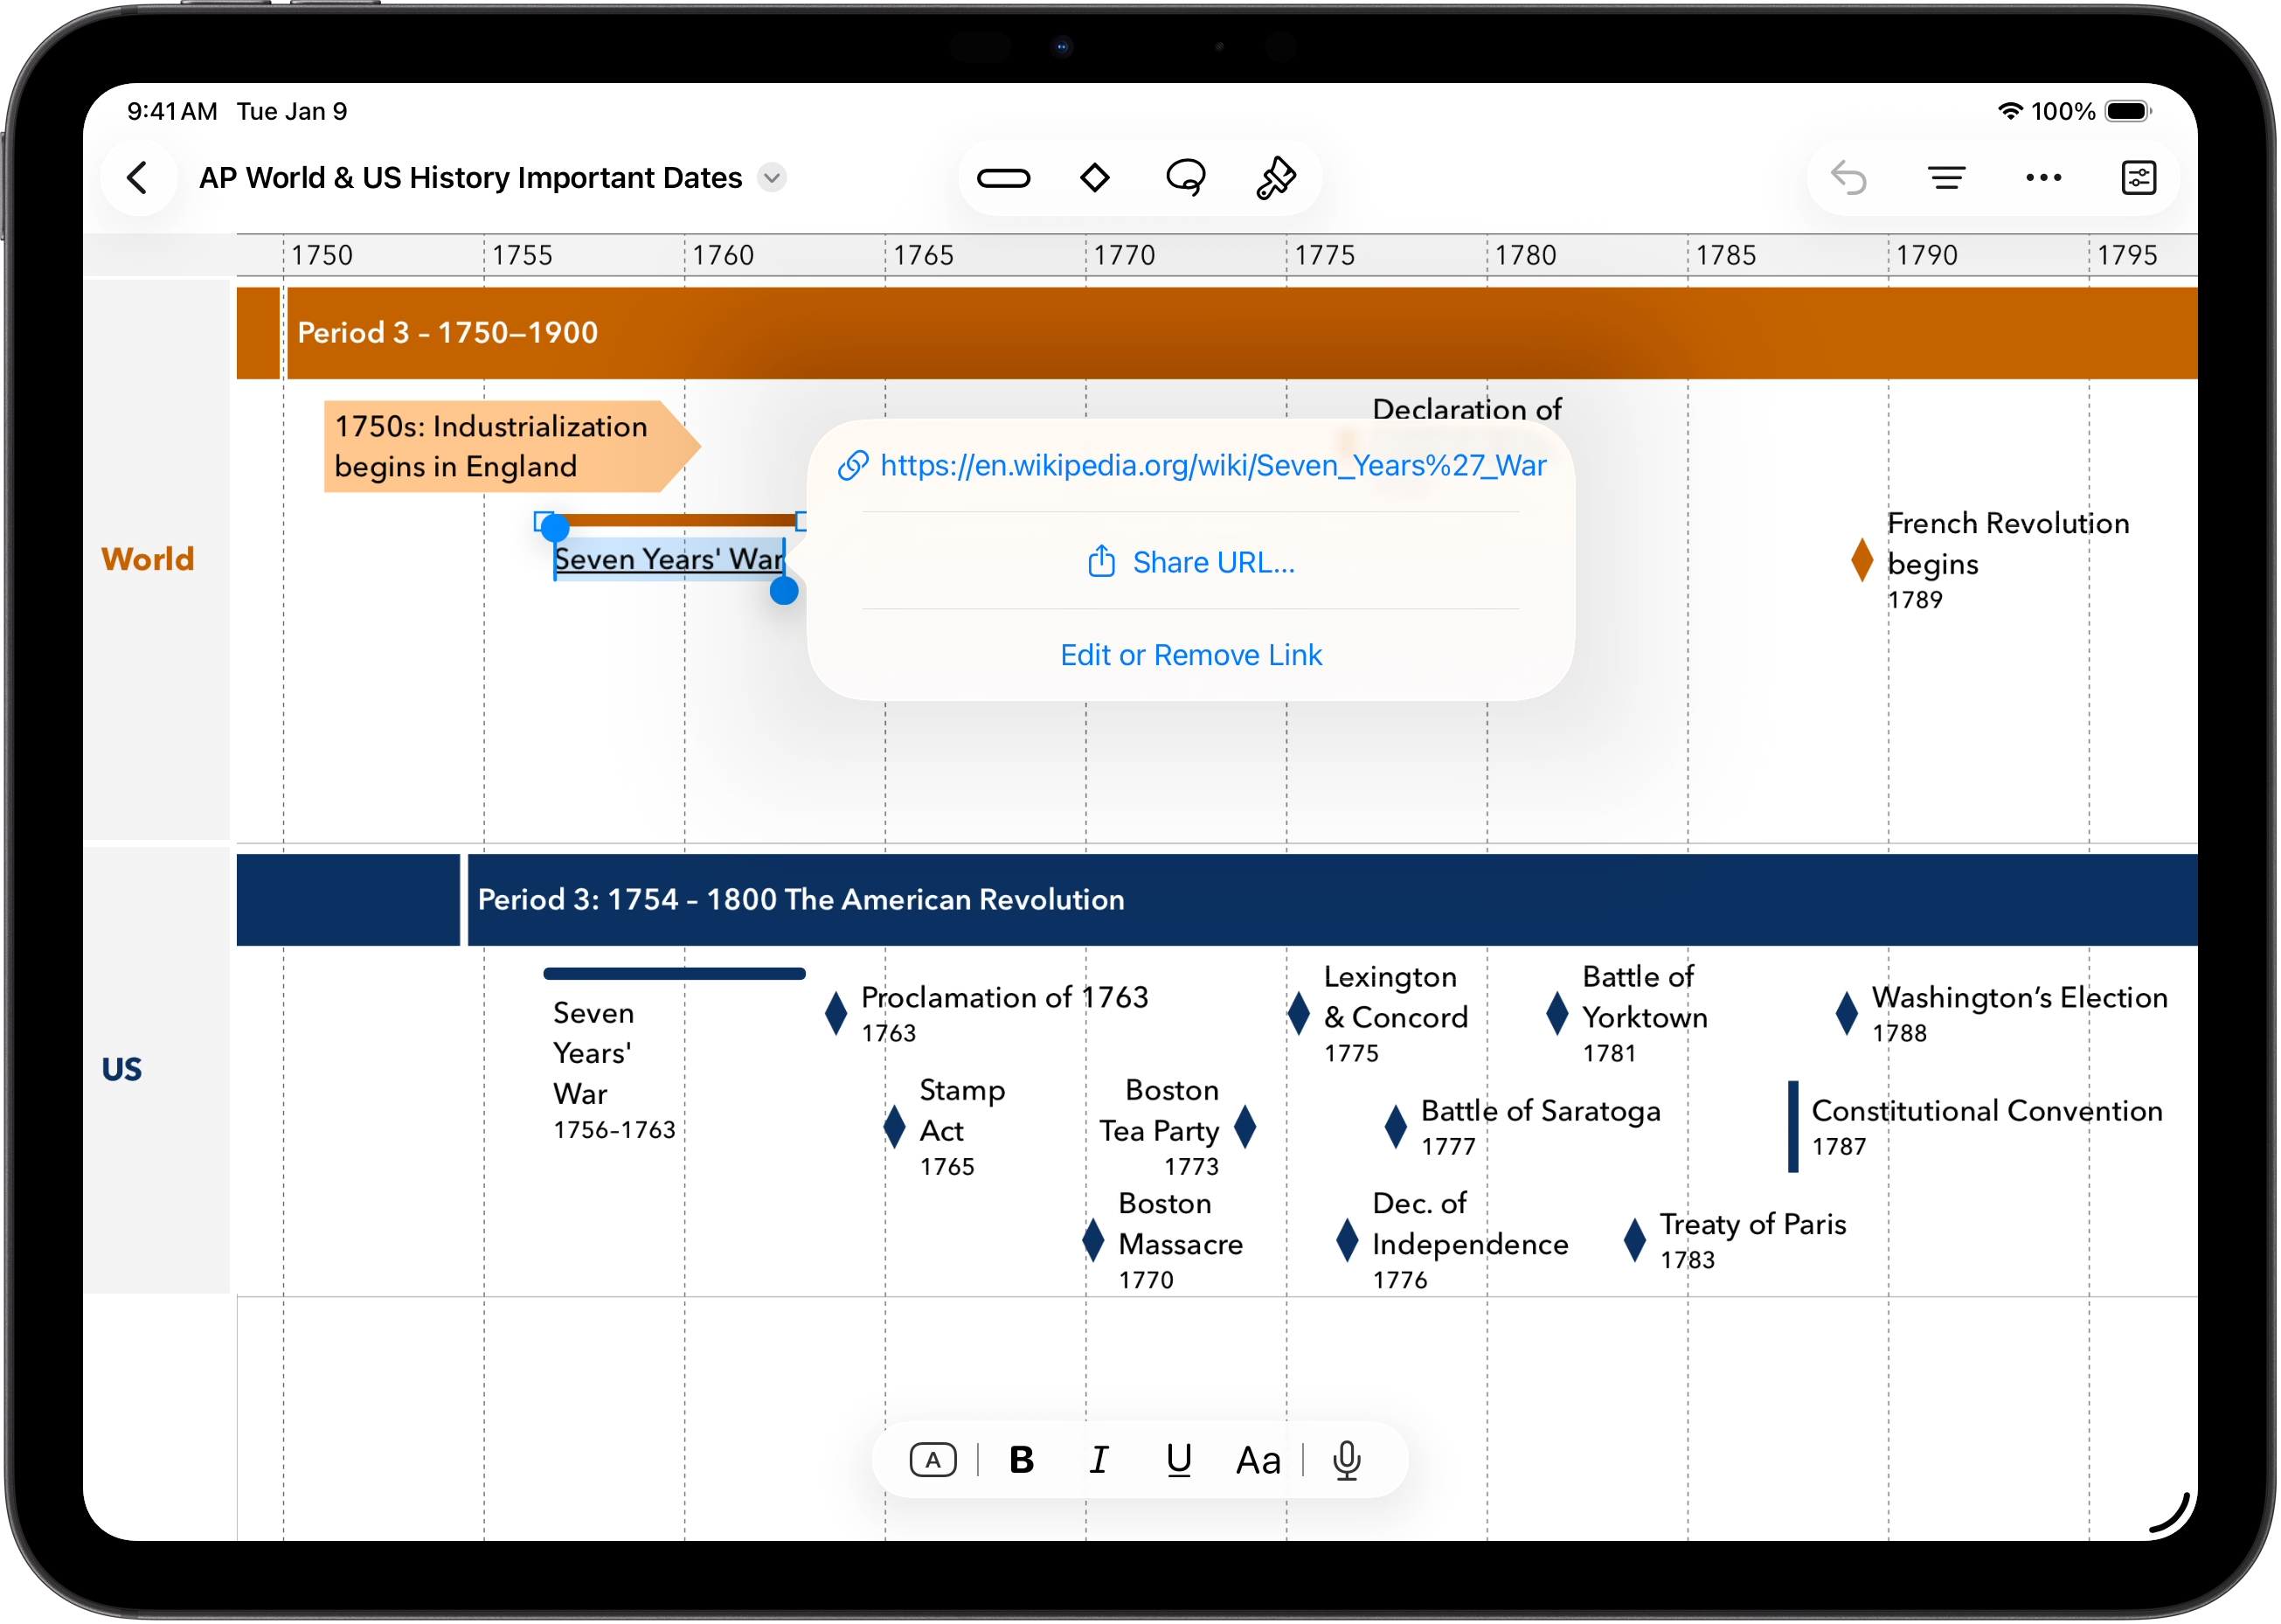
This update for the iPad/iPhone edition of the app lets you create, edit, and use links in your text, and fixes some bugs.
Enrich your timelines by easily creating and using Web links in titles and descriptions.
Tap on a link directly in the timeline, in the Inspector, or in the Details popover view (on iPad). Links are also preserved in PDF exports when sharing your work.
(Links have long been supported in the Mac edition, and linked timelines are fully compatible between the editions.)
4.1 brings big improvements for building and working with information-rich timelines or advanced import/export workflows!
When building rich timelines, especially of historical events, you often want to put a lot of document content in each event. Until now, this was only possible in the small, fixed-size “Description” field in the Inspector, but no longer.
Click on the “pop out” button next to Description, and the text will now pop out into a separate resizable editor window.
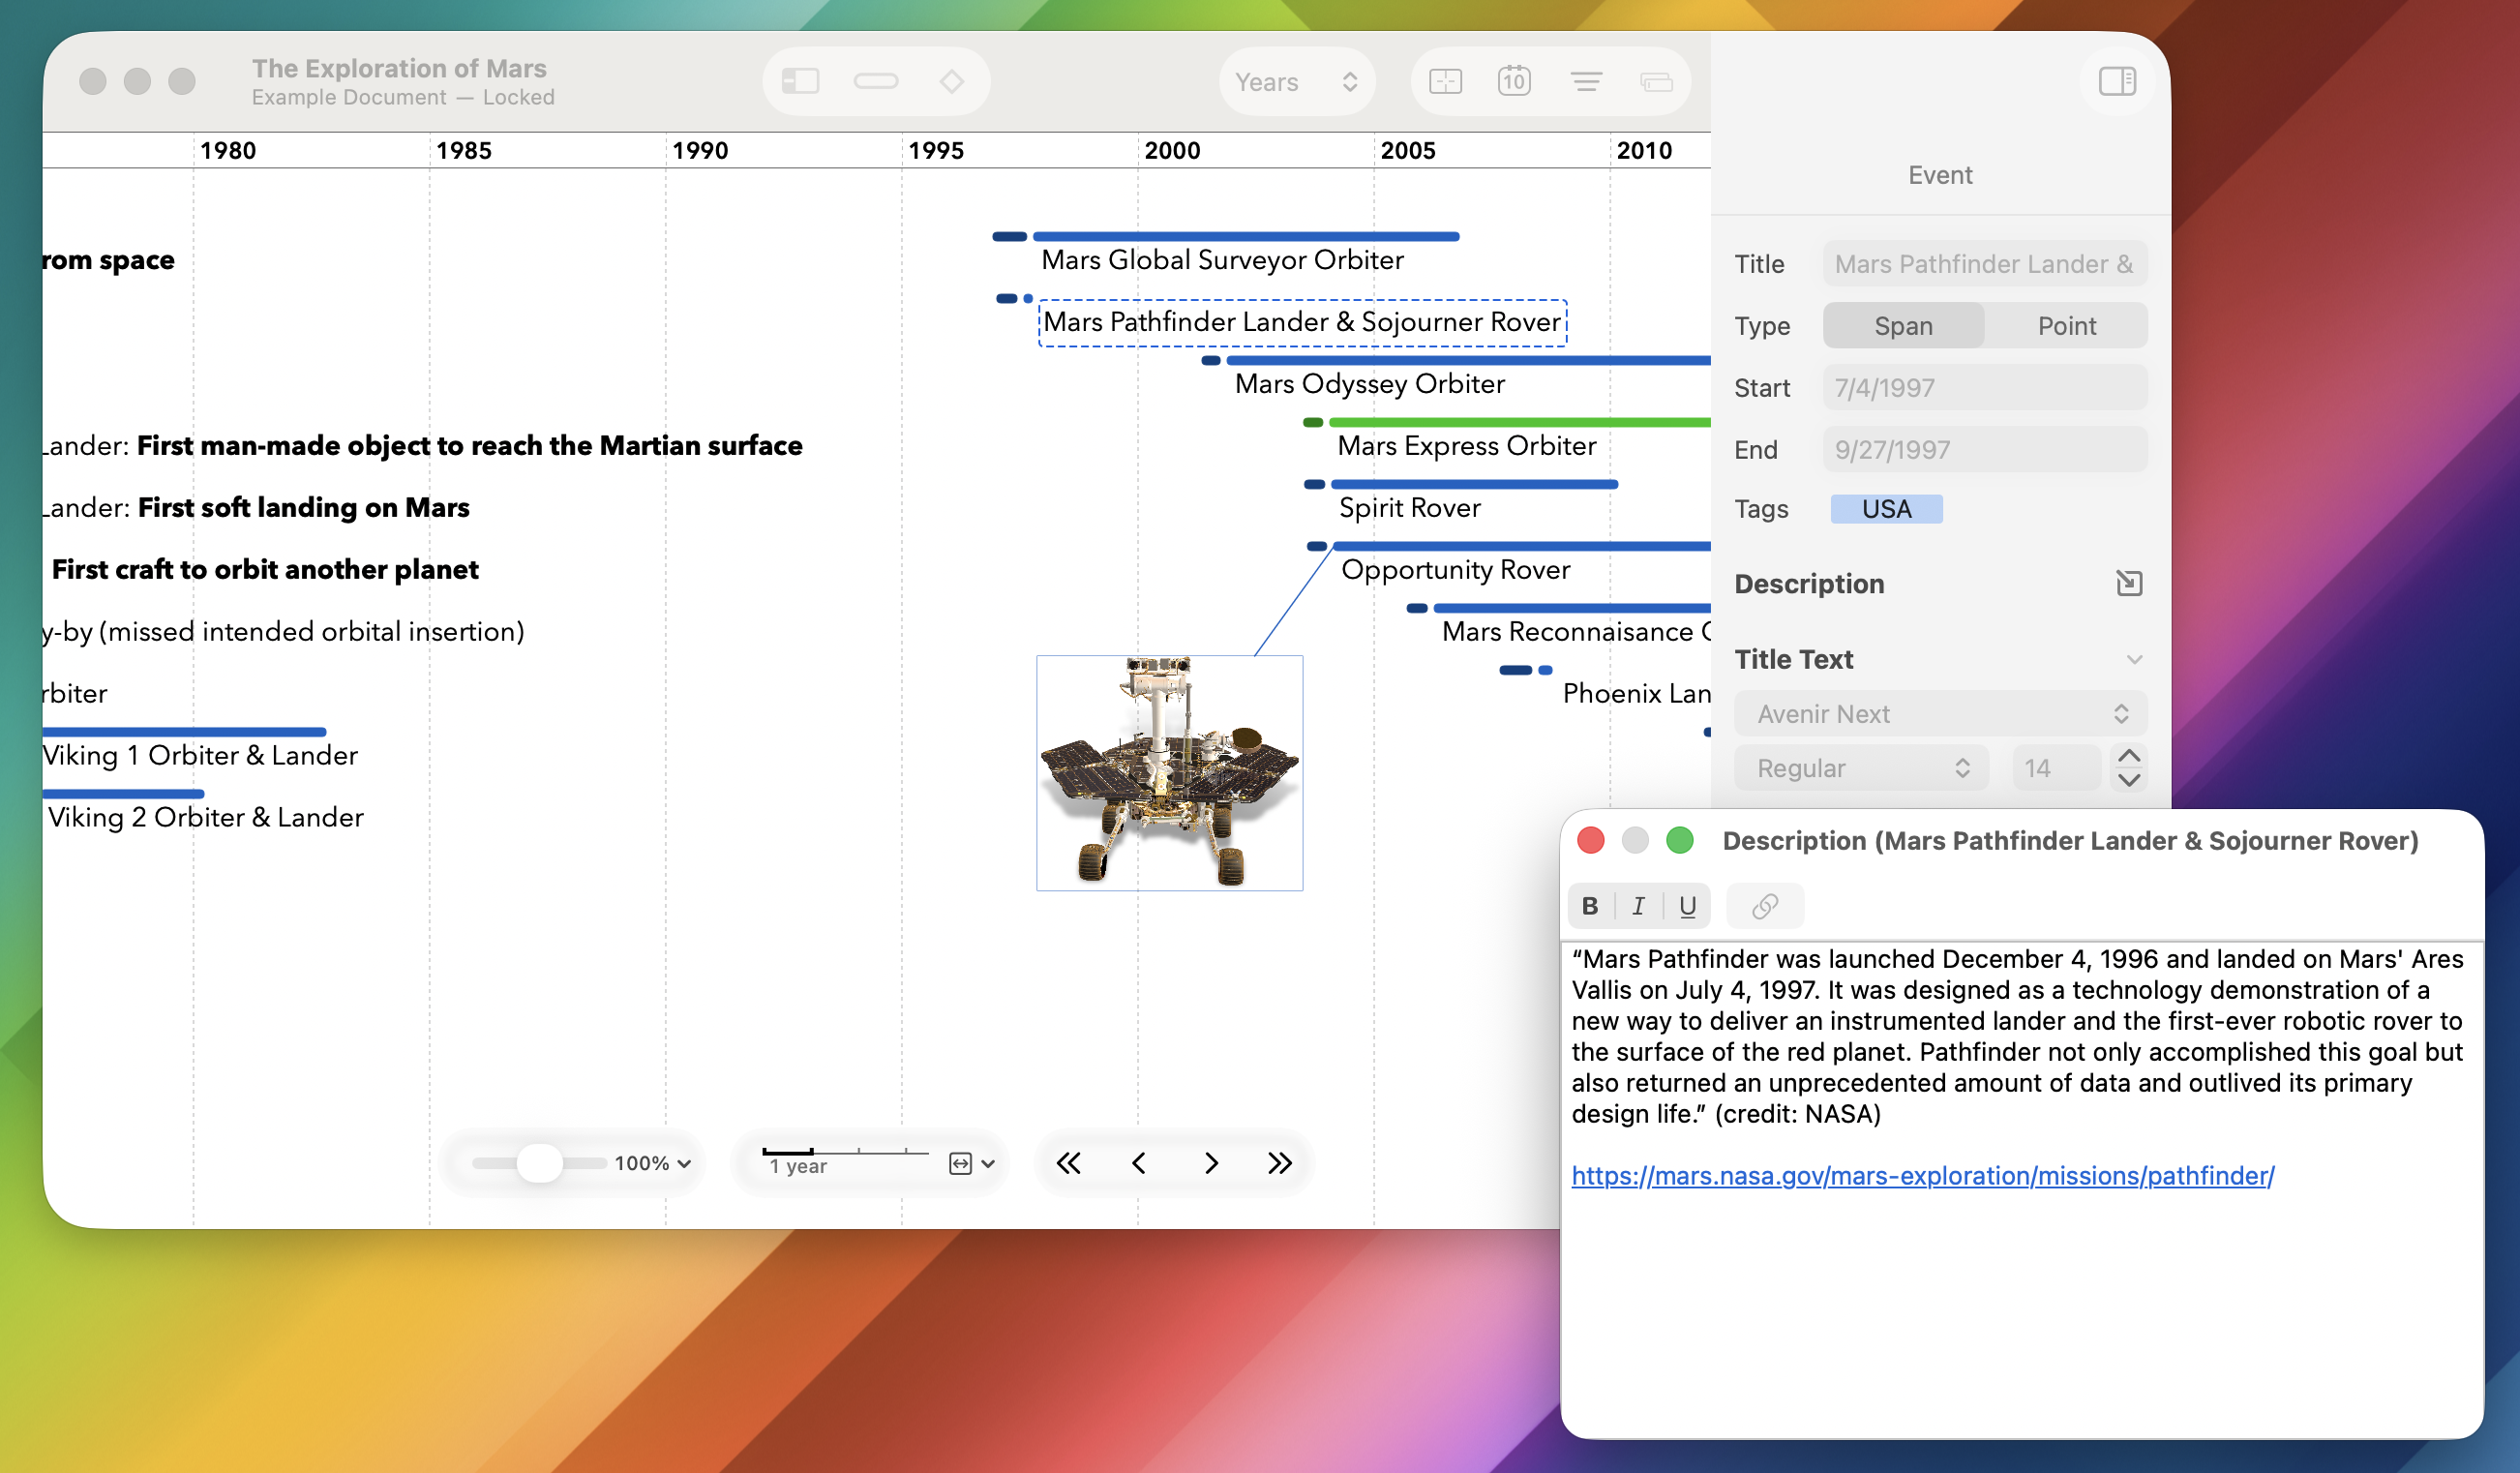
As you select different events, the window stays in place and updates to show those events’ descriptions. Close the window, or click the “pop-in” button back in the Inspector, to bring it back into its original place. And if you close the window, or if you select something that’s not an event and it closes automatically, it remembers its size and location for next time.
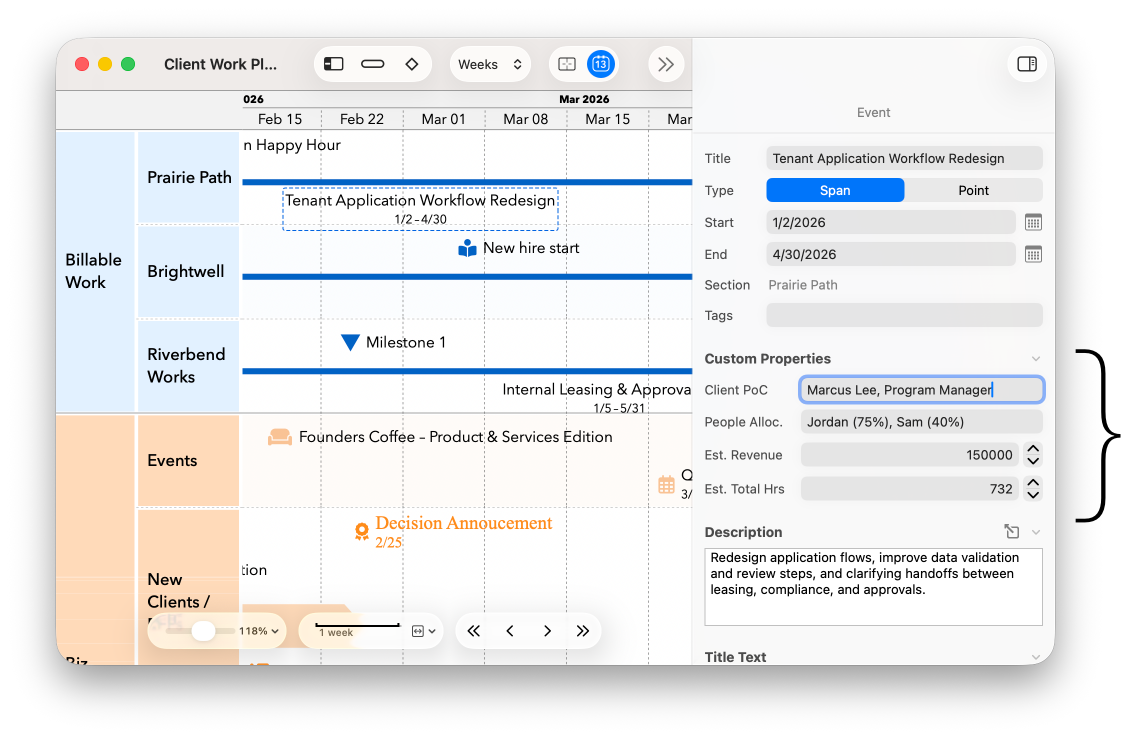
Sometimes you want to add more structured fields to your events. Maybe the assignee or priority of each task, maybe the source of each historical event, maybe the city in which each major life event happened.
You can now add your own custom text or number fields to your timeline, and they appear in the Inspector for each event just like the built-in fields. They are also visible in the Details pop-up view for quick access. Powerful filter criteria let you filter your timeline by exact match, text contents, or numeric comparisons against these properties.
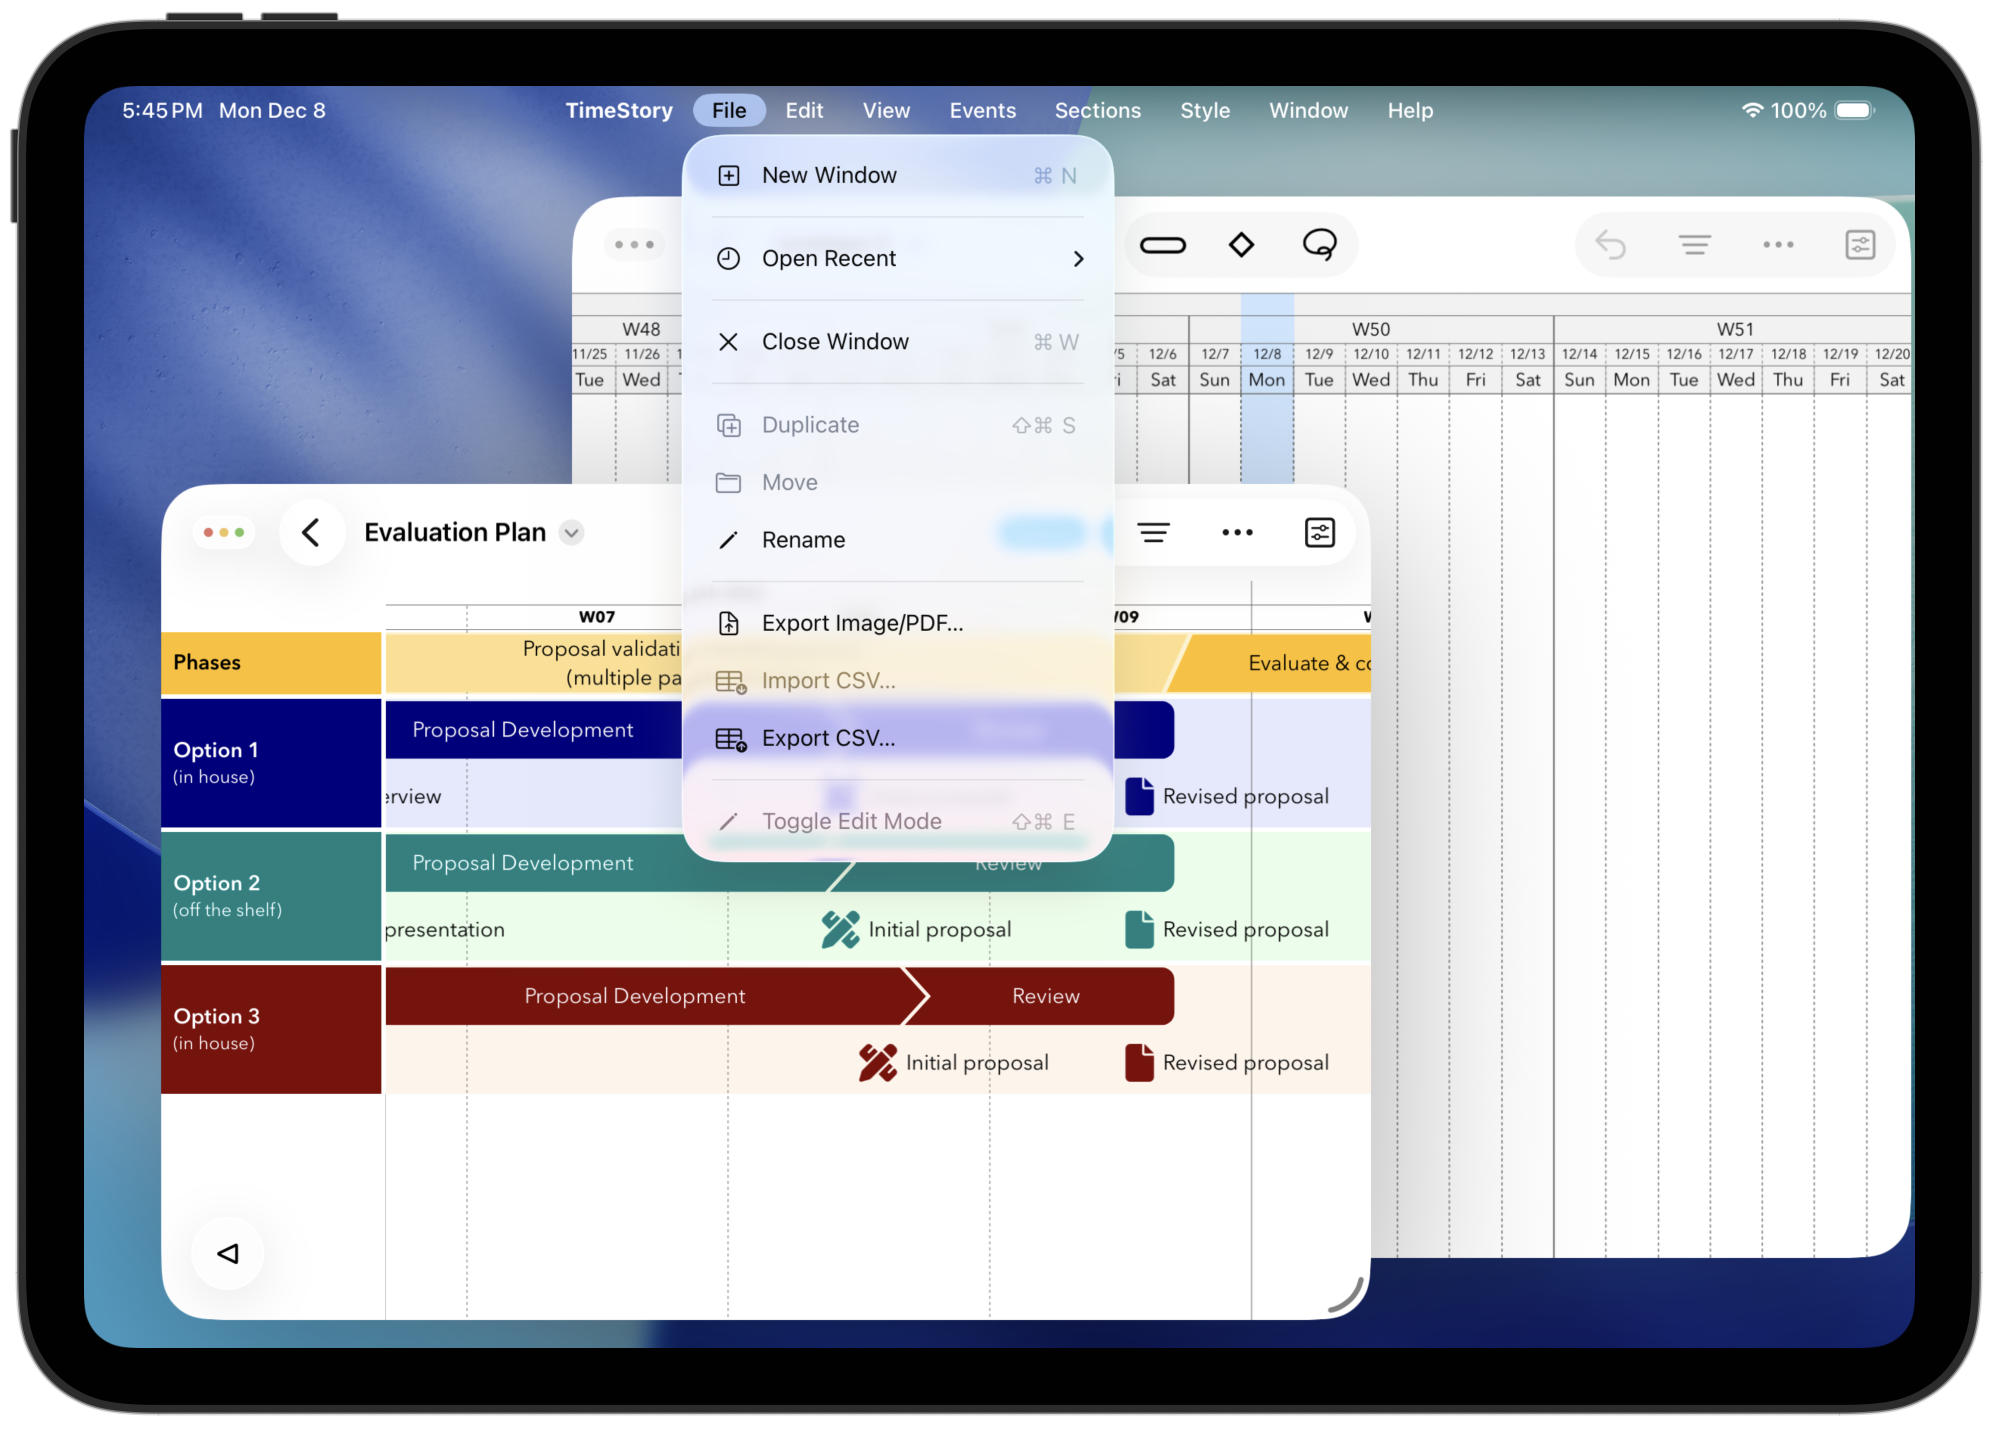
They are also available for CSV export and import, so now, if you have an external spreadsheet or file with timeline data plus other fields that TimeStory itself doesn’t recognize, you can bring that data into your timeline and edit it within the app.
Find full details in the User Guide section on Custom Properties.
For advanced users, sometimes it’s useful to export a TimeStory file to CSV, collect updates, then apply those updates back to the original TimeStory file. With 4.1, this can work much better.
When exporting your timeline, you can now add a TimeStory ID column to the CSV. Each event gets a unique, stable identifier for that field. When re-importing, set that same column to TimeStory ID again, and each row will use this value to look up the existing event, updating any other fields. With this in place, you can update anything, including titles, without ambiguity (before now, you had to use the title to look up existing events and so couldn’t change them and couldn’t have duplicates).
Learn more in the User Guide section on TimeStory ID Columns.
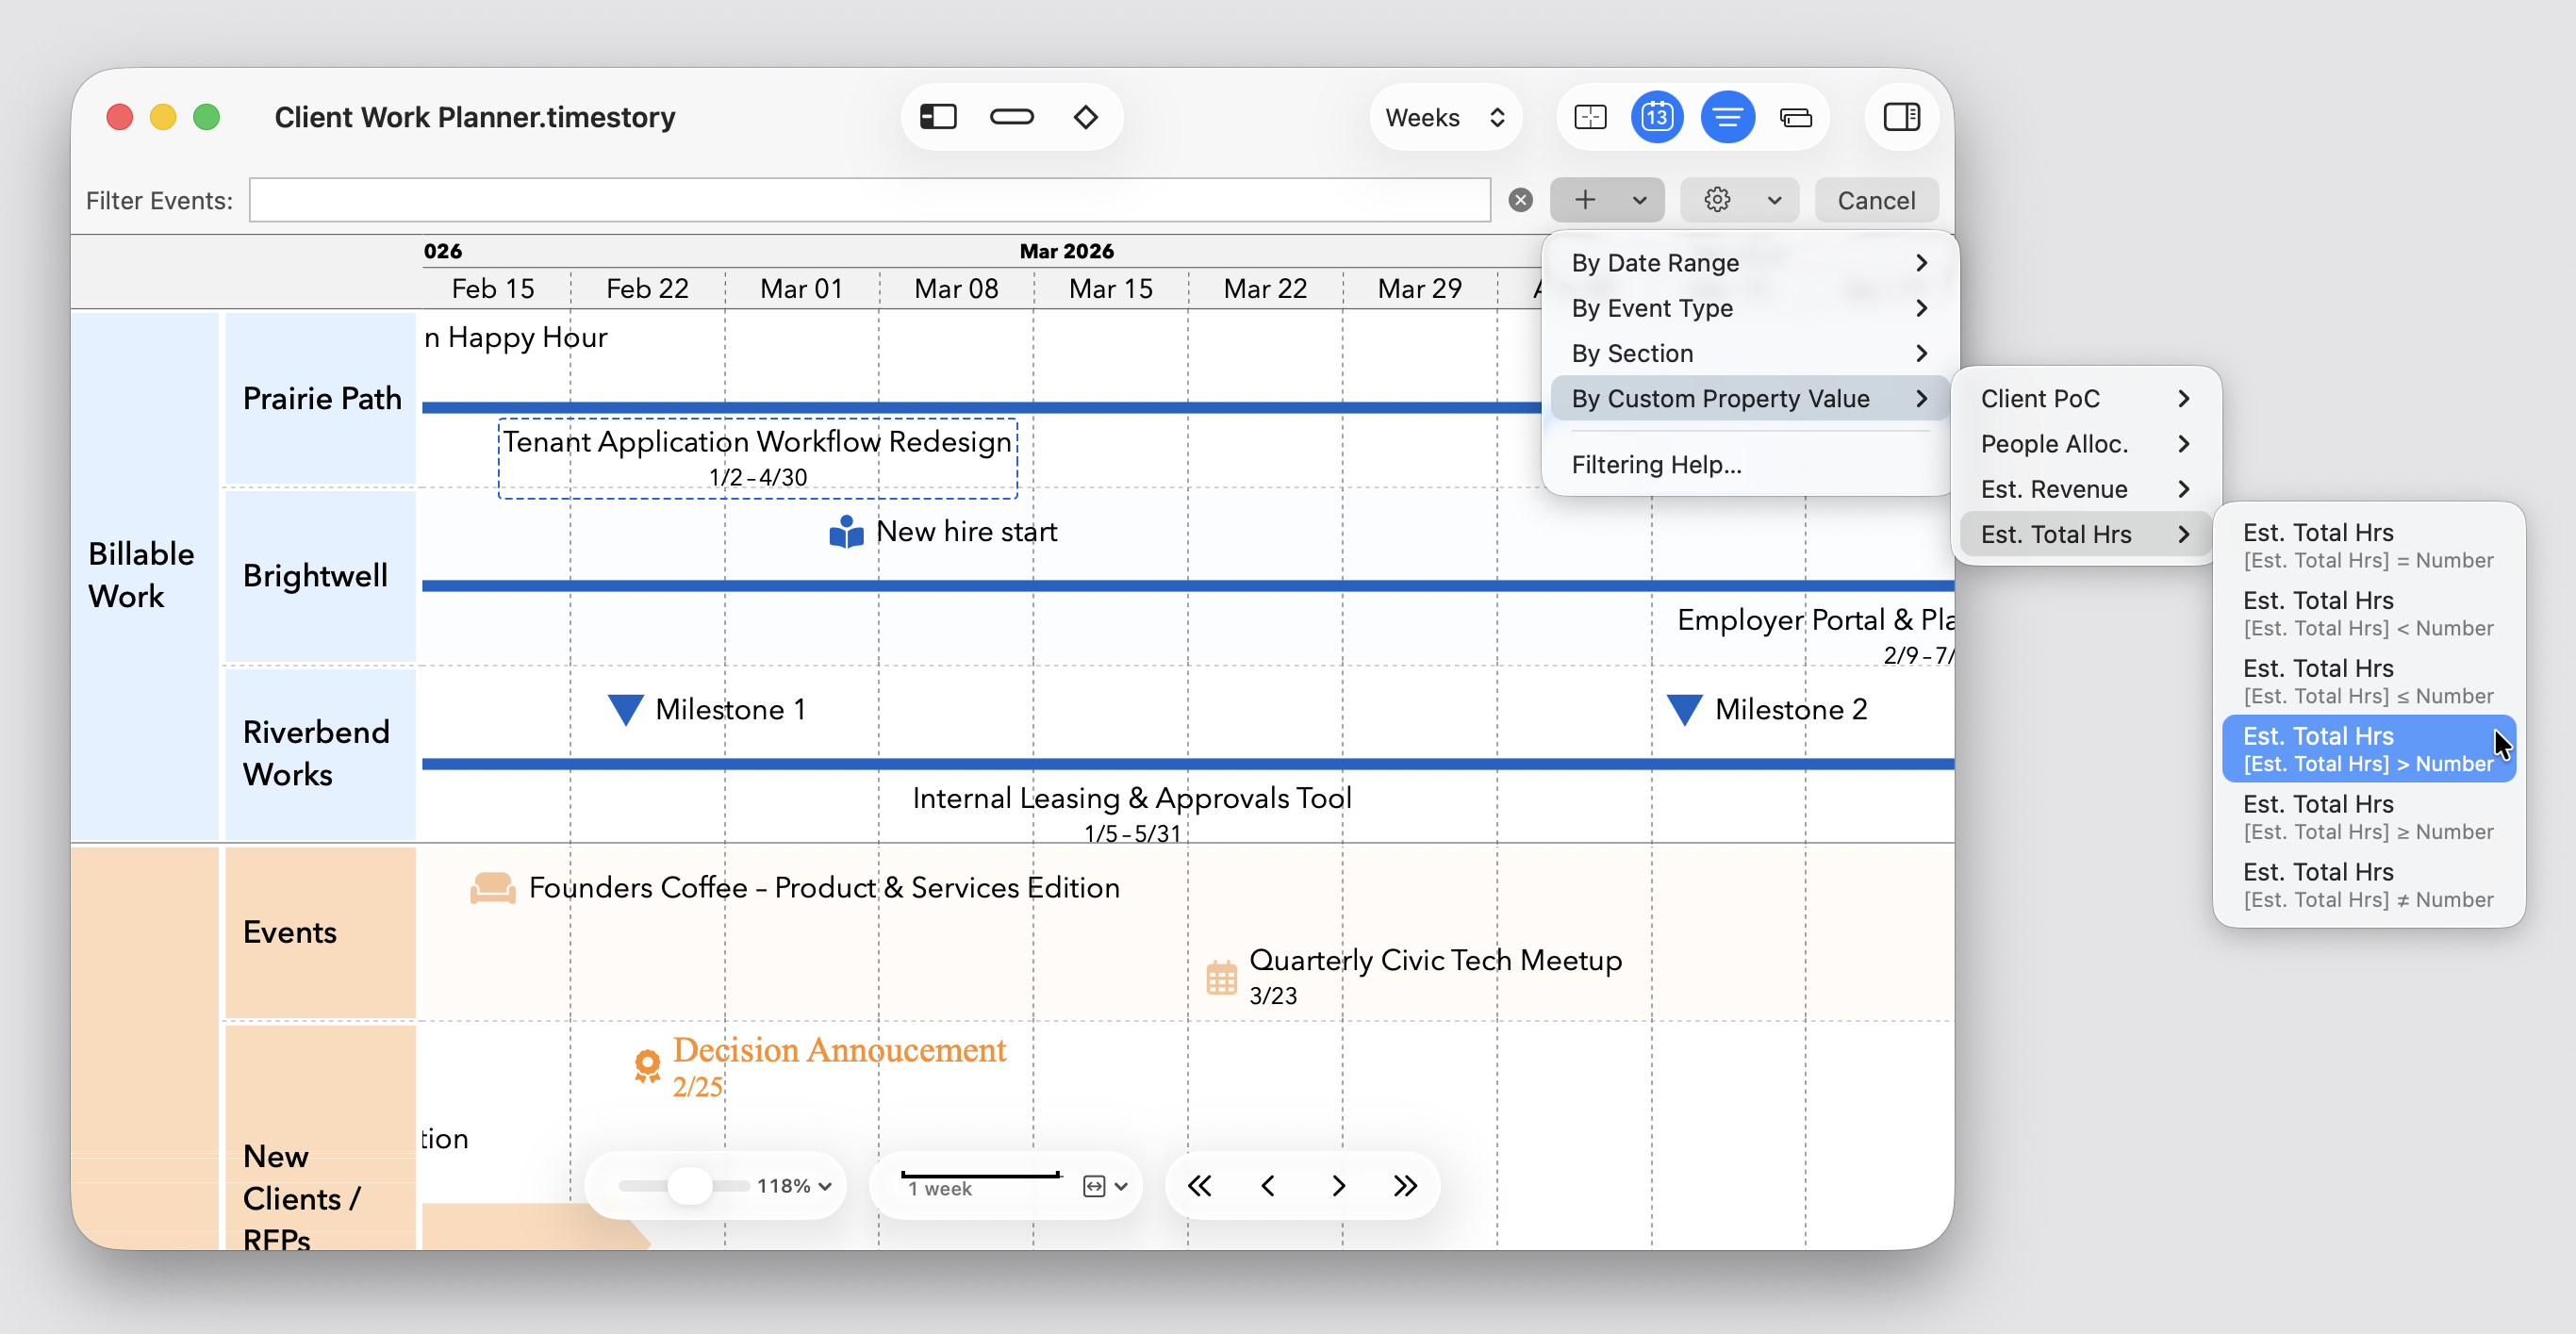
The TimeStory event filter is very powerful, with a range of special syntaxes to perform specialized matches. Until now, you had to type these in when you wanted to use them. For simple tests like “event starts before date”, this just meant typing a < and a date, but some options are more complex, and Custom Properties adds many more. The Event Filter now has a new menu which helps you enter these advanced operators:
This update synchronizes with TimeStory for Mac 4.1 for compatibility, and updates the CSV import/export features to support custom properties and the new unique ID feature. See the Mac release notes for details. It also improves the appearance of Details pop-ups when showing large event or section titles or descriptions.
There’s also a bug fix: if you have a hardware keyboard attached, and tap the Esc key while focusing in a text field in the Inspector, the entire timeline would close and return you to the document browser. Esc now just stops editing that text field.
This small update fixes a few bugs:
Note on the free trial version: On February 11, the corresponding trial version was updated to version 4.0.4. A bug was found in the released 4.0.3 trial which made it unusable to test the app. TimeStory Trial version 4.0.4 still corresponds exactly with TimeStory 4.0.3; the bug fix did not affect anything else.
This update just revises some text in the in-app purchasing screen and in the App Store’s app description. Nothing has changed about the app or its pricing; these were just textual edits based on feedback.
This fixes a couple of bugs found in 4.0 and 4.0.1 that could cause description or title text to get unexpectedly deleted.
Specifically:
This update fixes a single bug found in 4.0.
When you use the right or left arrow keys to nudge an event forward or backward, TimeStory flashes a little tooltip with the date, so you can place the event precisely even if individual days aren’t visible. In 4.0, however, a bug caused this tooltip to show the date you were moving from, not the date you were moving to, making it easy to accidentally put an event on the wrong day.
Both apps get new controls, refreshes across the UI, customer-requested features, and bug fixes with this update! We settled on the new major numbers 4.0 and 2.0 because of the refreshed, but still familiar, user interfaces. Along the way, we also updated the TimeStory User Guide, and for the first time, you’ll find a complete User Guide for the iPad/iPhone version here on the website.
We’ve kept the same core look and feel, but rethought specific controls, menus, and features based on the last few years’ experience.
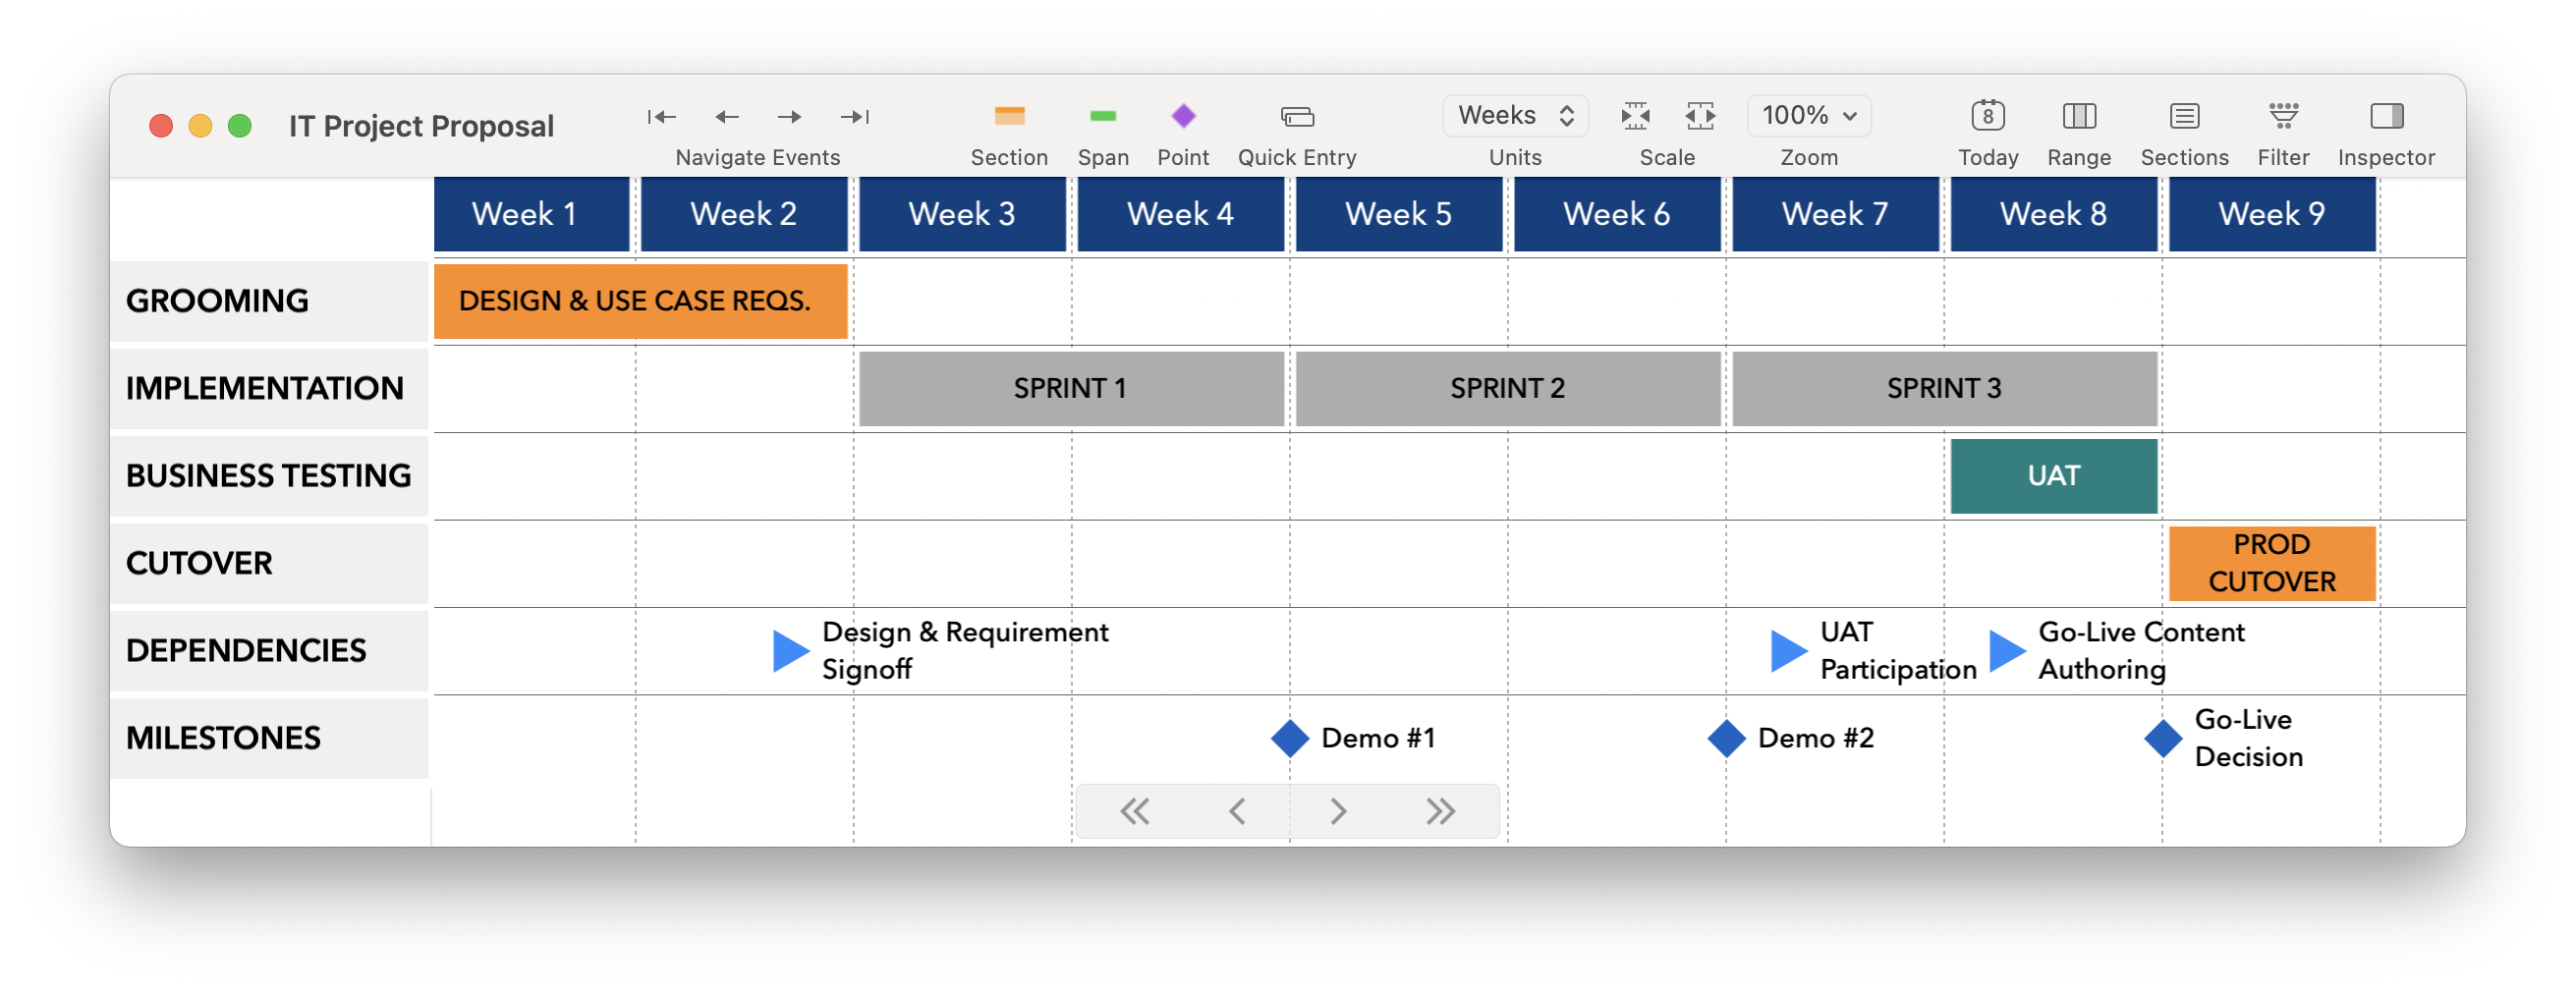
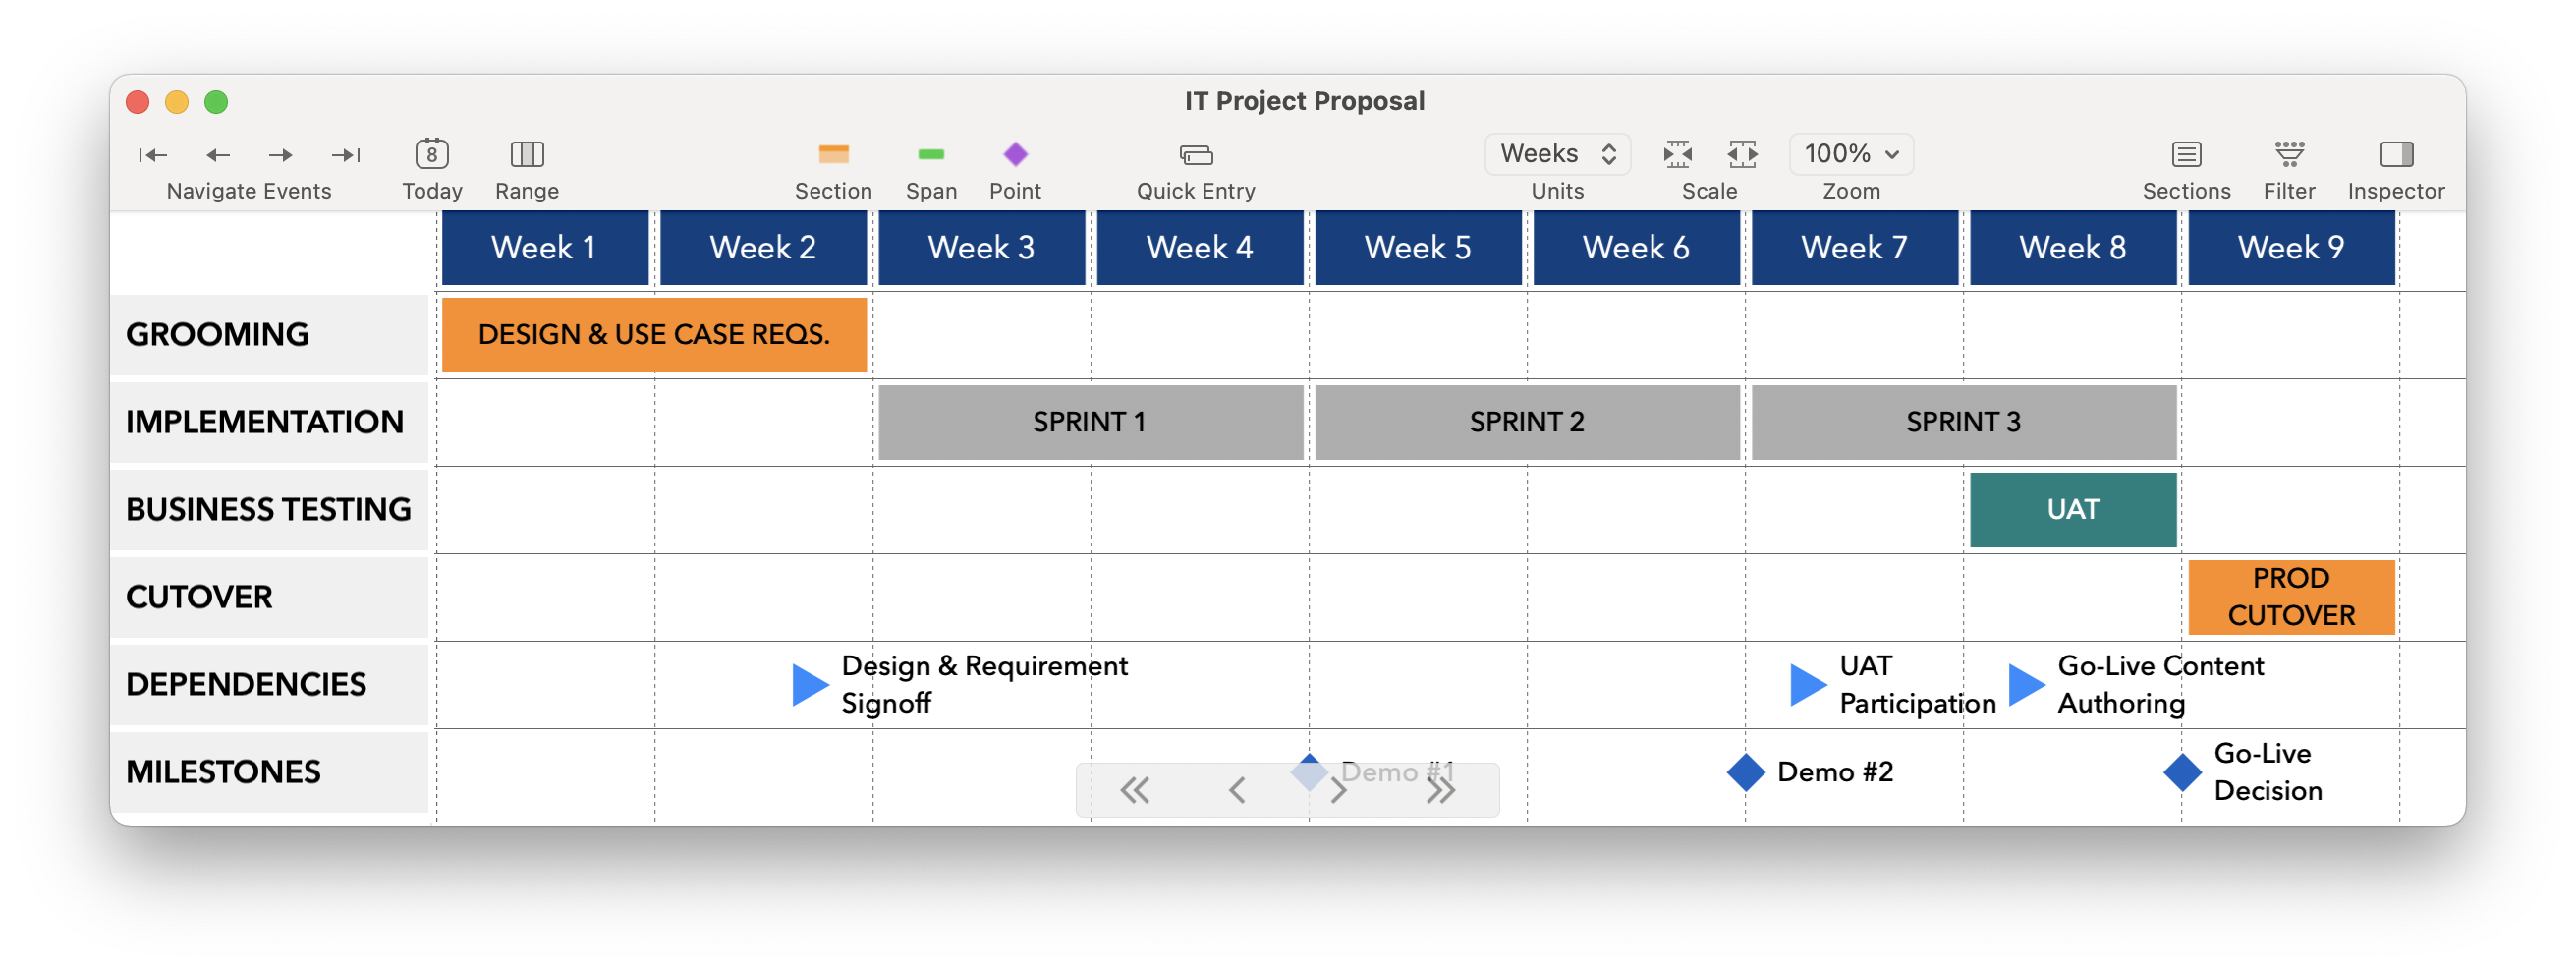
We moved some key controls out of toolbar buttons into more-suited places:
TimeStory on iPadOS 26 now also works great in its new windowed mode and with the new main menu bar. We’ve fleshed out and cleaned up the main menu, making many features more discoverable and accessible, and taken care to make sure the app works great in any window size.
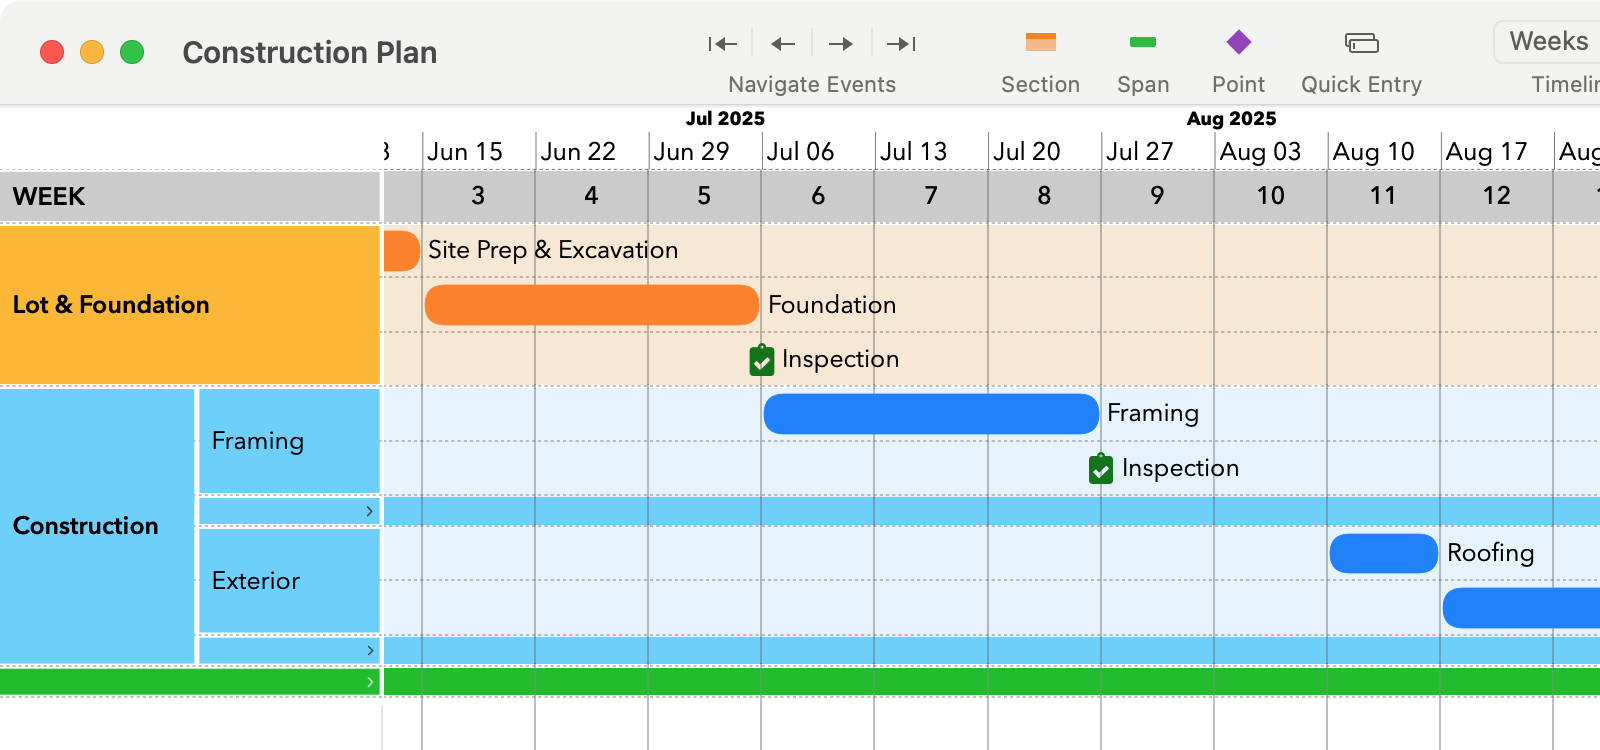
There are also smaller, targeted UI changes in each app, such as consolidated or renamed menu items and toolbar items. For example, on the Mac, the Section, Span, and Point toolbar items now visibly toggle when active, the Range Highlighter was redesigned to remove its dependence on the timeline header, and the Inspector control and divider are now full-height.
You’ll find the updated UI matched by updated text and screenshots in the User Guide.
You can now lock or unlock one or more events; a locked event can’t be dragged, and can’t be moved with arrow keys. Use this to prevent accidental edits of one or more events, for example if you’ve finalized some tasks but are still working on others. (If you just want to temporarily browse a timeline without accidentally editing anything, we also still have view-only modes for the whole document.)
This feature has been requested by many customers over time. TimeStory was designed specifically to make drag-and-drop as simple as possible, but sometimes that’s not what you want.
CSV Export now has a “Presets” menu button containing two preconfigured lists of columns: Minimal and Full. A full export includes everything that a TimeStory CSV export can contain, and is great as an archival or interchange format; a minimal export just includes basic event data, and might be a good starting point for your own custom export.
TimeStory 4.0 now requires macOS 14 Sonoma or newer. TimeStory 3.10, the prior release, will continue to run on older OSes, and we’re still happy to provide email support to users who can’t upgrade yet. (With the substantial changes over the last few years, especially the major update that came with macOS 26 Tahoe, it has become more and more difficult to support and properly test older OS versions while adopting Apple’s latest technologies, and this update should last for a while.)
There are now full User Guides here on the website for both Mac and iPad/iPhone versions. Until now, we had a full manual for the Mac edition but just a quick overview for the iPad/iPhone version, but while developing 4.0 and 2.0 we built a new dedicated version of the guide containing specific screenshots and content for that platform. (The Mac version is, as always, also included in the app under the standard Mac Help menu.)
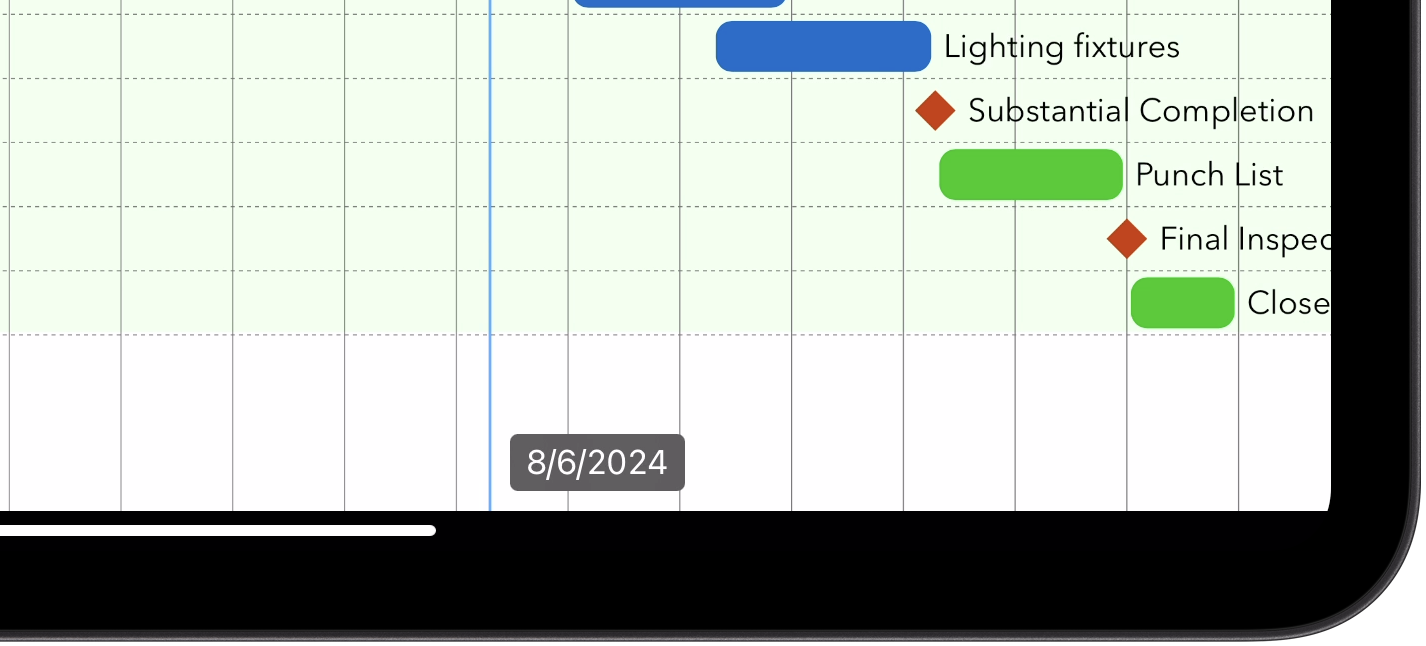
Quickly point out a date or line up events with the Dateline, new to the Mac edition. This puts a vertical line under your mouse pointer, with a tooltip showing its exact date. (Much like the Stocks app.) Turn it on and off with a new toolbar button or keyboard shortcut, for quick access while browsing or presenting your timeline.
Show Details has also gotten an update on both the Mac and iPad/iPhone versions, with an improved, consistent appearance, more information, and better handling of long descriptions.
Visualize more prehistory, with a new lower limit of 1 million BC. (The prior limit was 500,000 BC, and the limit before that was 4713 BC. We’ll continue pushing this limit back, as we solve problems with date input and formatting.)
There’s also a new “years only” formatting option for year labels, which omits both AD and BC. You might use this if you’re working on a multi-century timeline and you don’t need the “BC” markers because it’s obvious.
Finally, years with more than four digits will now use proper grouped digits for readability; for example, on a Mac configured for US English, you’ll now see “1,000,000 BC” instead of “1000000 BC”.
This is a pure bug-fix release, resolving these issues:
This update fixes a bug that affected users with certain calendar or region settings on their device; in those cases, Go to Date, Go to Today, and Inspector date pickers would display and choose incorrect dates.
This update addresses a printing-related problem found soon after releasing V3.9: with some time scales and options, when you printed, the timeline header at the top of each page might be partially filled in, or might be entirely missing. It contains no other changes.
With this update, both apps get several new long-requested features that can make any timeline better looking and easier to use!
You can now collapse any section or subsection in your timeline into a thin bar:
This hides that section’s contents, while showing the section’s place in the timeline. Expand it again with one click (on macOS) or two taps (on iOS).
A similar feature previously existed for timelines that used the “section headers on top” style, but it wasn’t available in the default “section headers on left” style, so wasn't useful for most people.
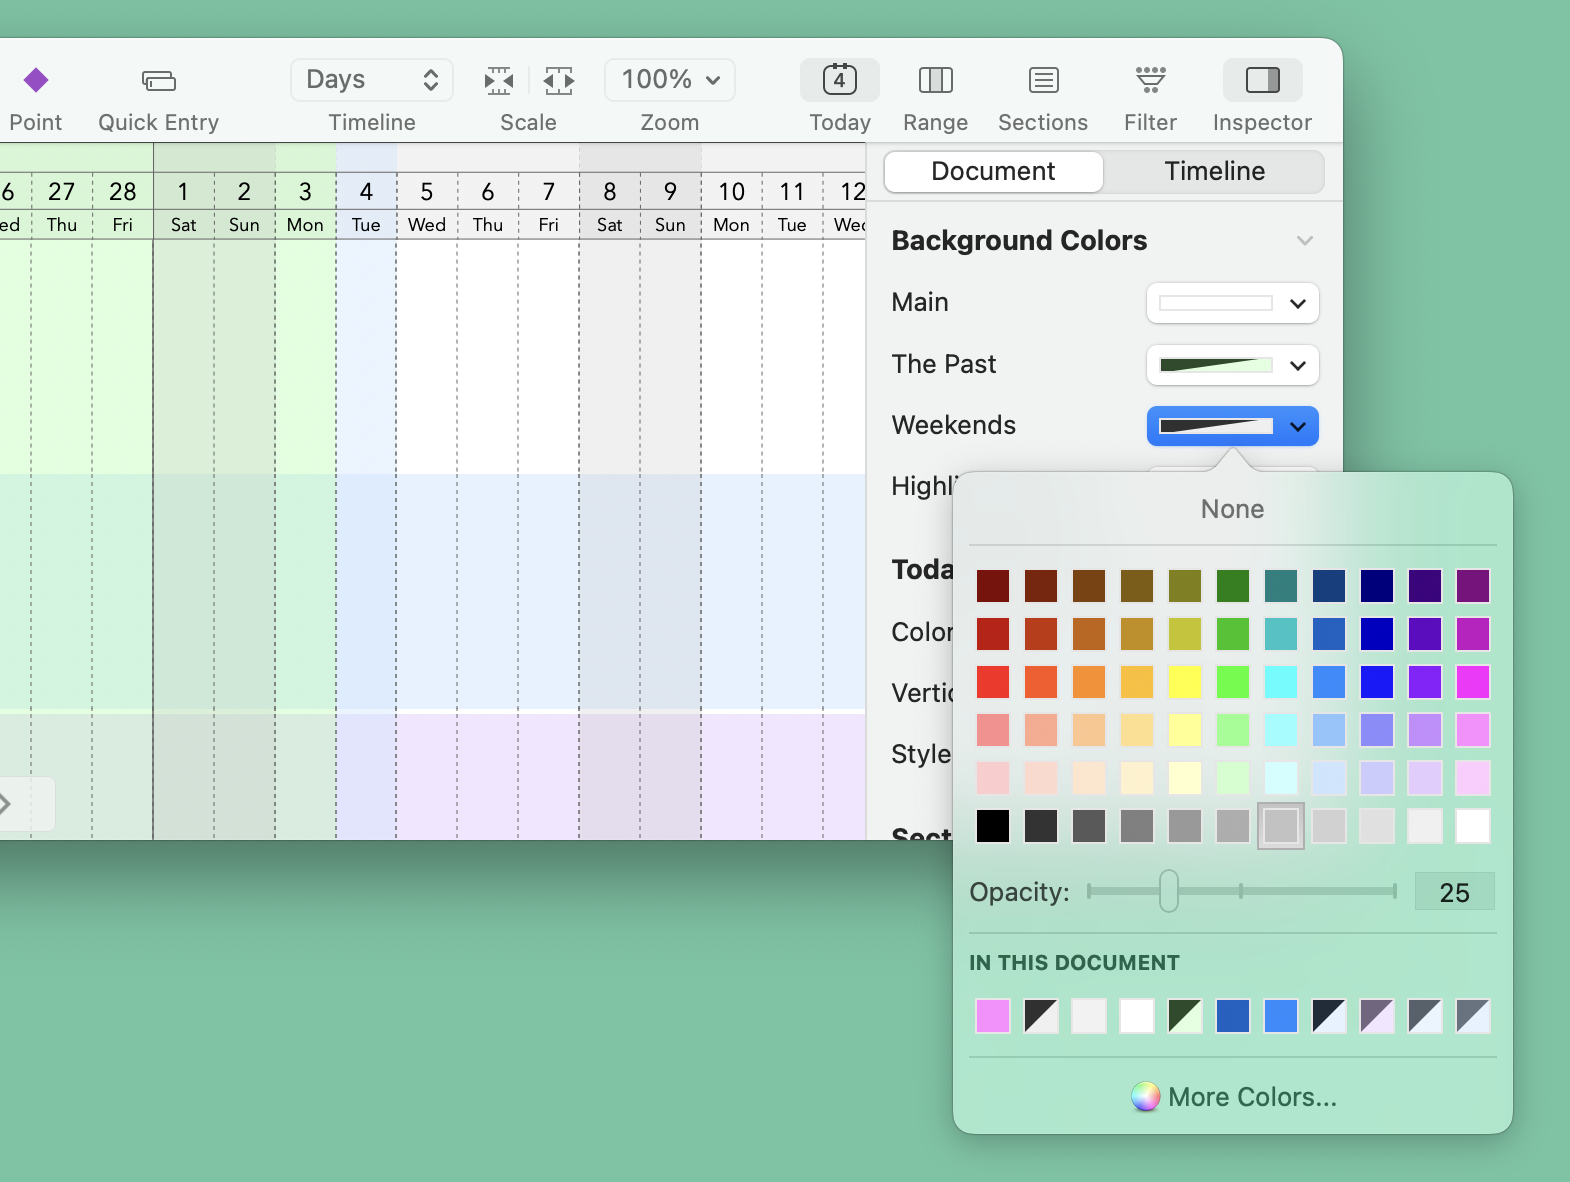
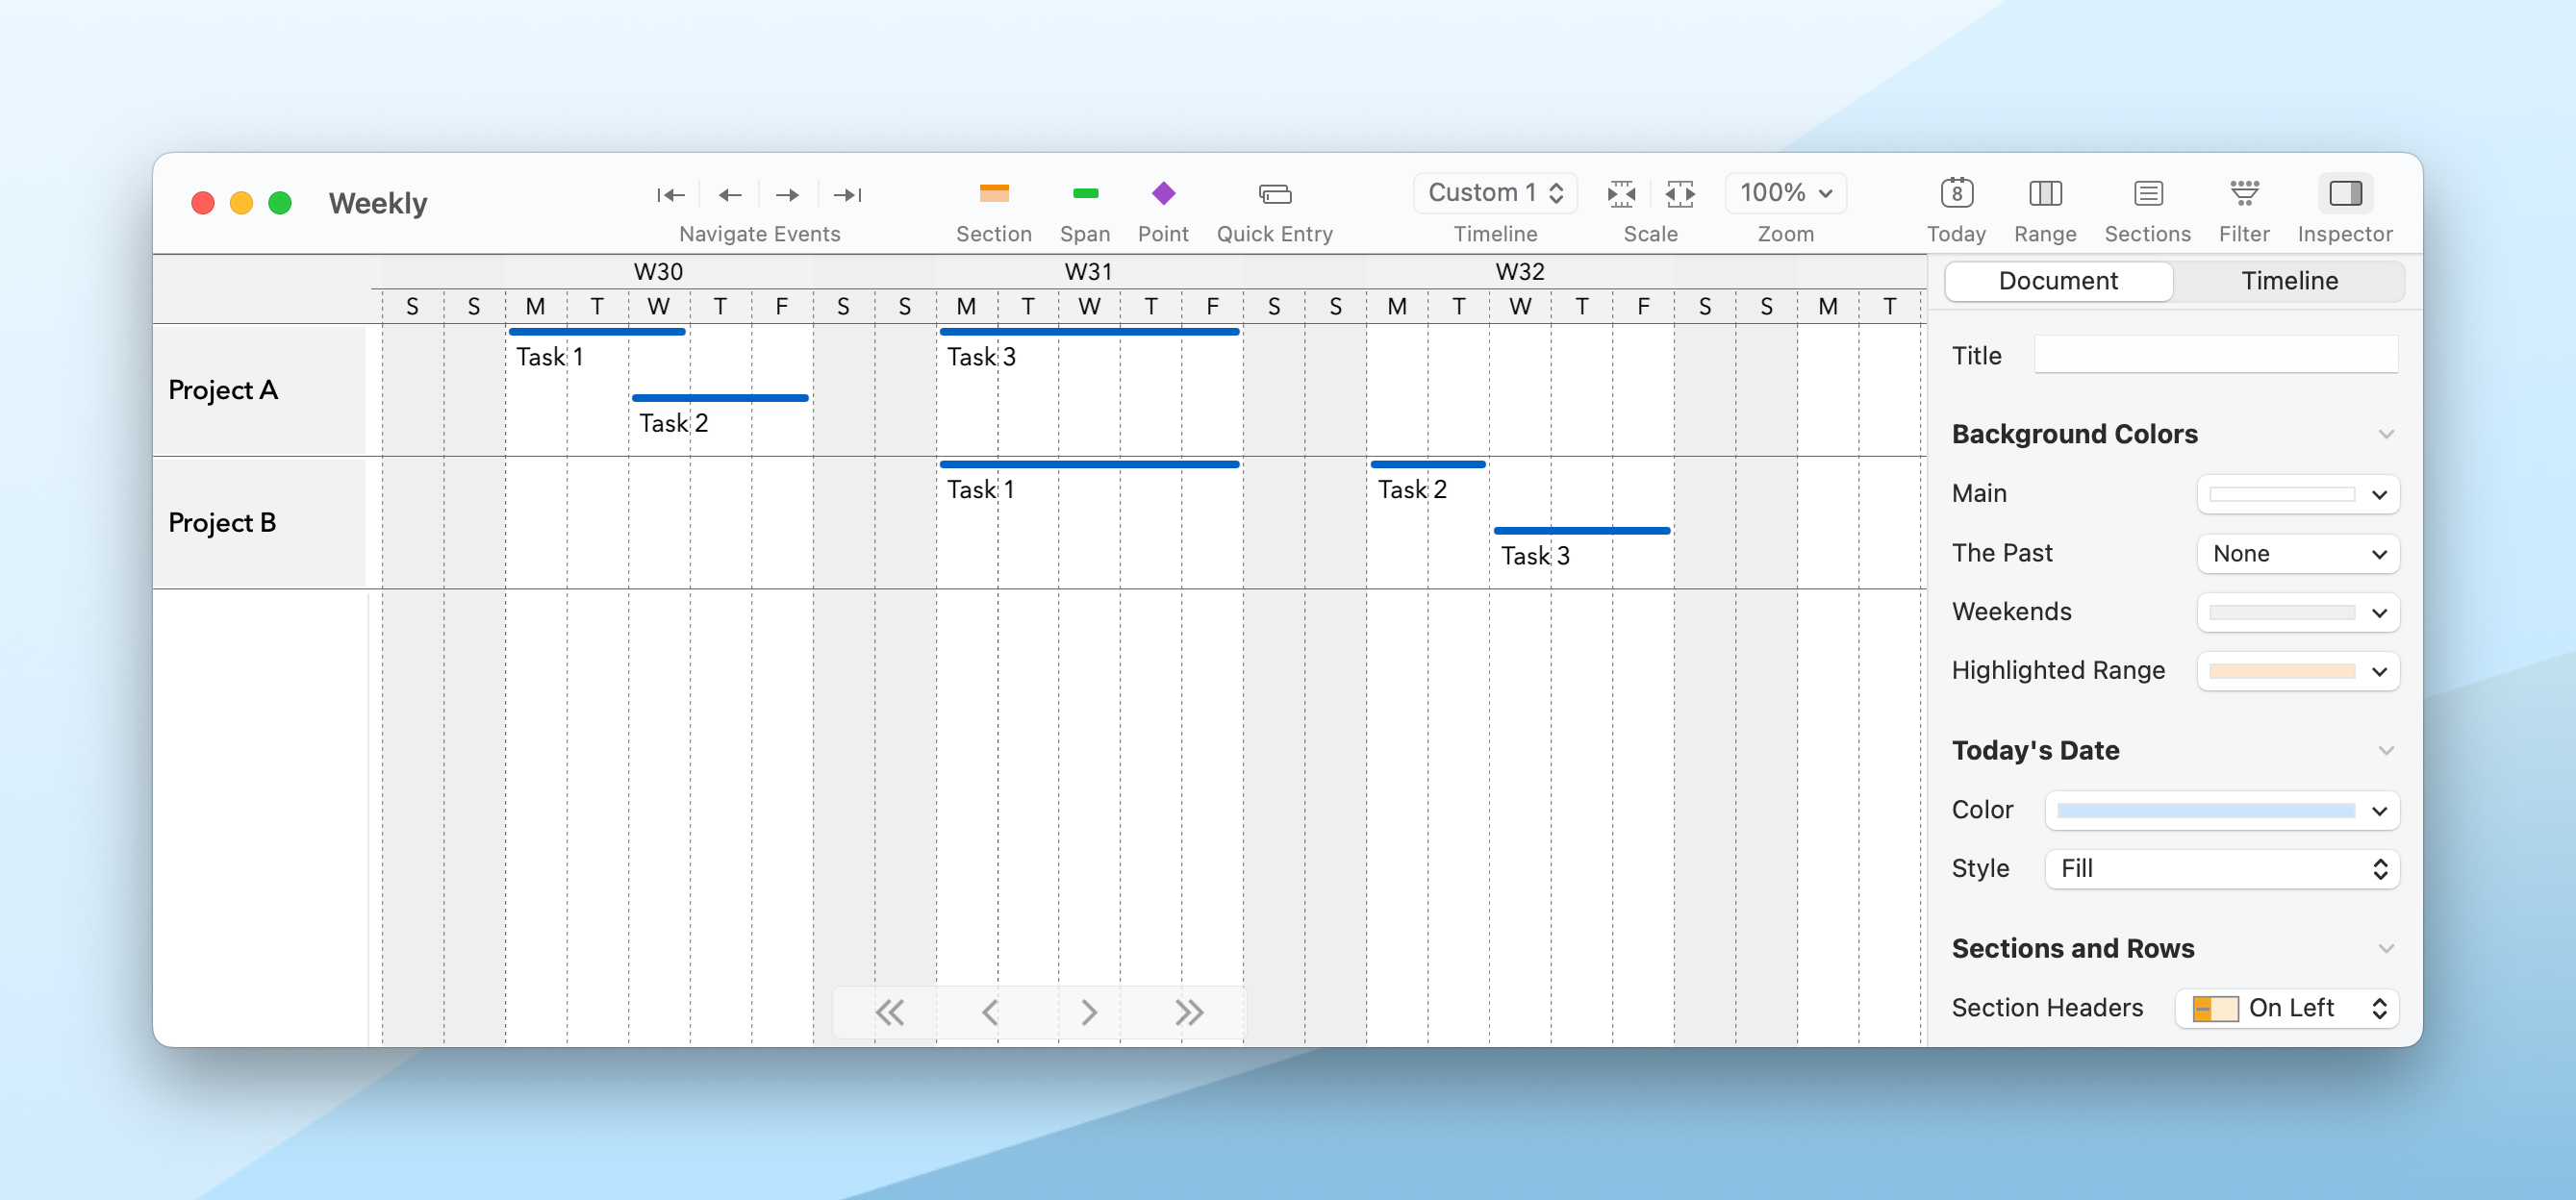
You can now choose any opacity from 0% to 100% for many background and highlight colors. Setting a value less than 100% makes that color partly transparent, blending it with whatever’s behind it, whether that’s an overlapping highlight or a section background:
This is allowed on all date-range highlights, including weekends, today’s date, the past, and event date ranges, plus on section body backgrounds. (It’s not allowed on the main or header backgrounds, because there’s nothing underneath them!)
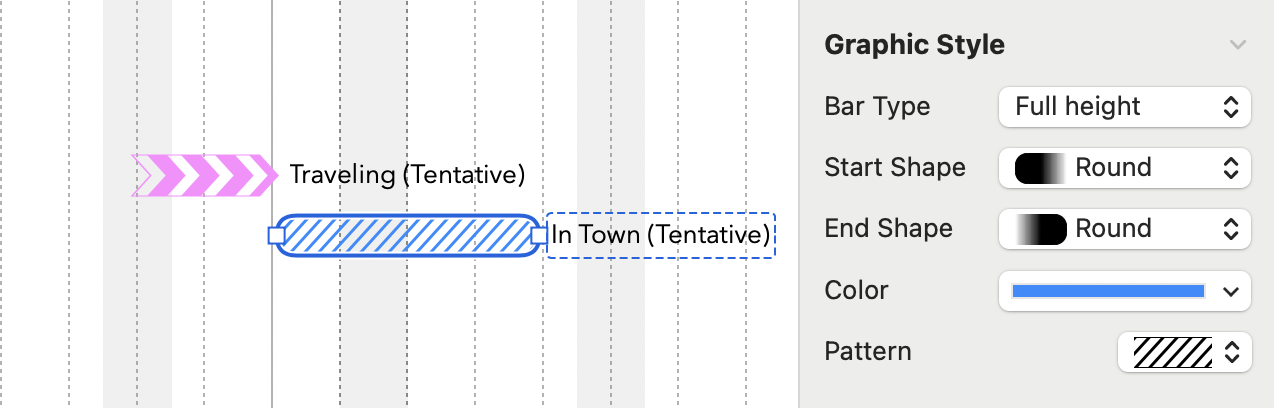
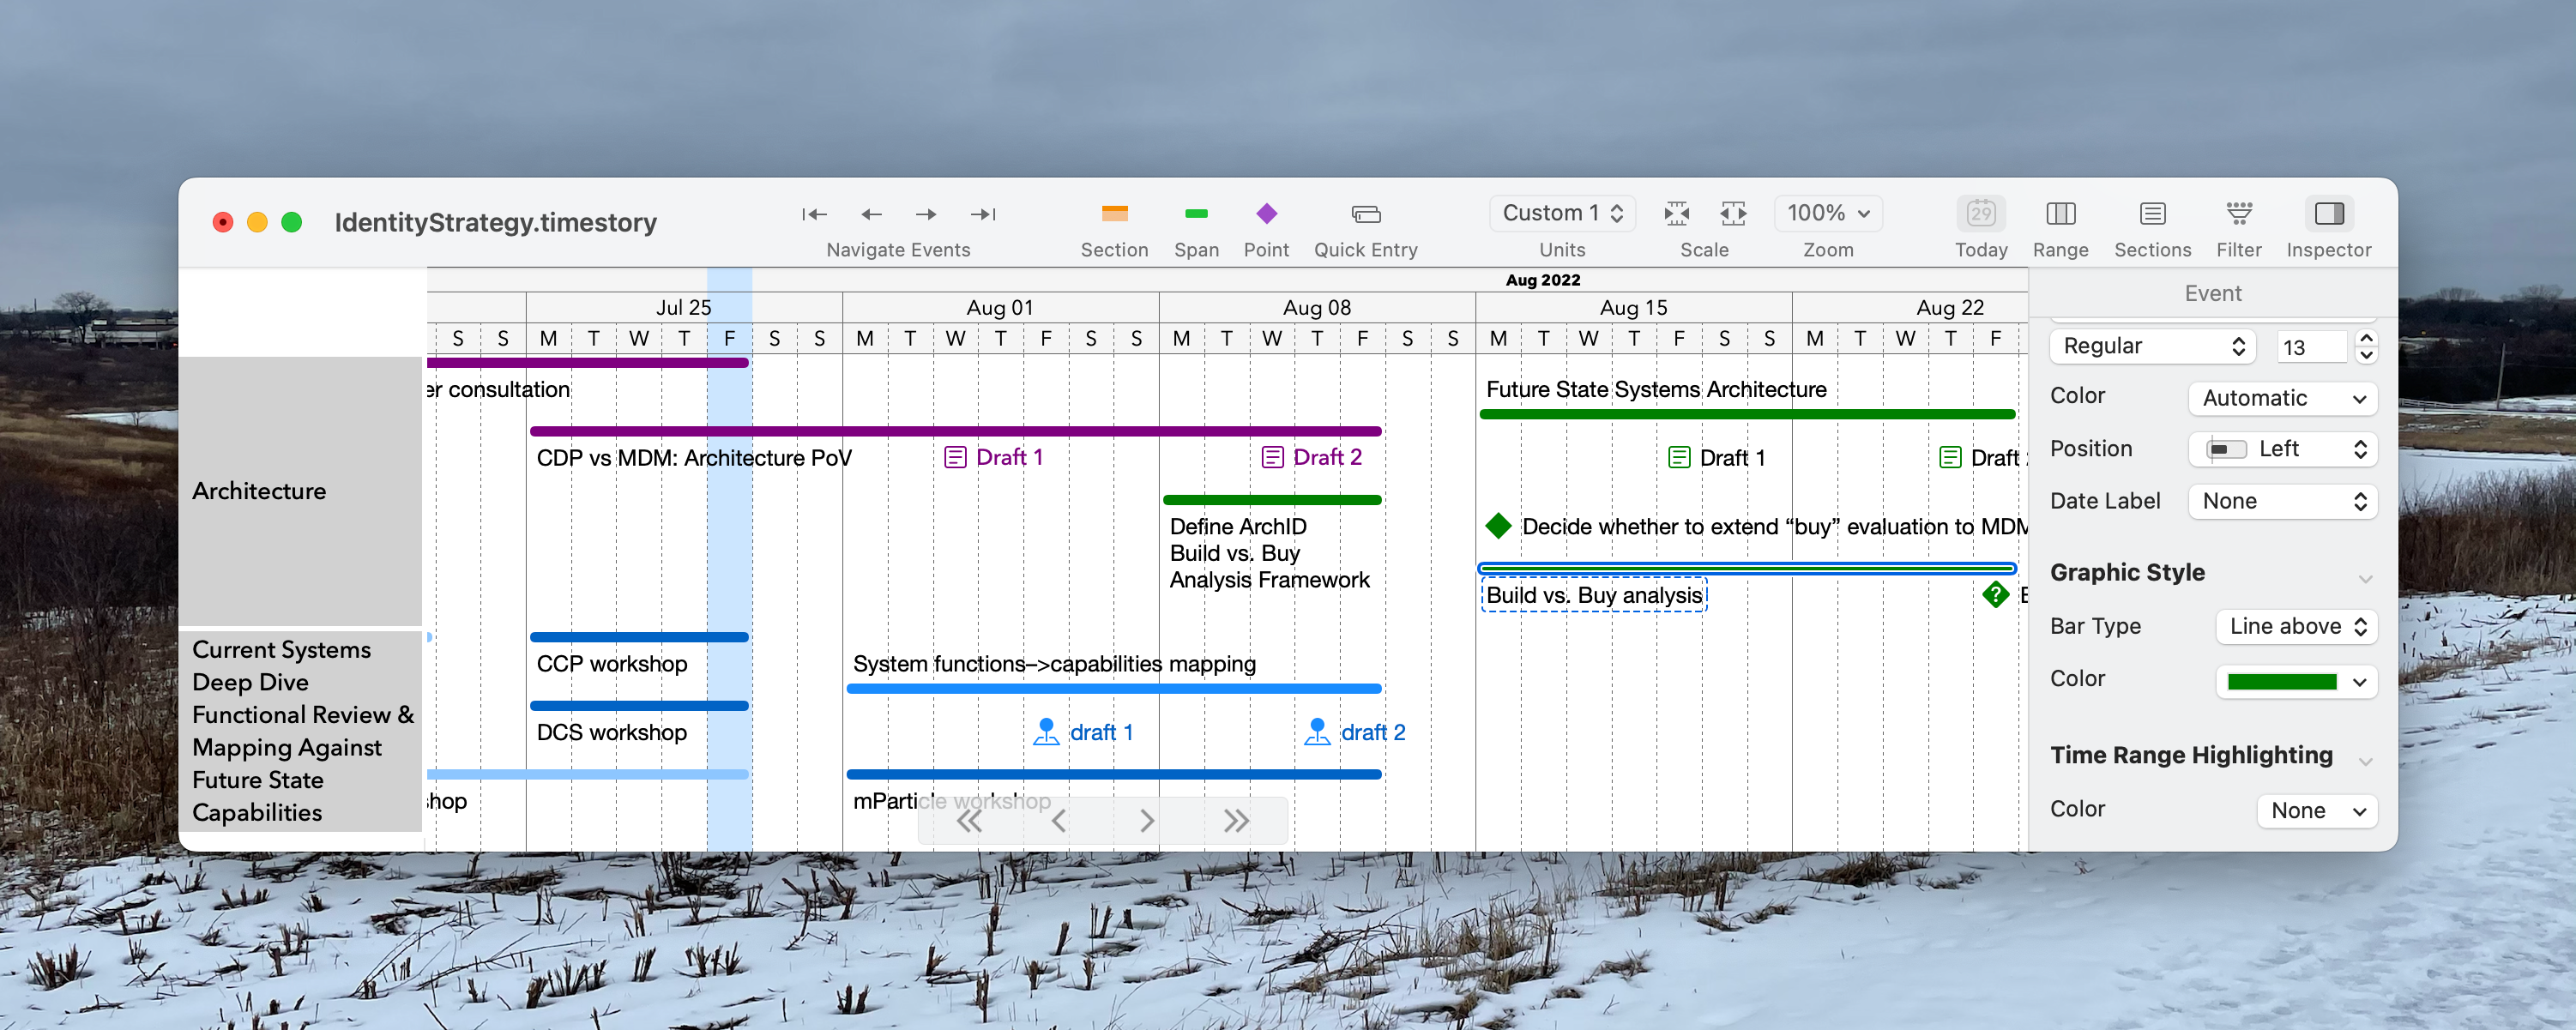
Call attention to an event, or mark it as tentative, by giving it a pattern instead of a solid color.
Patterns can be applied to thin-line or full-height events, and combined with colors and end shapes to open up all kinds of styling options.
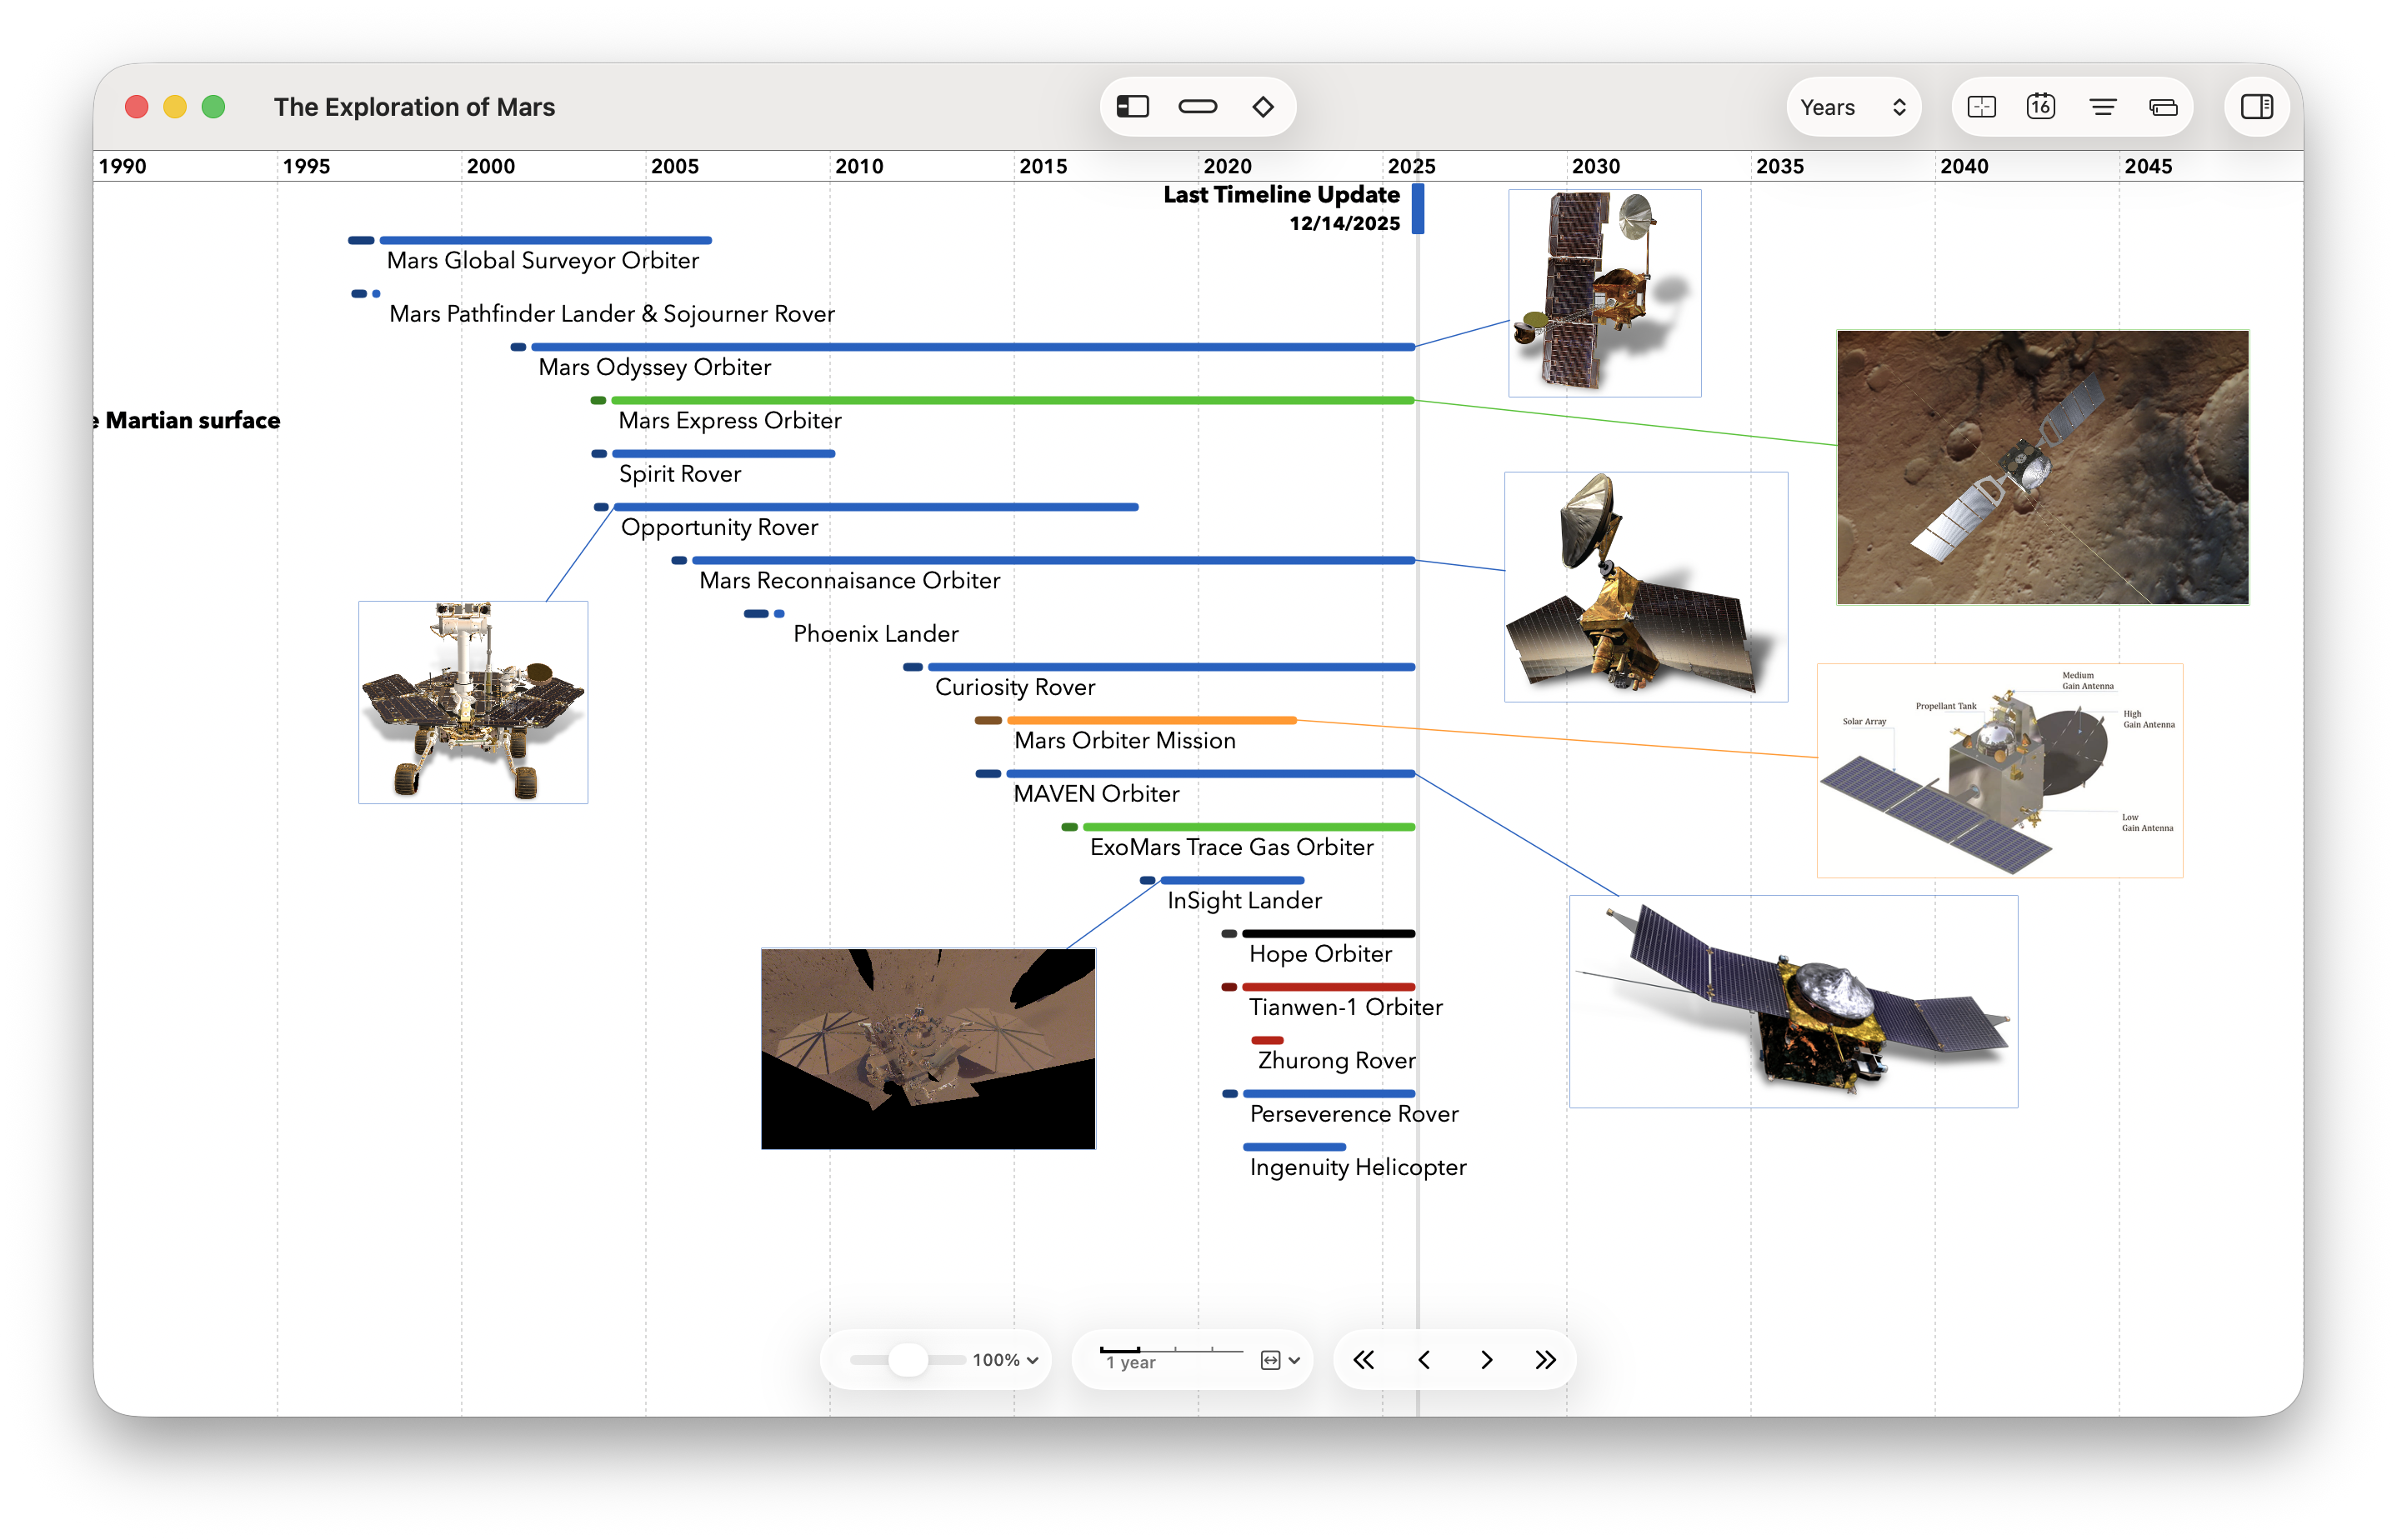
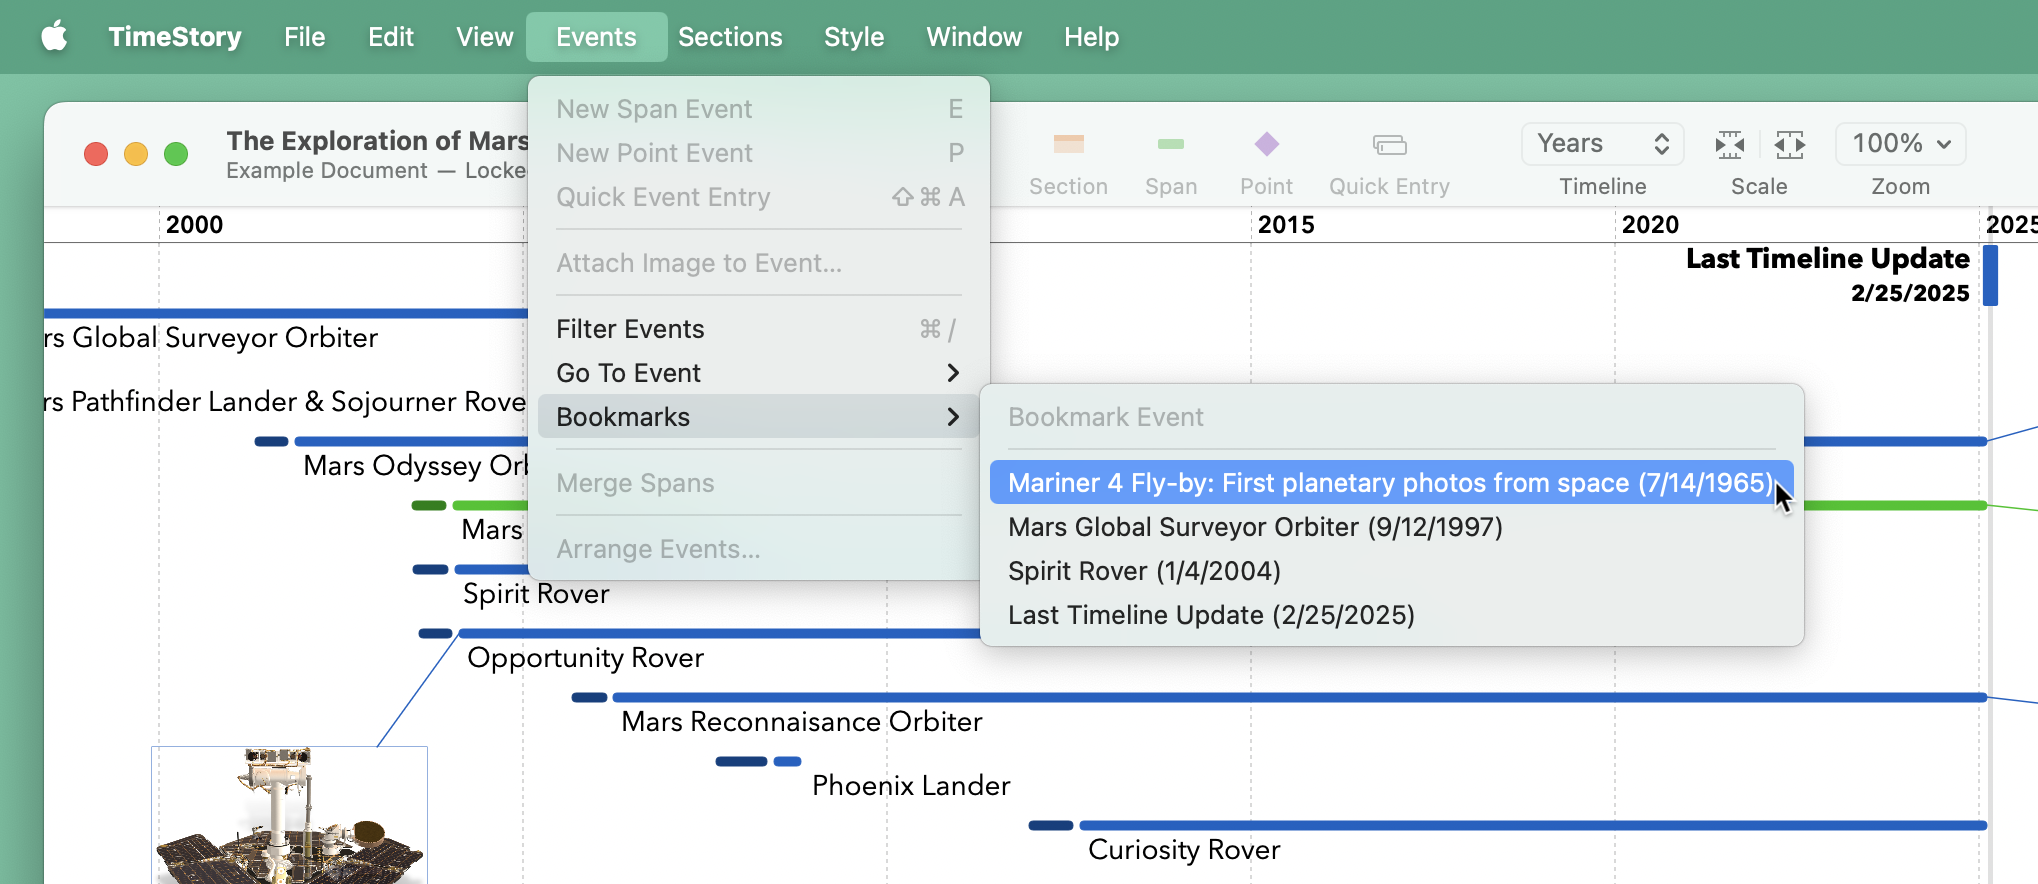
Some people build really long timelines, and scrolling back and forth to find things can become a pain. TimeStory now allows you to bookmark any event for quick access; choosing an item from the Bookmarks menu scrolls directly to that event. Find examples in the built-in Mars Exploration timeline:
When printing a large timeline across multiple pages, TimeStory now lets you choose to repeat left-side section headers or the timeline date header on each page, instead of only placing it on the leftmost or topmost pages. If you’re viewing each page separately, this allows you to keep context, at the cost of less space to show your other timeline content. While making this change, a few other minor printing layout issues were also found and fixed.
The version for iPad and iPhone also fixes a few bugs:
This update fixes a couple of bugs related to typing in or choosing dates in Quick Entry, Go to Date, and other places. Most importantly, in some languages, when typing in a all-numeric date separated by “.” characters (e.g. 28.1.2025), the app would previously misinterpret the date and reject it with an “out of range” message. (This happened on both the Mac and iPad/iPhone versions.)
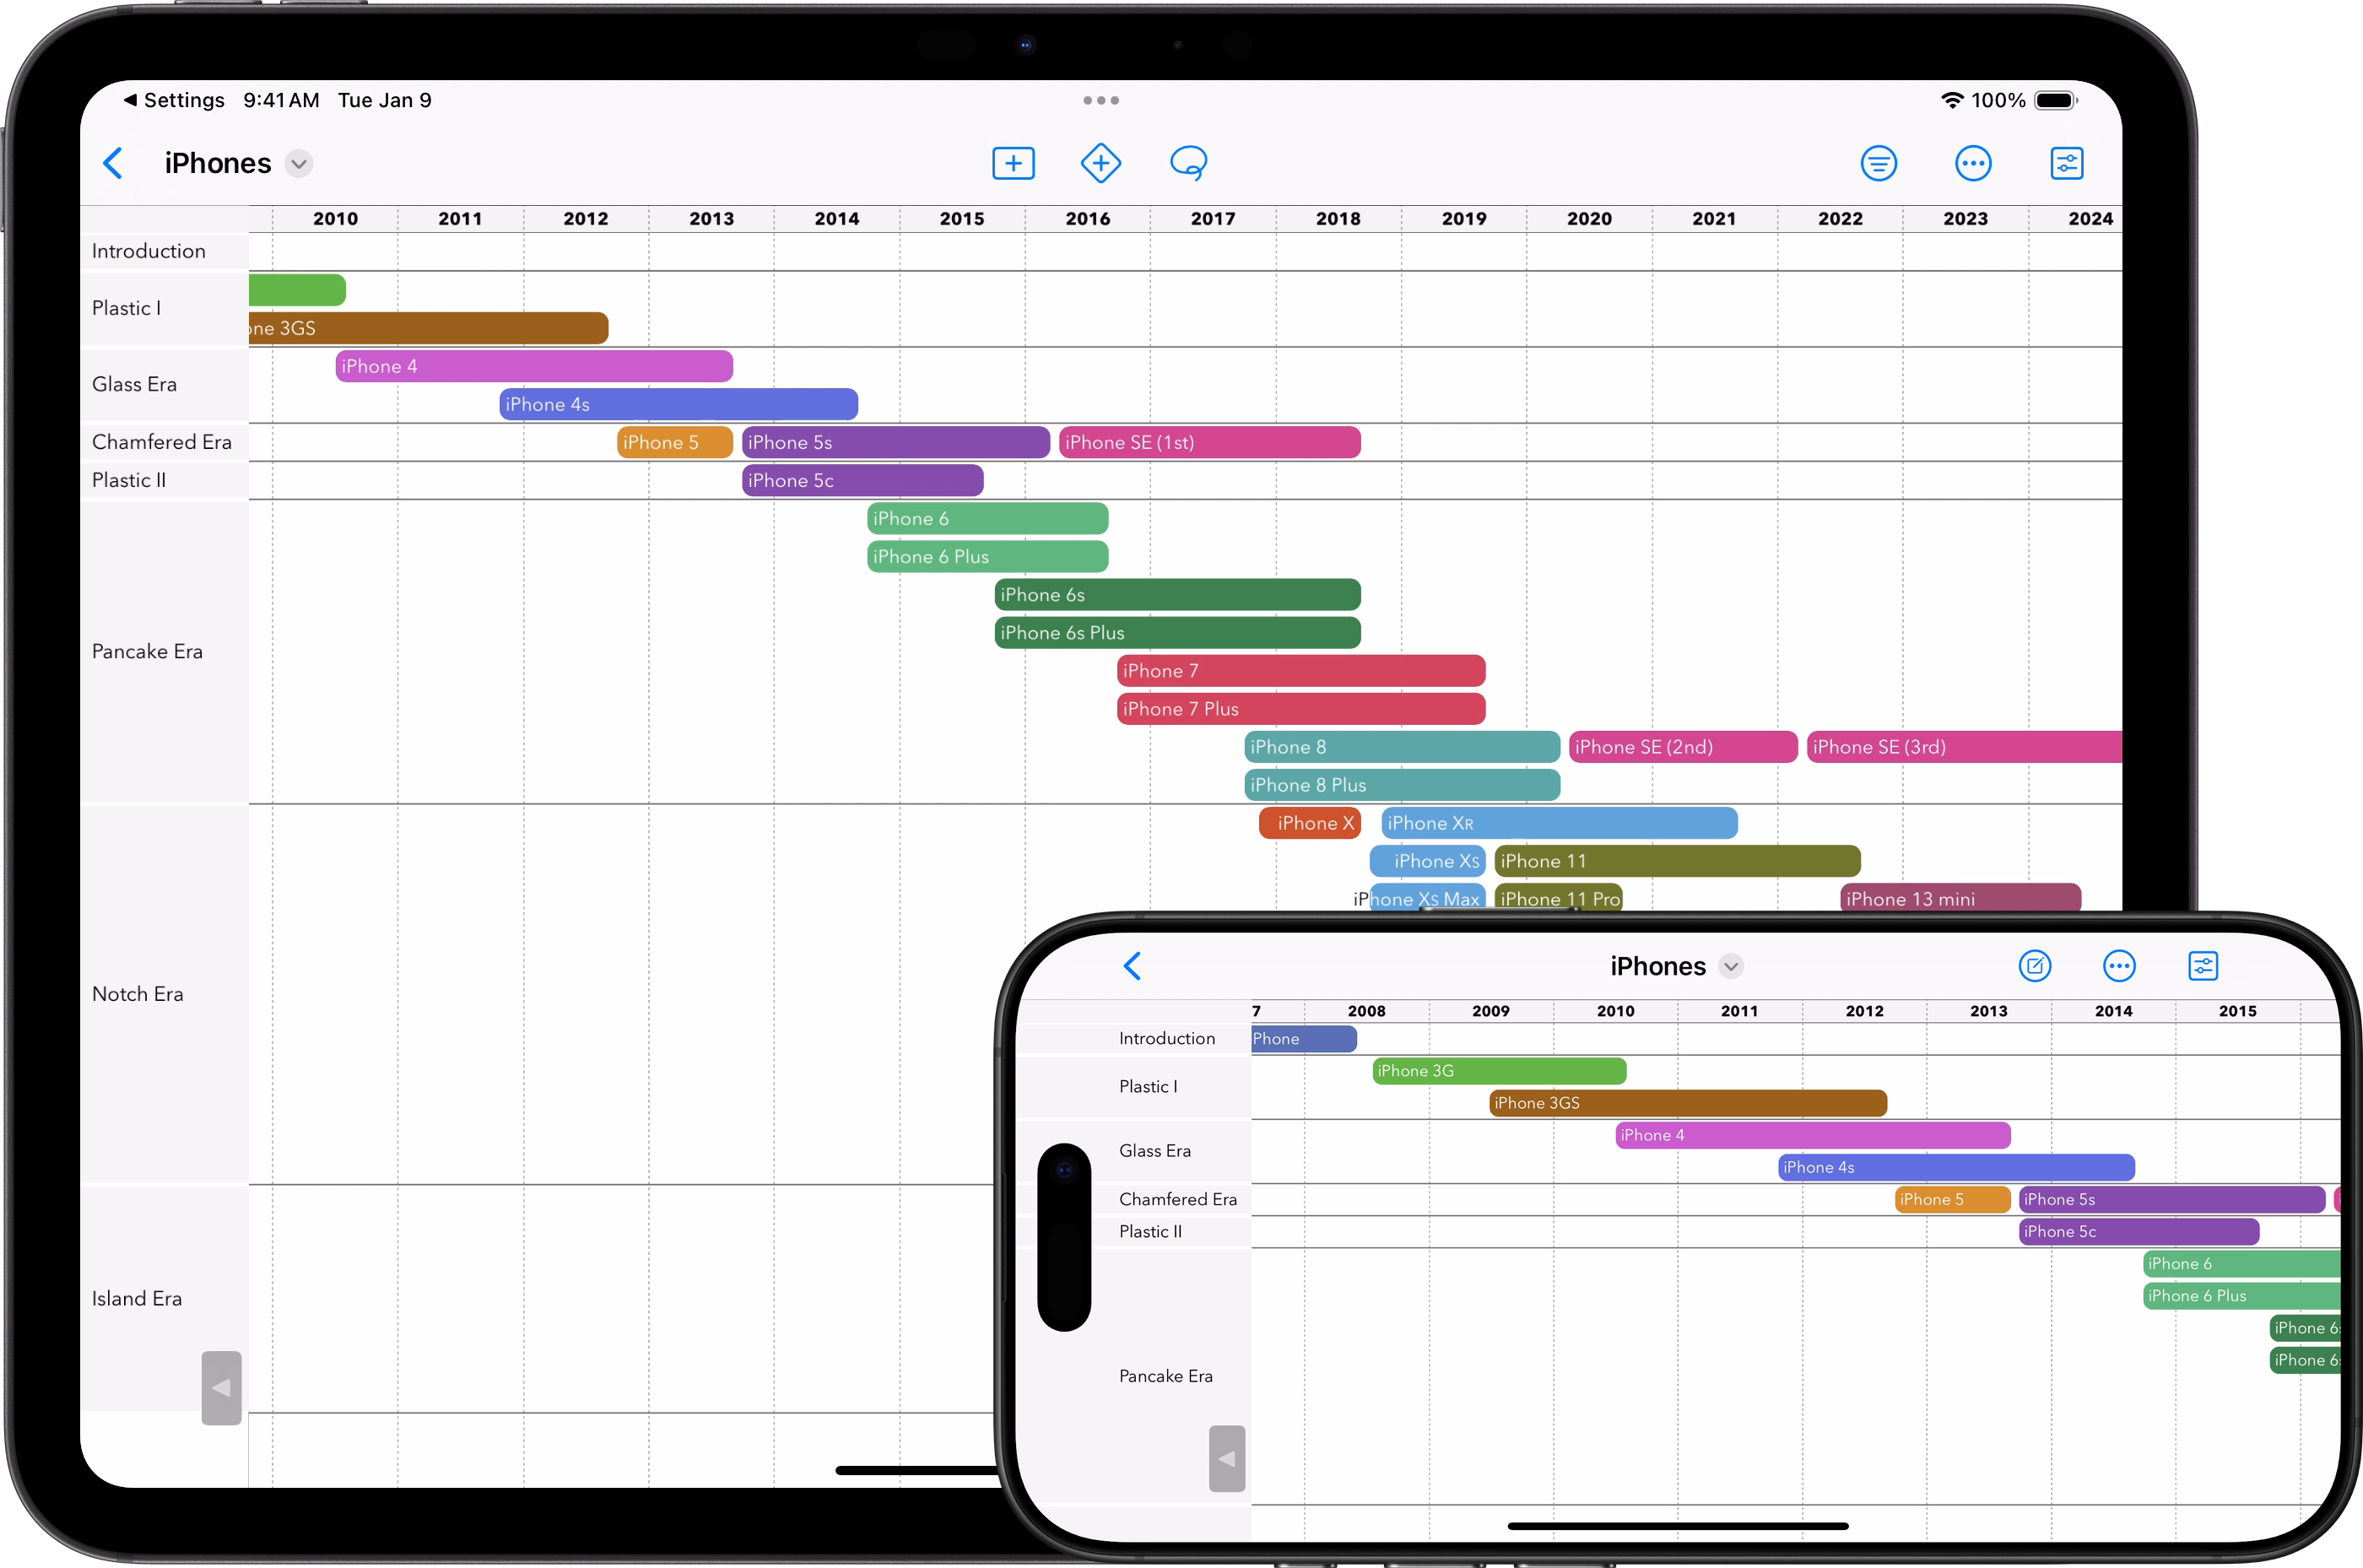
The iPad app has now been brought to iPhone, with the same features and a familiar interface.
Use it as a companion app to your iPad (or Mac) or entirely on its own. Every feature, from the timeline editor to the Inspector, was revisited to make sure it was usable on any size device.
The iPad and iPhone versions are a single app; if you buy or subscribe on one platform, you unlock both. (The Mac version remains a separate app and purchase.)
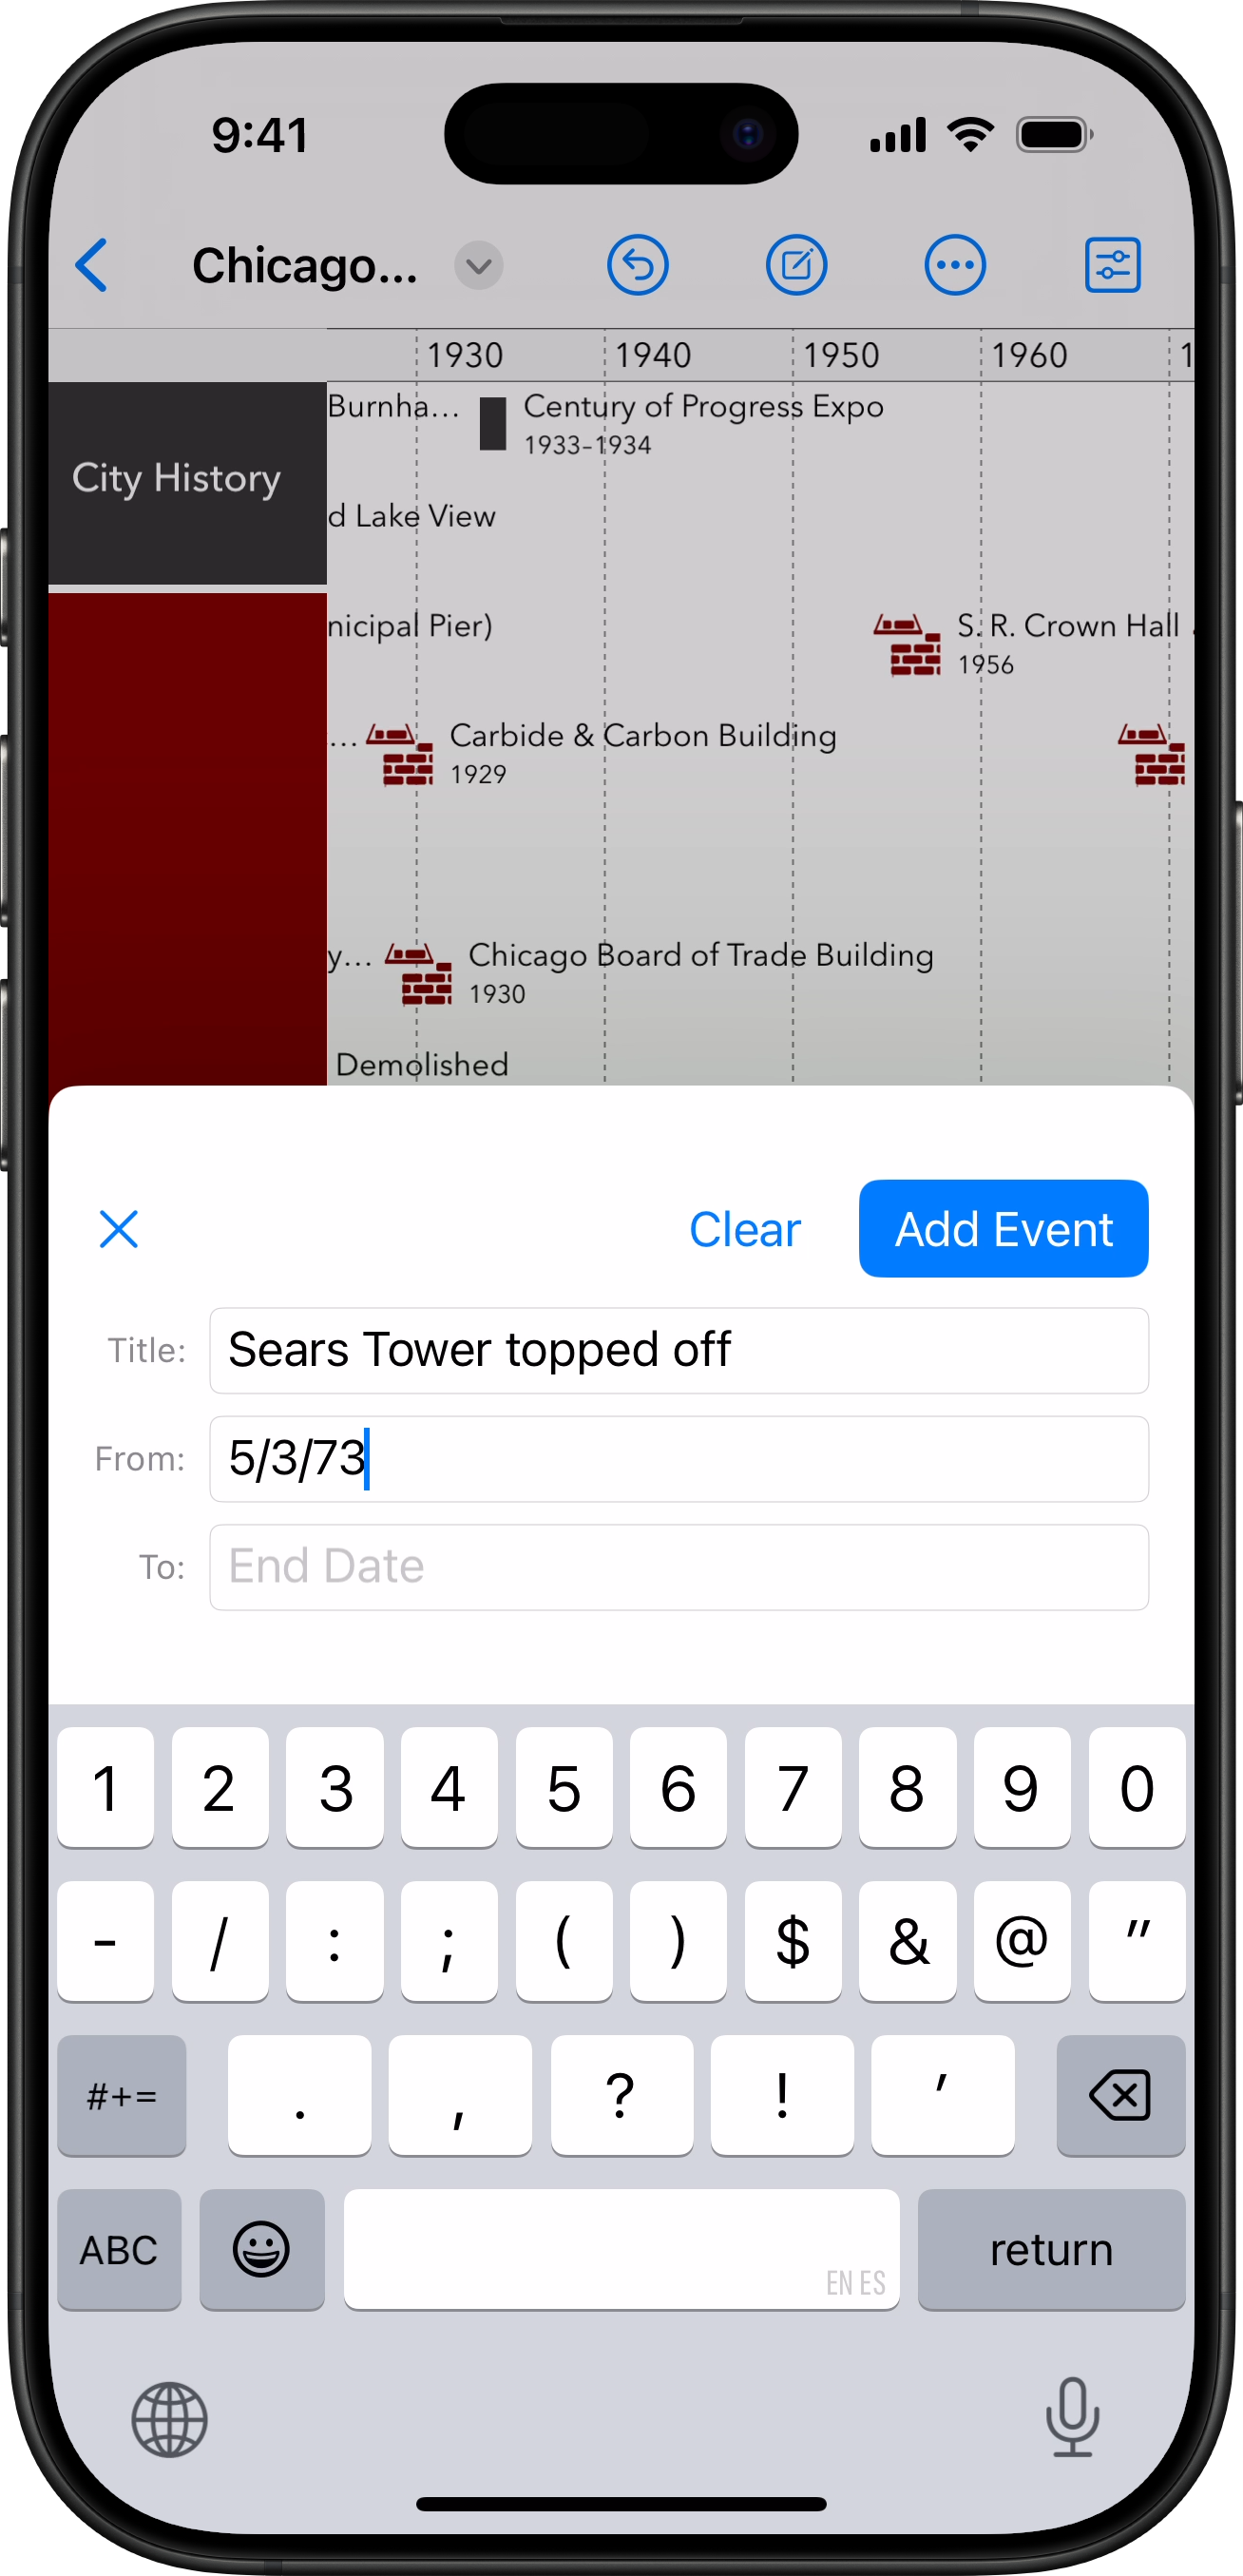
Quick Entry is now available on iPhone and iPad. This feature, long available on TimeStory for Mac, allows you to type in (or paste) an event title and date range to add it to the timeline.
When viewing a timeline with left-side section headers, there’s now a button to minimize that header area and show more of the timeline.
If you don’t want to see this button, there’s a switch in Settings to turn it off. You can, for example, hide the button on your iPad while leaving it visible on your iPhone.
A simple User Guide is now built into the app. A new integrated Welcome view, available from the document chooser, provides access to help and example documents, to get you started more quickly.
This quick update fixes one bug introduced in 3.8 and 1.4. For people using certain language and region settings on their Mac or iPad, picking a date in the Inspector could actually crash or hang the app. Apologies for missing this in my code and testing, and thanks to the customer who emailed me with the bug report!
If you’re working on project plans or modern timelines, this release brings bug fixes, UI improvements, better performance, and some nice UI updates including a dark icon for iOS 18. If you’re working on ancient history, however, this is a much bigger update!
iPadOS 18 lets you switch your Home Screen between light, dark, and tinted (monochrome) icons, and TimeStory iPad Edition 1.4 now includes updated, tuned dark and monochrome icons!
The app itself also now offers a light theme in addition to its original dark theme. By default, it will follow your iPad’s system light/dark mode settings, but you can go into TimeStory’s Settings and choose one independently of the system.
A few small problems had cropped up when running TimeStory on the new macOS Sequoia (15), notably some strange behaviors when pressing or releasing Shift, Command, or another modifier key while dragging. These are fixed.
Also, starting with this update, TimeStory no longer supports macOS Catalina (10.15) or Big Sur (11); the oldest supported macOS version is now Monterey (12). (TimeStory 3.7 will continue to work on those older OSes indefinitely, and has no known major bugs.)
Many people use TimeStory to build historic and even prehistoric timelines. This update solves some major issues, most importantly the prior limits on its time range.
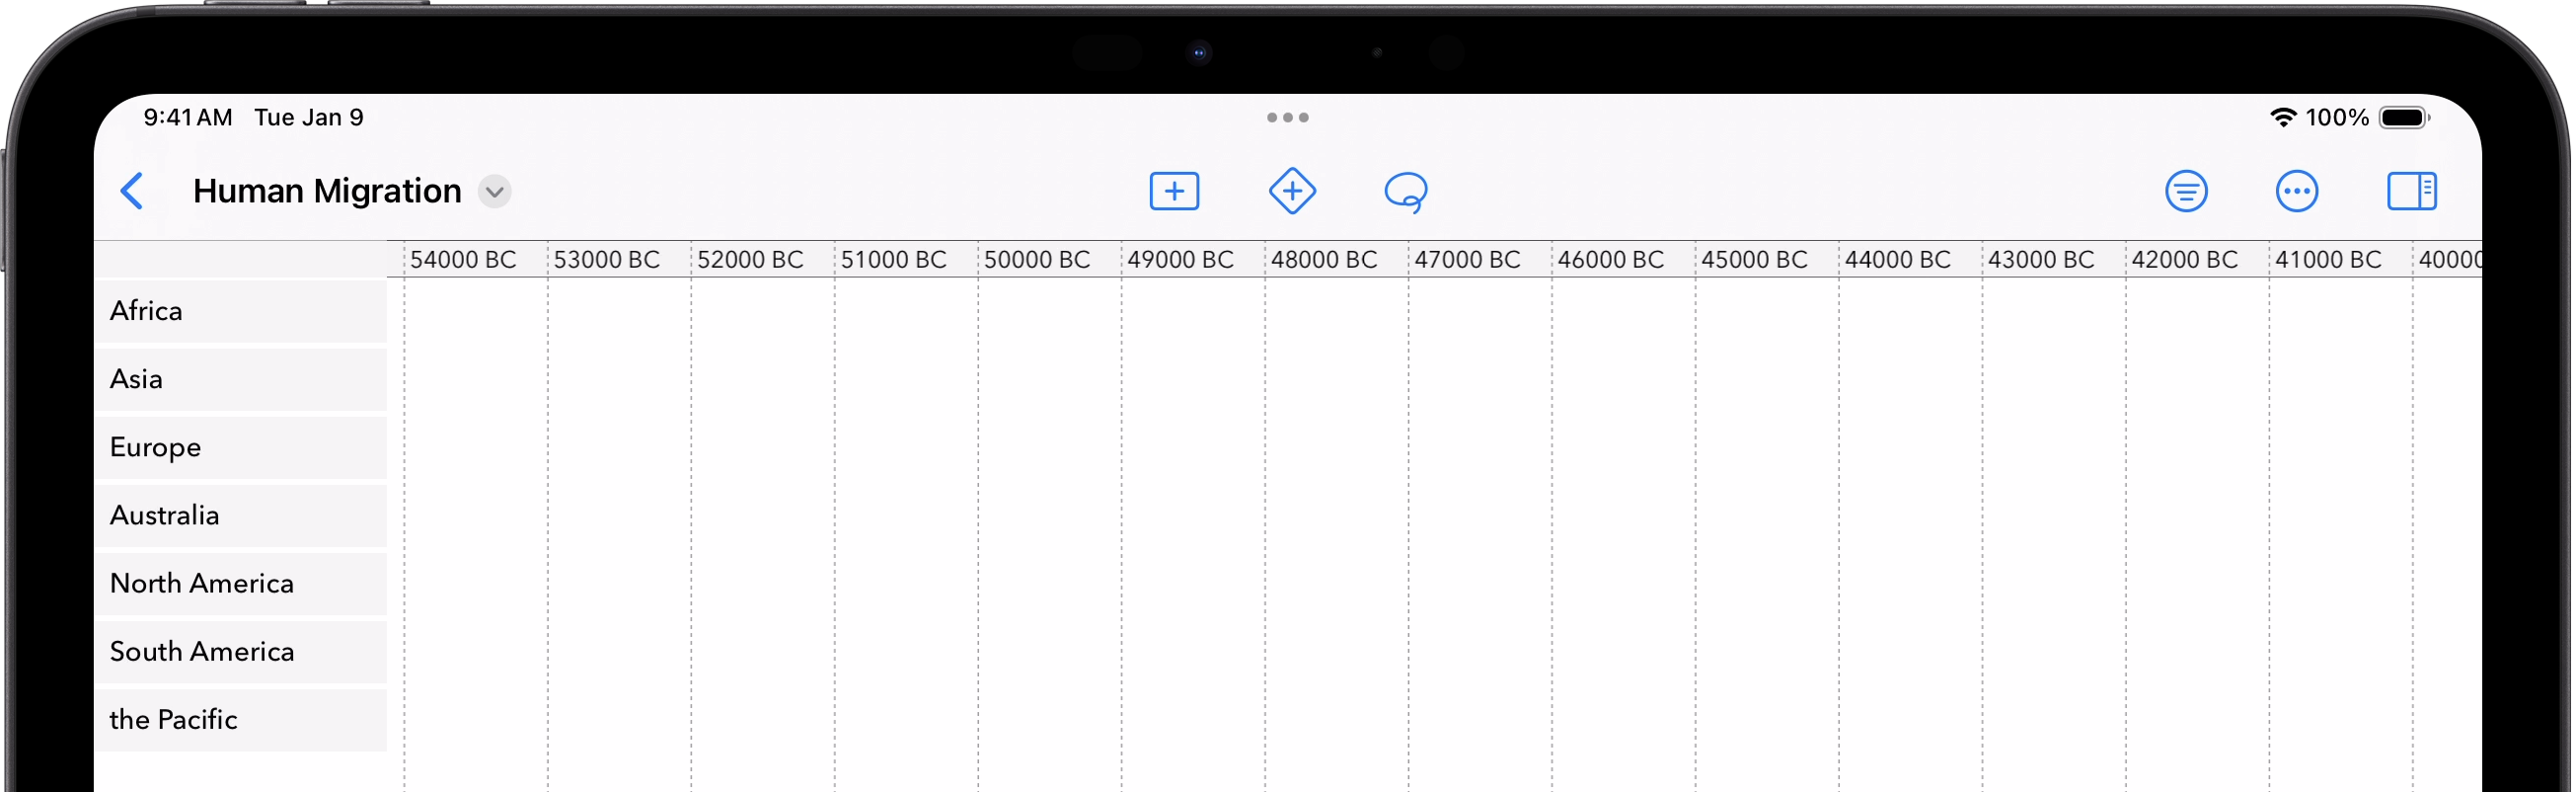
You can now scroll left, and create events, all the way back to 500,000 BC. Prior versions of TimeStory had a lower limit of 4713 BC; that limit still exists for day-level dates, e.g., January 1, but you don’t typically need such dates for ancient history. Beyond that limit, everything switches to years only; the timeline header will only show years, and drag-and-drop will snap to year boundaries. But you can freely drag events across the whole timeline. You can even mix-and-match far-ancient year-only dates with modern ones, for example with an event starting at 10,000 BC and ending next Tuesday.
When typing in year numbers, for example “1000 BC”, input fields are now much more accepting of date entry, making it easier to quickly type them or to paste in years from places like Wikipedia. For example, on a Mac configured for US English, it doesn’t matter if you type “10000 BC”, “10,000 BCE”, or “10000bc”; they all mean the same thing.
When using a year-based timeline header and scaling down, TimeStory skips years as needed to fit the labels into the header. The year increment will automatically adjust from 1 to 5, 10, 20, 50, 100, or, starting with this release, 500 or 1000 year steps. Also new in this release, it actually shrinks the step immediately below 1 BC so, for example, a 100-year increment will appear as 200 BC, 100 BC, 1 BC, 100 AD, 200 AD; previous versions were strict about adding 100 years per step, so you’d actually see 201 BC, 101 BC, 1 BC, 100 AD, 200 AD, which looked a little odd even though it was mathematically correct.
There are also a collection of bug fixes and smaller improvements in this release.
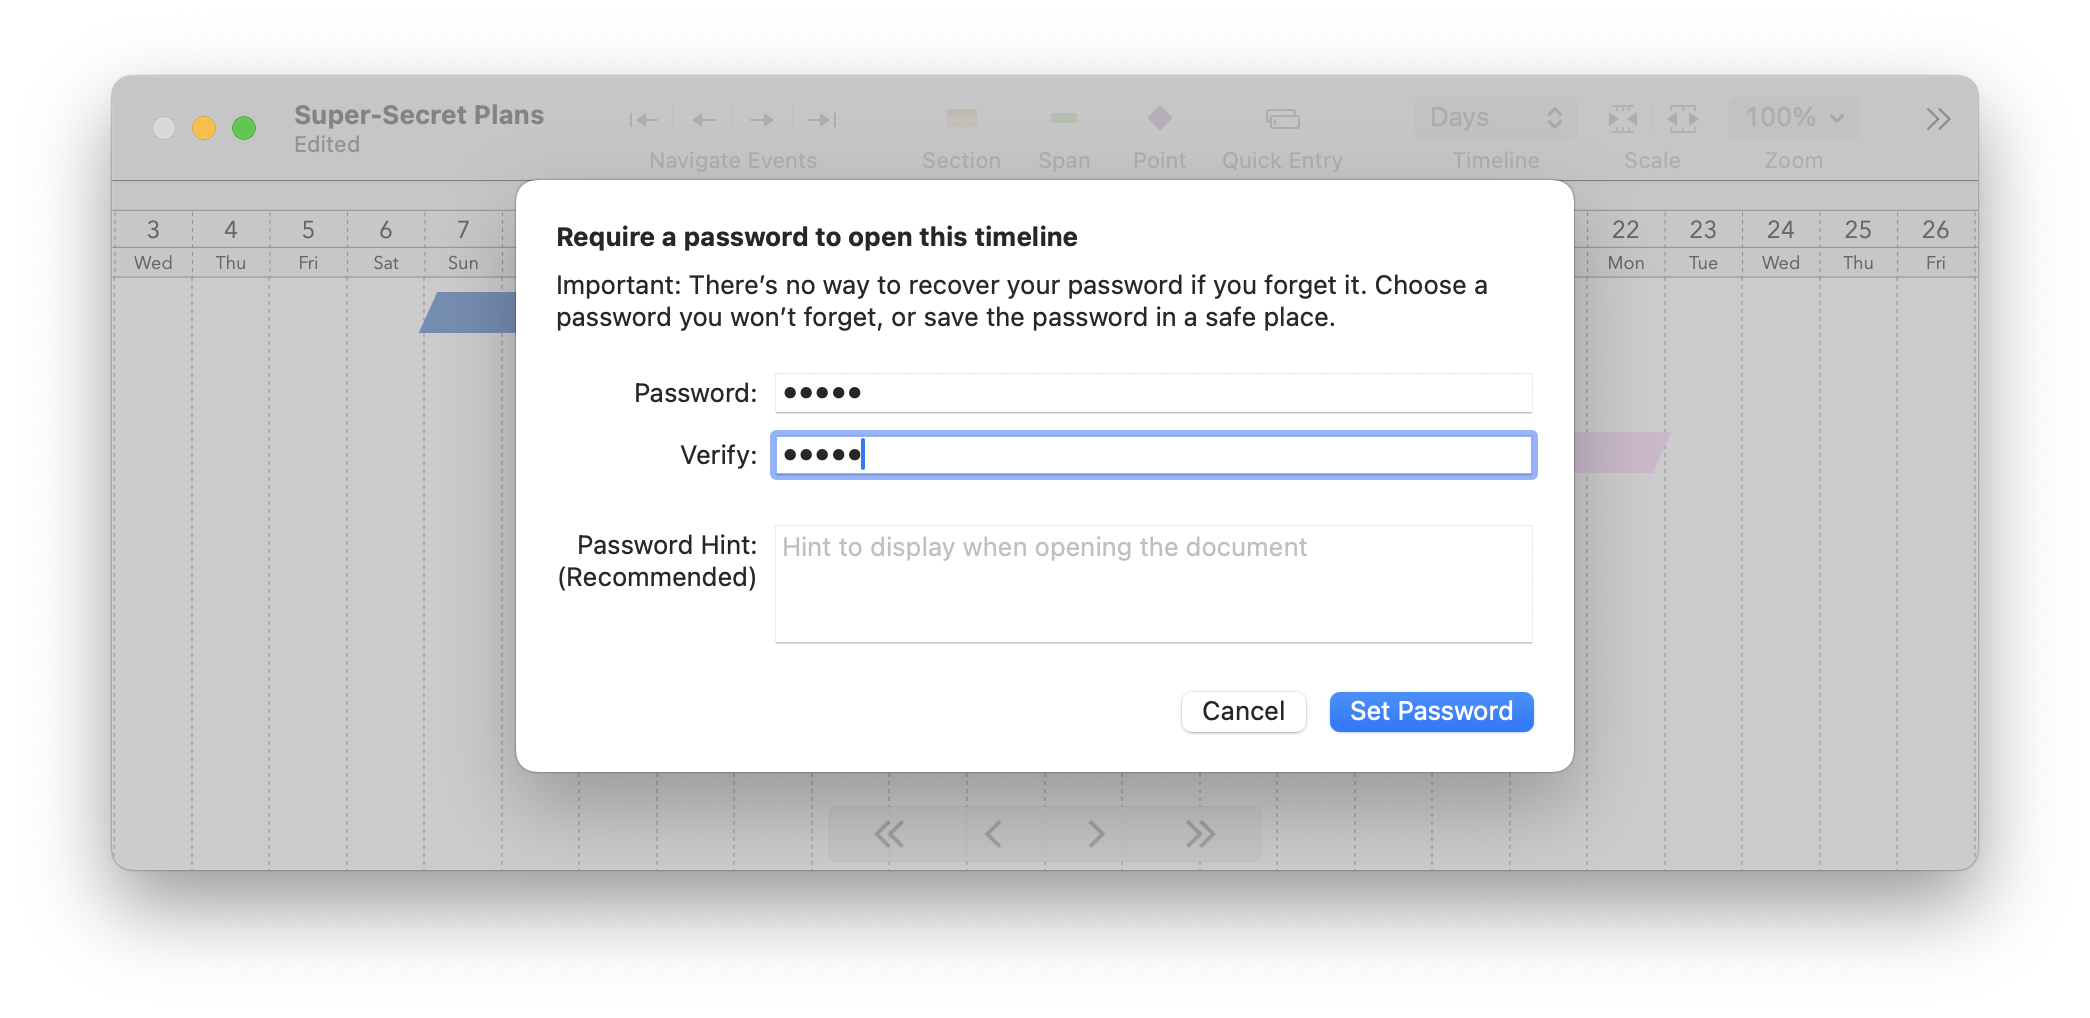
This update, for both Mac and iPad editions, brings password-protected file support for private timelines. It also fixes a few bugs and improves a few other things.
You can now protect any timeline with a password when needed. The file will be saved in an encrypted form, and that password will be required to open it.
Important: If you lose a file’s password, there’s no way to recover it or to unlock the file! Choose a password you’ll remember, or use a password manager to securely save it.
This update also collects a few fixes across both platforms.
This update brings better support for Apple Pencil and trackpads, including the new Apple Pencil Pro, some new editing options, and some important fixes!
Find precise dates by hovering your Apple Pencil or mouse pointer over the timeline. A new vertical line will appear, labeled with the closest date, making it simple to locate event dates when they’re not lined up on the vertical grid.
Note: Apple Pencil hover is available on any M4 iPad Pro, any M2 iPad Air, iPad Pro 11" (4th generation), and iPad Pro 12.9" (6th generation).
Tap New Point Event or New Span Event, then hover with your Apple Pencil or trackpad or mouse pointer, and the new event will follow your movements around. Simply move the pencil away or exit the new-event mode to cancel this action, or tap/click to place it exactly where you see it.
When dragging an event across the timeline with Apple Pencil Pro or the new Magic Trackpad for iPad Pro, you’ll feel haptic feedback whenever the event snaps to a nearby gridline, when a long-press starts editing, and in other state changes. This is a small thing that makes a big difference in the feel of editing.
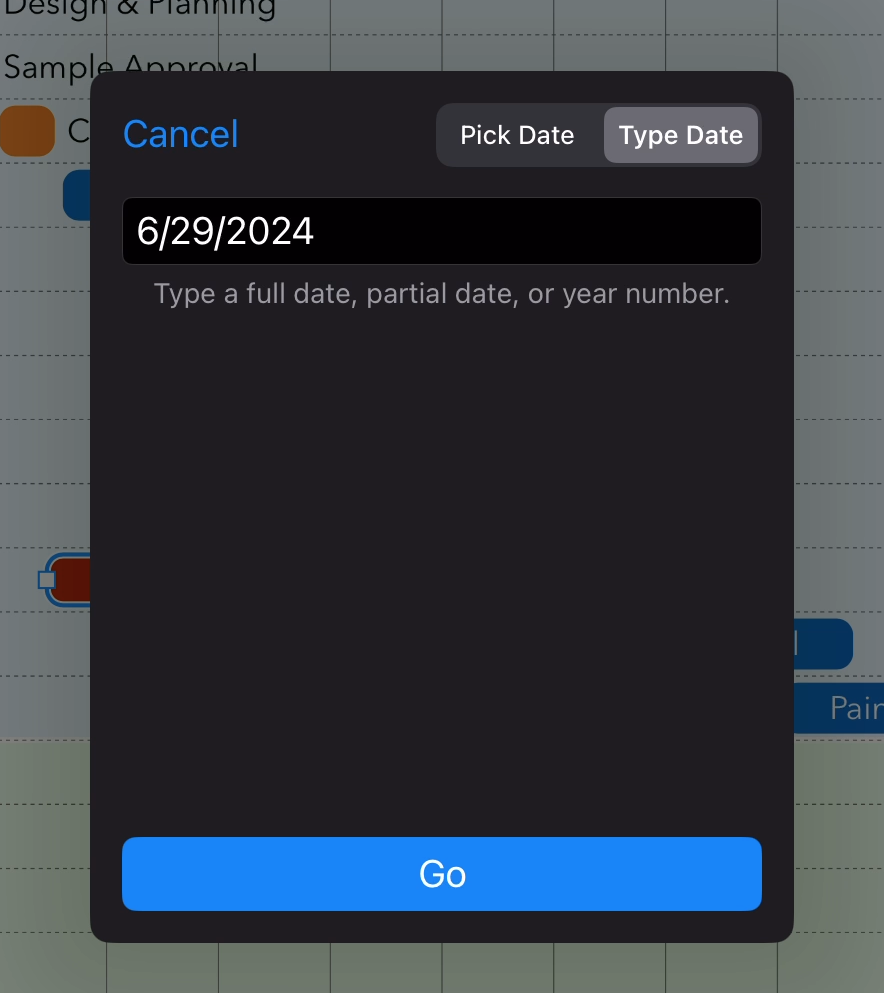
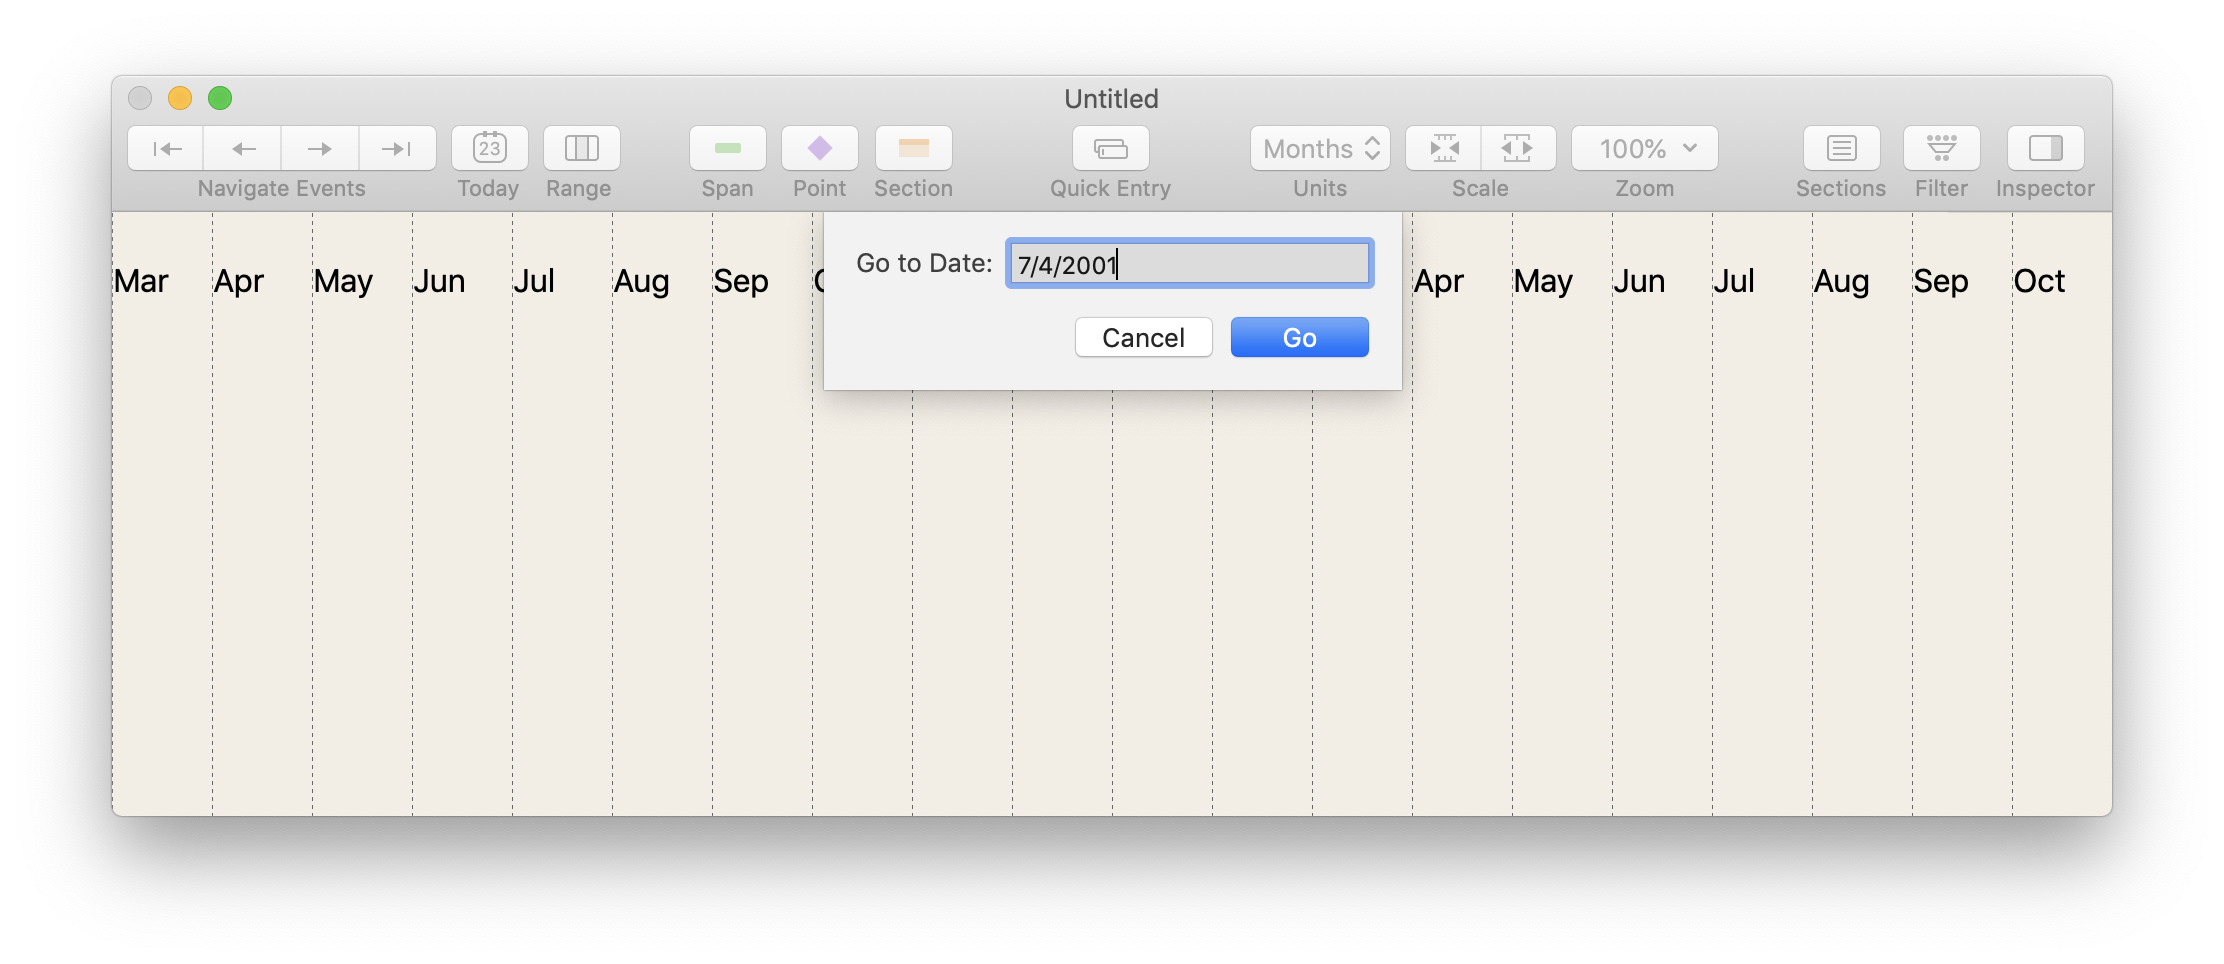
The Go to Date menu item brings up a calendar picker, letting you scroll the timeline to any chosen date. New in 1.2, there is also an option to type in a date, when that’s a quicker way to get where you want. (Like any date input field, it lets you type using your language and local settings.) This is great especially when jumping a long distance.
When dragging events around on the timeline, TimeStory normally snaps events to your vertical gridlines and prevents span events from overlapping. There’s a new Dragging Options menu which gives you control over that, when those options aren’t what you want.
This version adds a couple of key features, unlocking more uses and bringing the iPad Edition closer to full feature equivalence with the Mac Edition. It also fixes some important bugs found in version 1.0.
Have timeline data in another app or spreadsheet? Want to collect timeline info from external users (for example via the Web-based Timeline Event Entry tool on this site)? Need to export your TimeStory events to share or feed into some other document? CSV (comma-separated values) files are tabular plain text files, supported by every spreadsheet app and many other productivity apps, and TimeStory supports reading and writing them.
Choose which columns contain event dates, titles, or other optional data like colors or descriptions. Import from any file accessibly by your iPad, or export to a file or share to any other app or sharing destination supported by your iPad (like AirDrop). The column types and default formats are the same as they are on the Mac, but as with the rest of the iPad Edition, redesigned for iPad.
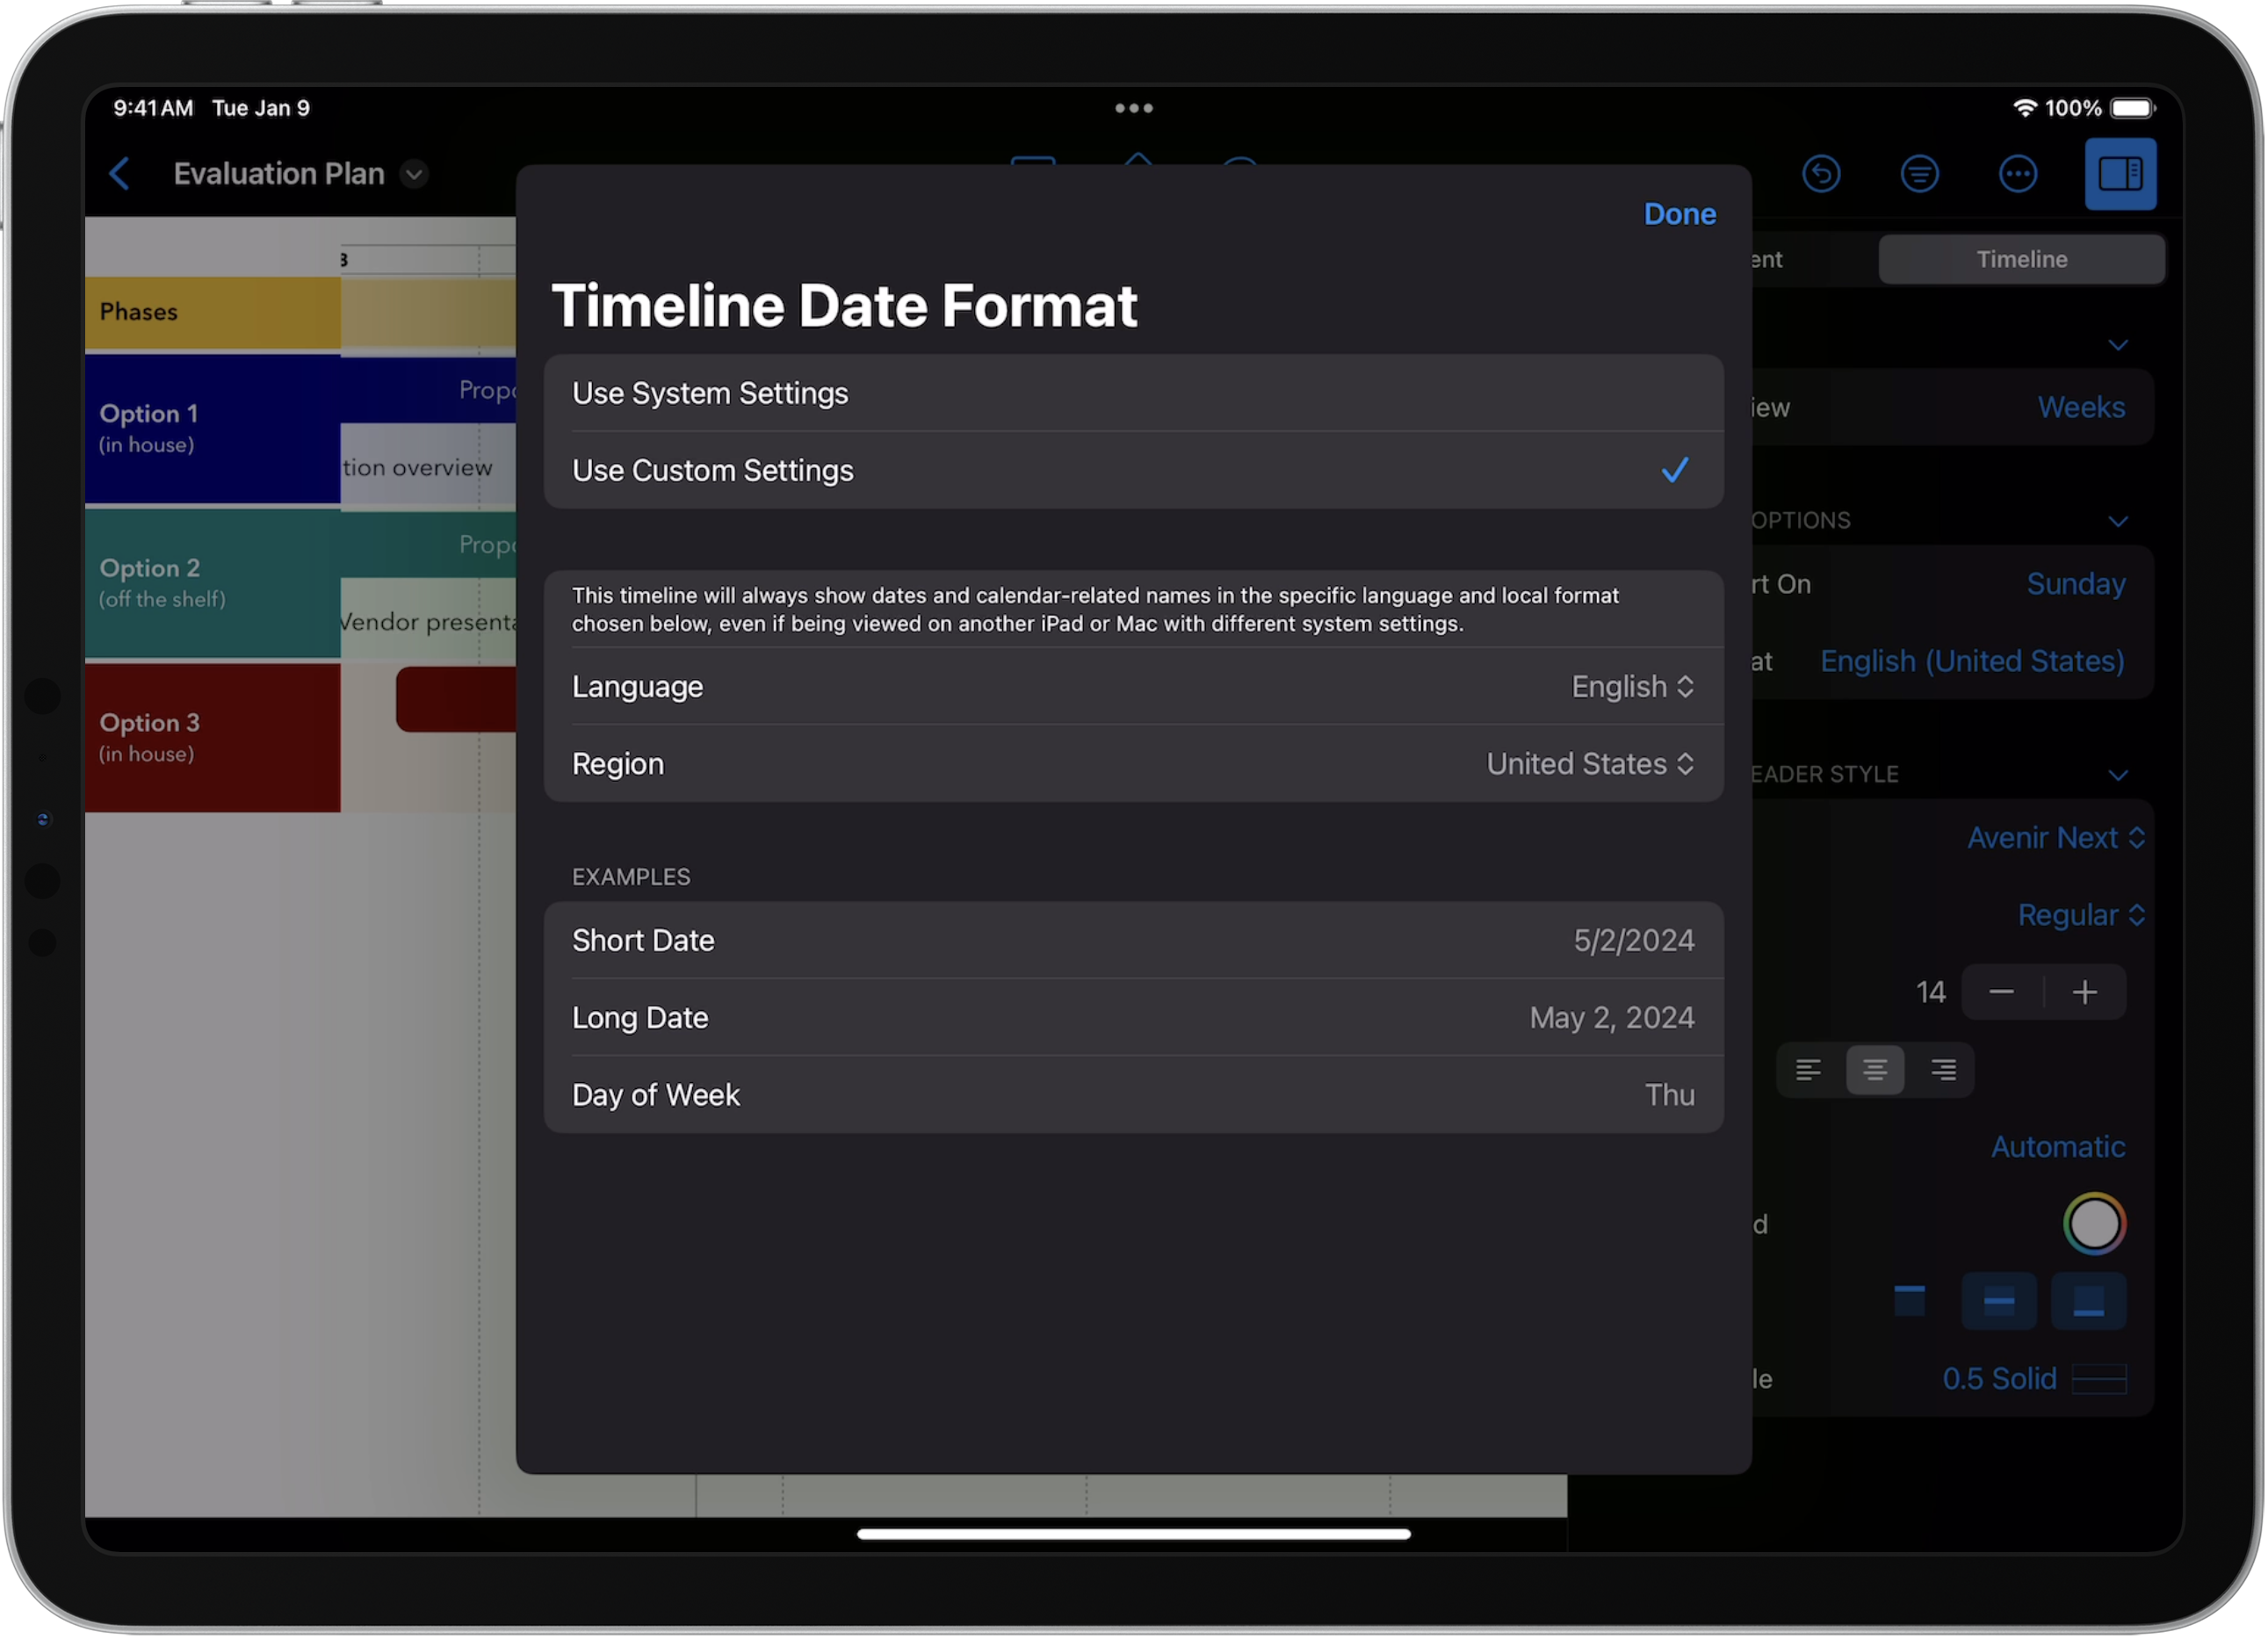
If your iPad is set for one language and region, but you want a timeline document to use a different, fixed format when viewing or exporting it, you can now explicitly configure that via the Inspector. Select the document, go to the Timeline tab, and choose Date Format to view the format chooser. (This feature has existed on the Mac edition for a while, and version 1.0 of the iPad Edition would respect that setting in an existing document, but lacked any way to change it.)
A few things were updated in the interface to make them more comfortable based on user feedback.
This release also fixes some bugs found in iPad Edition 1.0.
This update brings a number of small improvements and fixes for the Mac edition.
Include more information in your CSV imports and exports with these new column choices:
Fixed a crash which only occurred on versions of macOS Sonoma newer than 14.2.1, and only for certain document layouts. The crash could occur when editing filters or sections, but was not consistent.
TimeStory now has a version for the iPad! Containing almost the full feature set of the Mac app, TimeStory iPad Edition has been designed and built to fit the modern iPad experience, from touchscreen gestures to toolbar and menu layout, from Apple Pencil to Magic Keyboard, from Split View to Stage Manager.
Timelines can be moved freely between the Mac and iPad editions, including via Handoff. You can even open the same document stored on iCloud Drive on both at the same time. There is no difference in file format; every timeline document will look the same on either platform.
V1.0 of the iPad edition is based on V3.6 of the Mac edition. It does lack some features found in the Mac app, notably CSV import and export, and contain some features missing on the Mac app, such as attaching images from your device’s photo library. These gaps will be closed in upcoming releases. But every timeline created by either edition, no matter which features you use, will always work exactly the same when opened on the other.
An iPad version has been in our plans since day one, and it’s exciting to finally have arrived!
This version brings a variety of updates, feature improvements, and fixes throughout the app.
When you set a date range highlight color for an event, you can now specify its vertical range. Full Height matches traditional TimeStory behavior; the highlight ranges from the very top to the very bottom of the document. Use Below Header to color everything below the timeline header; use In Header to color only the header. And, to constrain the colored range just to the section containing the event, choose In Section.
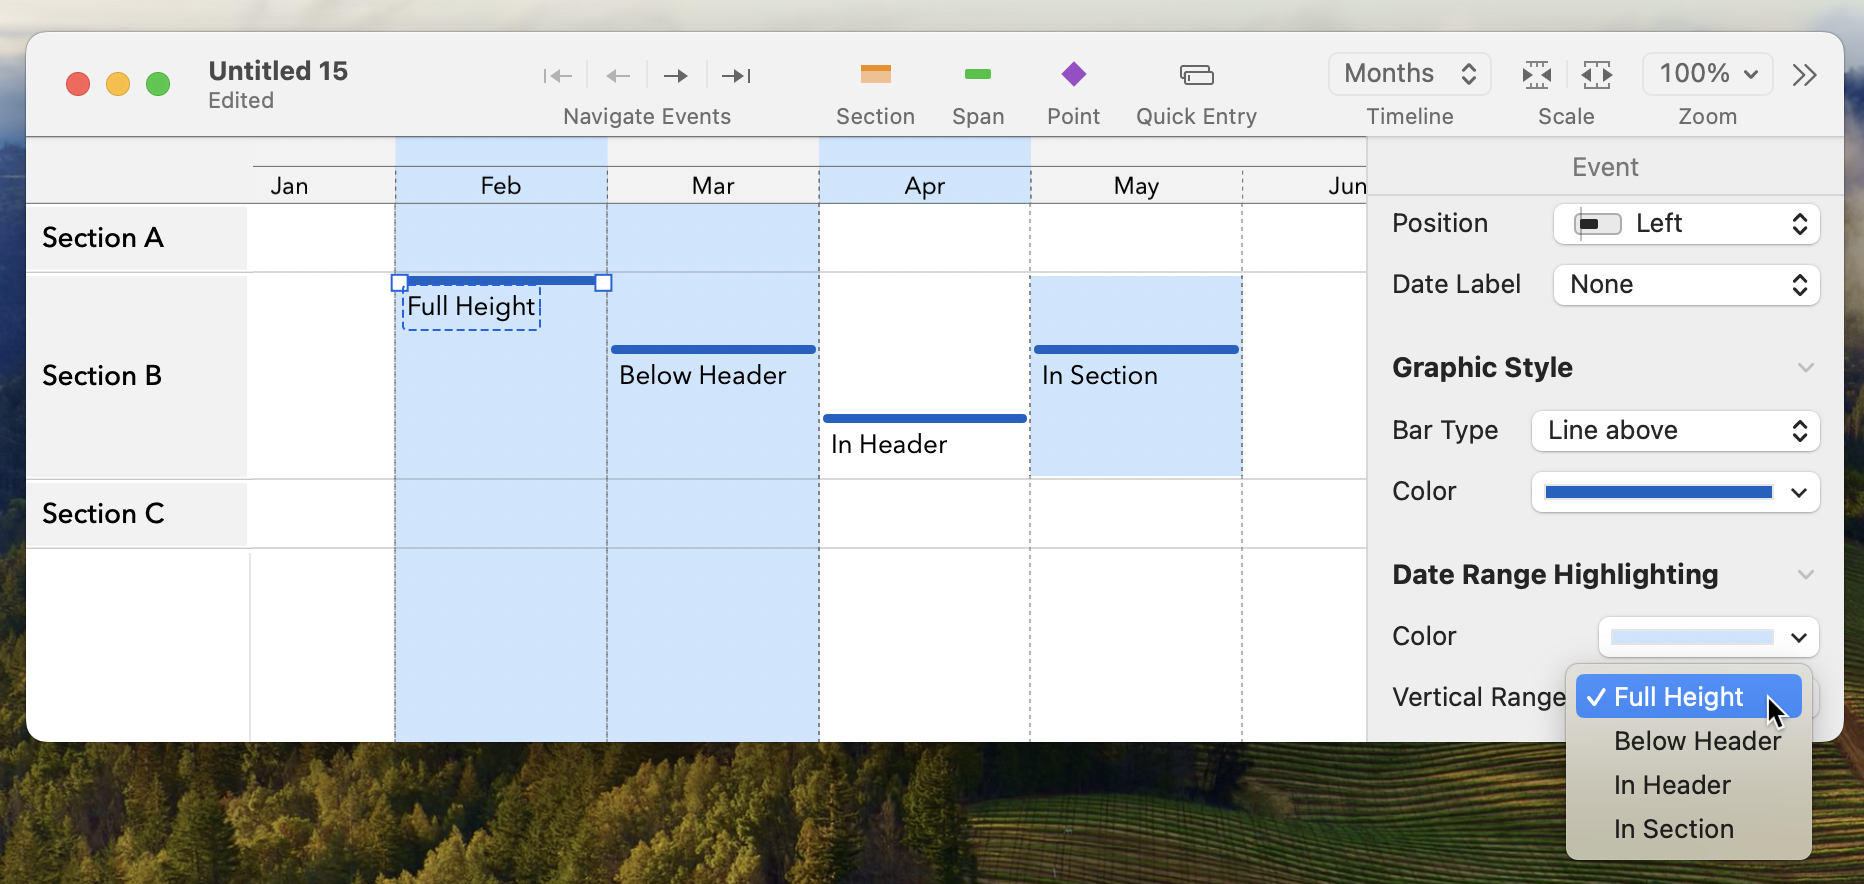
The Today highlighter has the same options except for In Section (since today’s date isn’t part of any section).
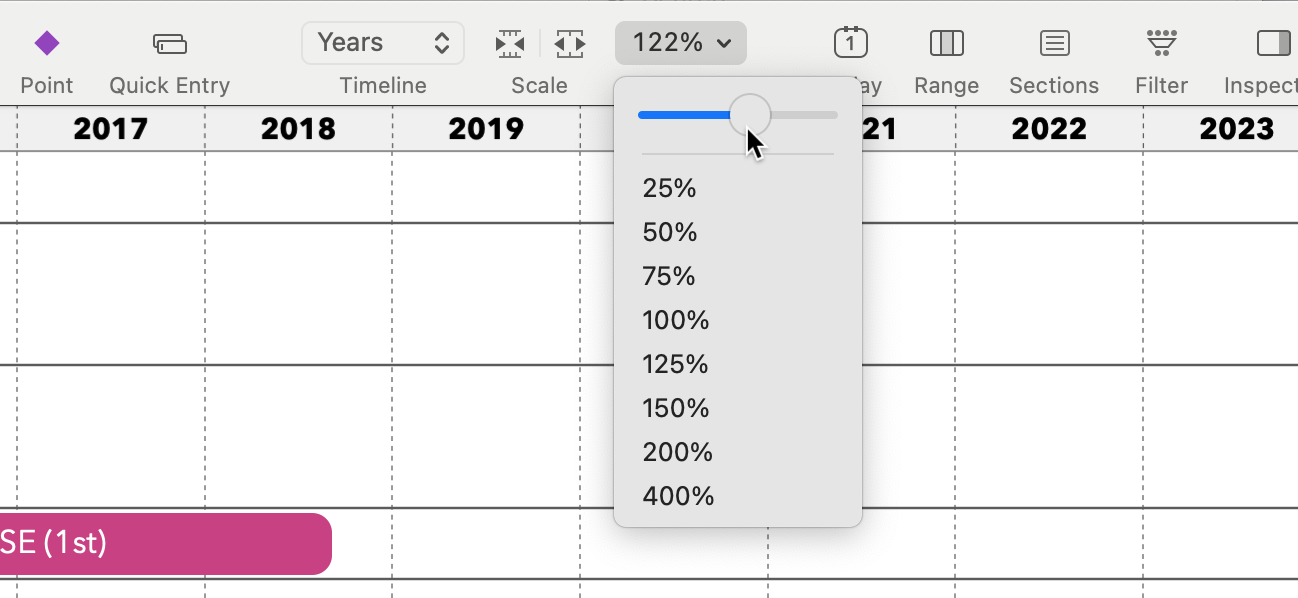
Use the new zoom slider control for precise and smooth magnification of your document.
Titles in left-side section headers now wrap at word boundaries when they’re too long to fit. (You can still use Option+Return to create manual line breaks, just as before.)
This release includes two fixes:
This update fixes two important bugs.
3.5.1 is a minor update to fix a handful of display bugs.
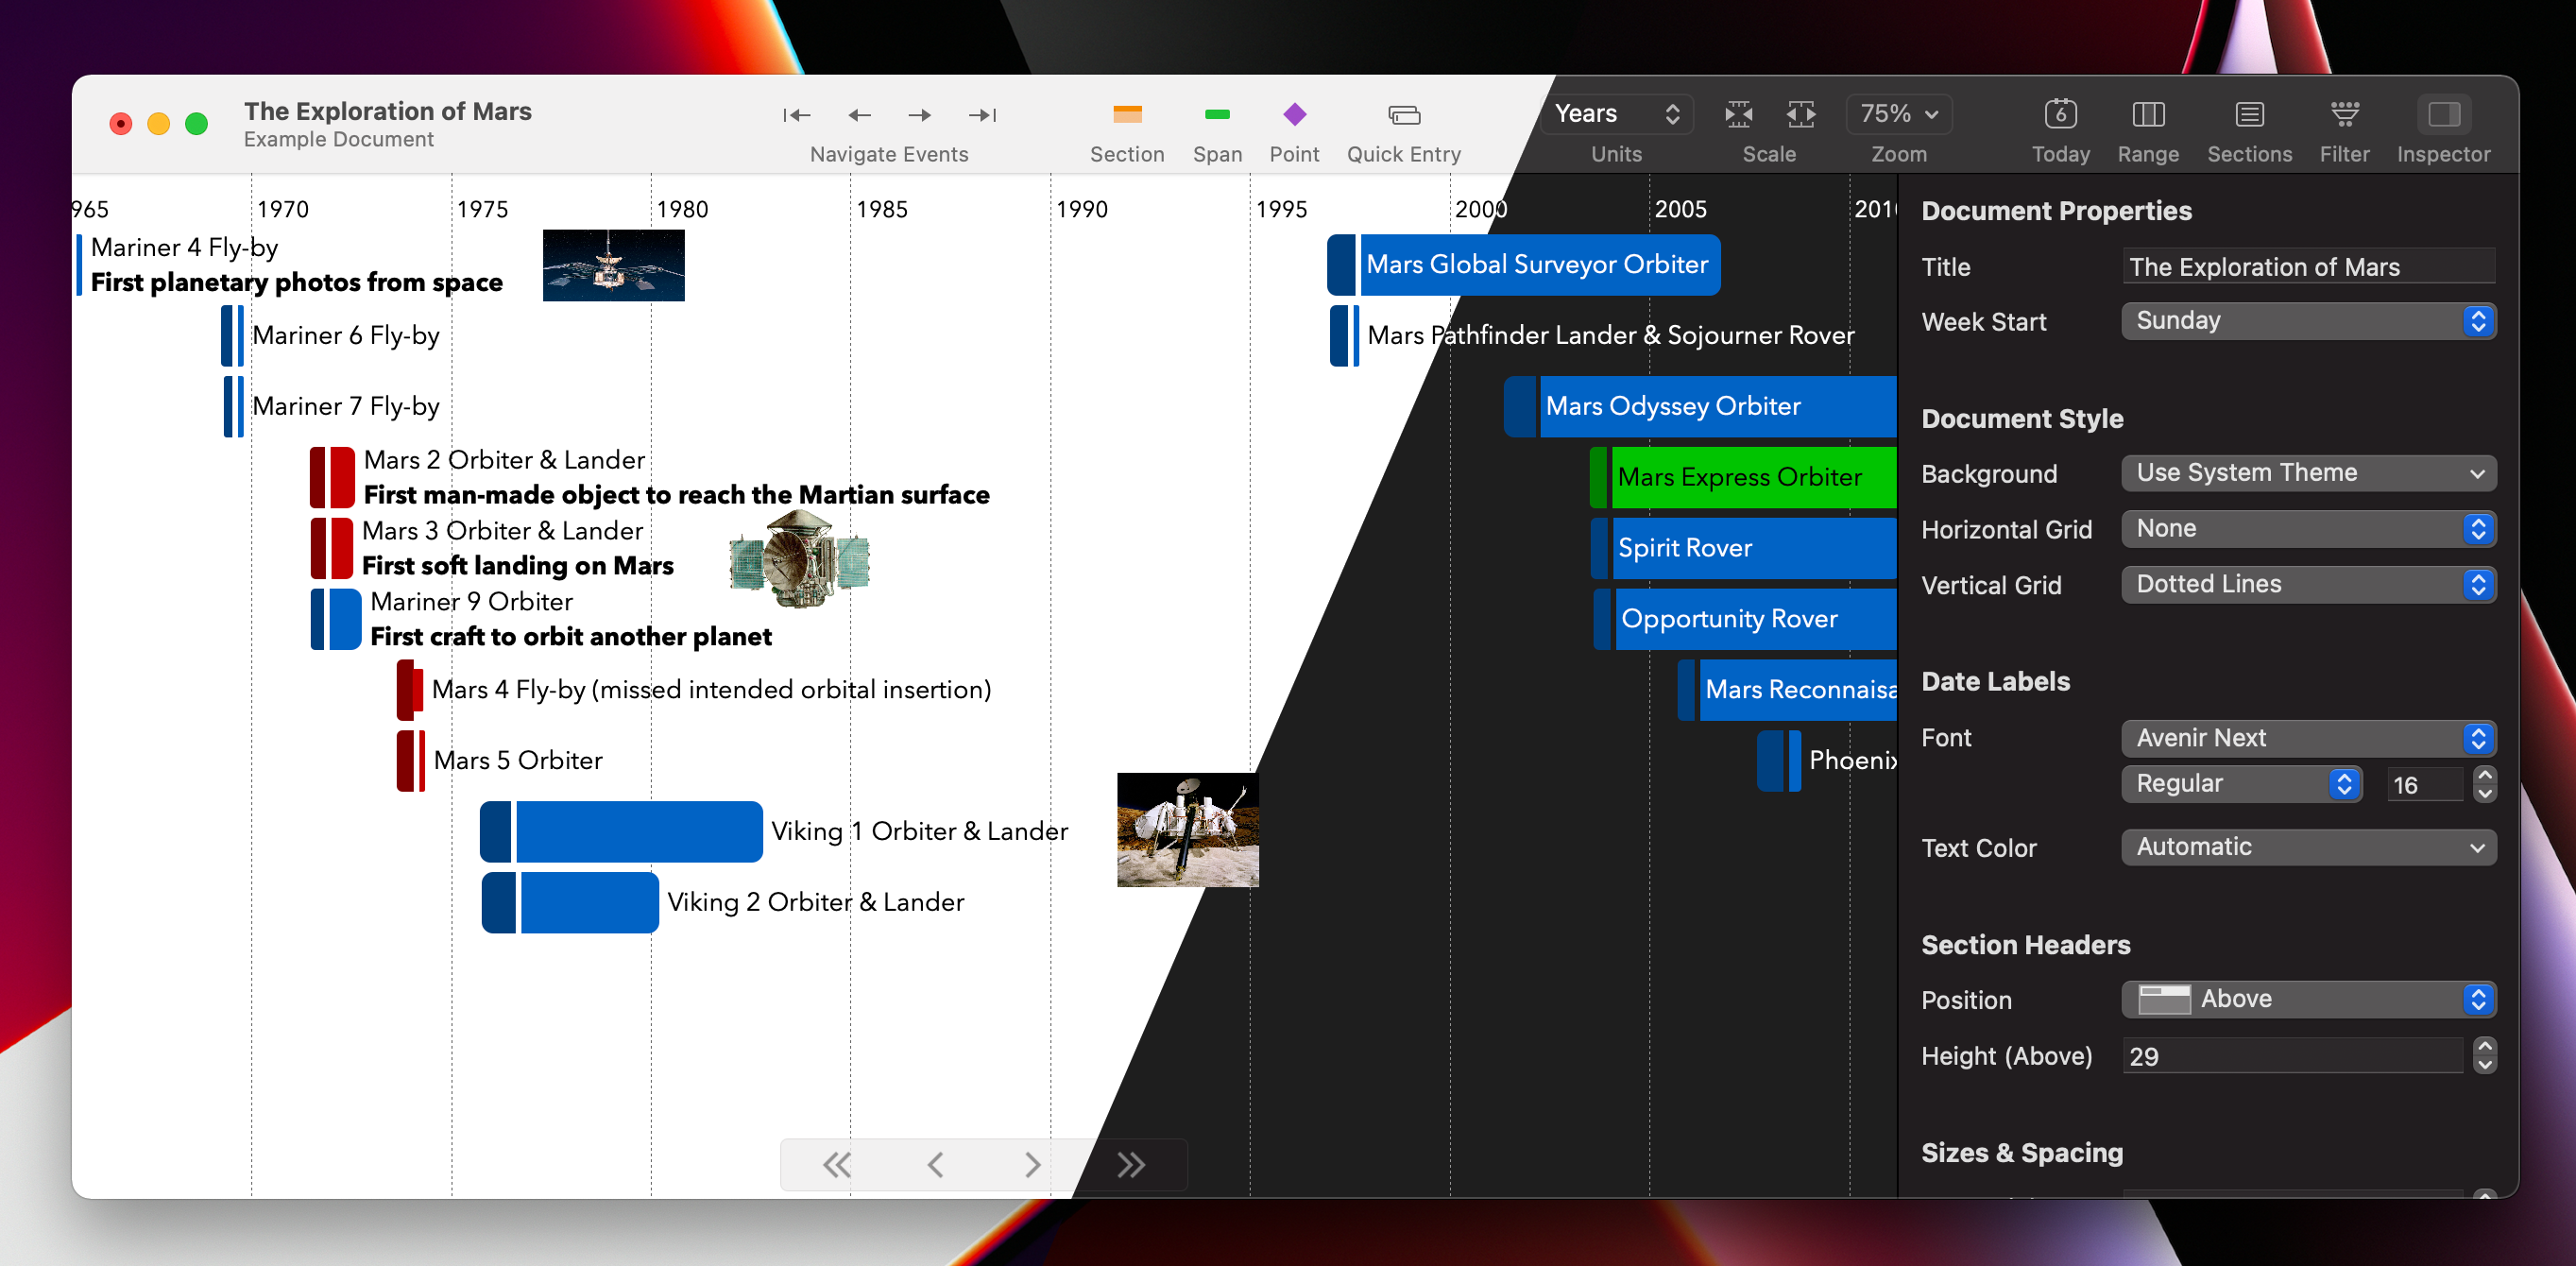
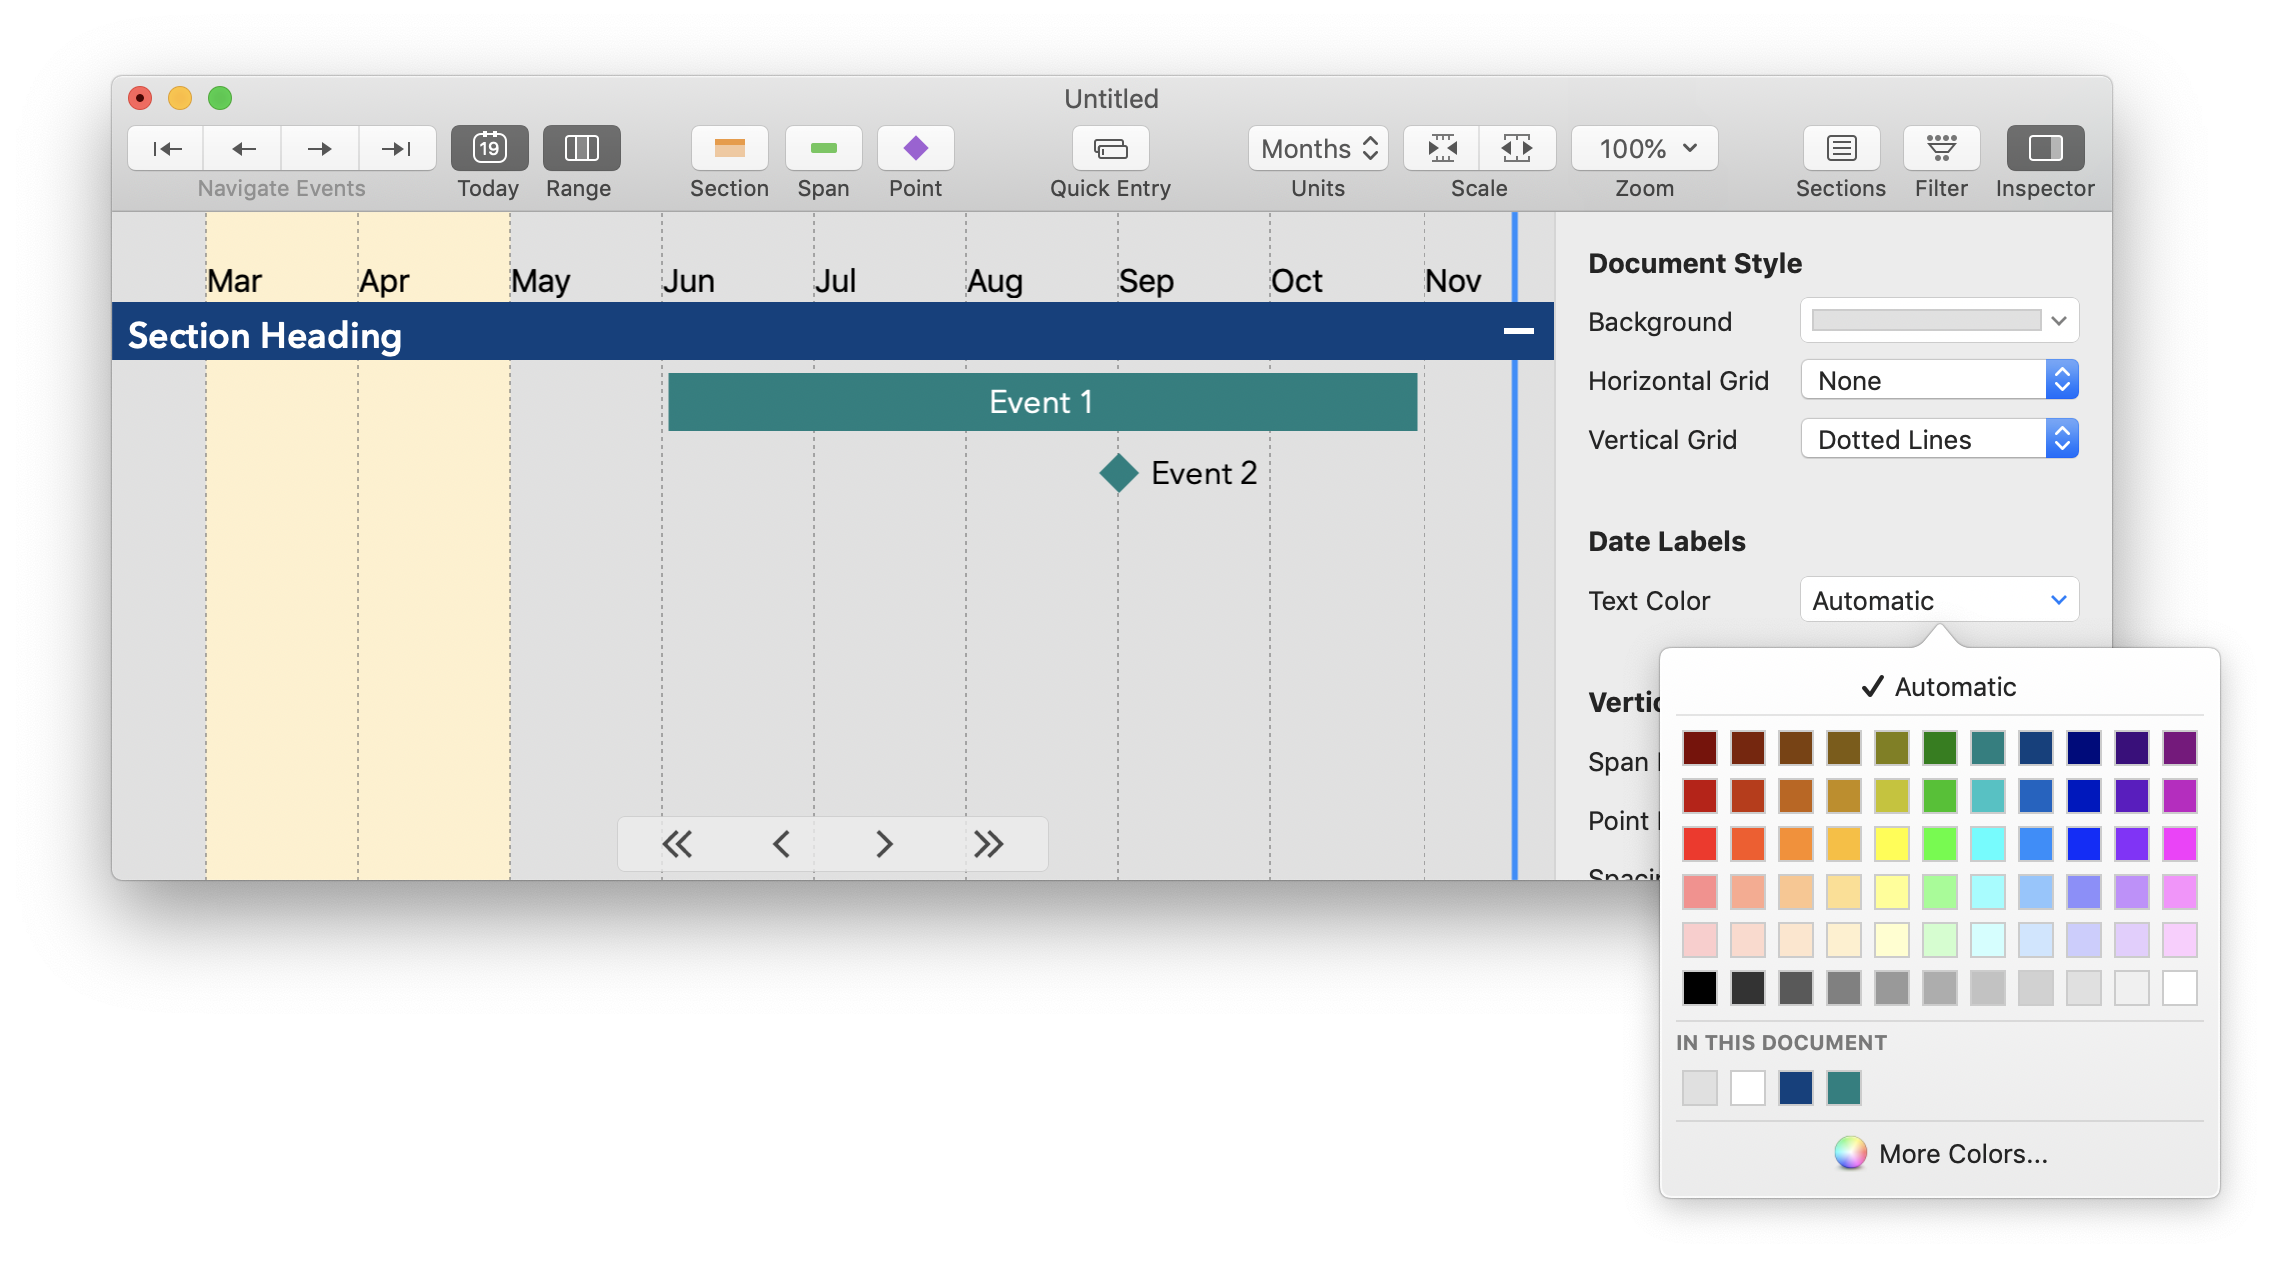
Version 3.5 contains one key feature—much improved automatic text coloring over various backgrounds—and enjoys some other improvements as a result.
Until now, if you selected “Automatic” as an event title’s color, that title would be made entirely either white or black to try and maximize its visibility, even if it crossed over multiple background colors. Starting in 3.5, though, it will switch between white and black anywhere its background changes:
Between time-range highlights, separate background colors for the past, weekend shading, and more, complex timelines often have rich and overlapping background regions, making this a long-needed update.
This even applies as you type:

Thanks to this new precise coloring, TimeStory now allows, in many cases (but not all), text to flow out of a span event. This can dramatically increase the amount of text you can fit into a timeline at smaller timescales.

Finally, this change also fixes a bug where the automatic text-color logic didn’t properly account for overlapping time-range highlights in the past, if you had a separate background color set for it.
Version 3.4 is out, with support for weekend colors and a new way to visually highlight and connect event-attached images, plus a handful of smaller updates and fixes.
You can now set a different background color for weekends, a long-requested feature useful for anyone doing project schedules.
(These colors are hidden when you switch views to monthly, quarterly, or yearly views.)
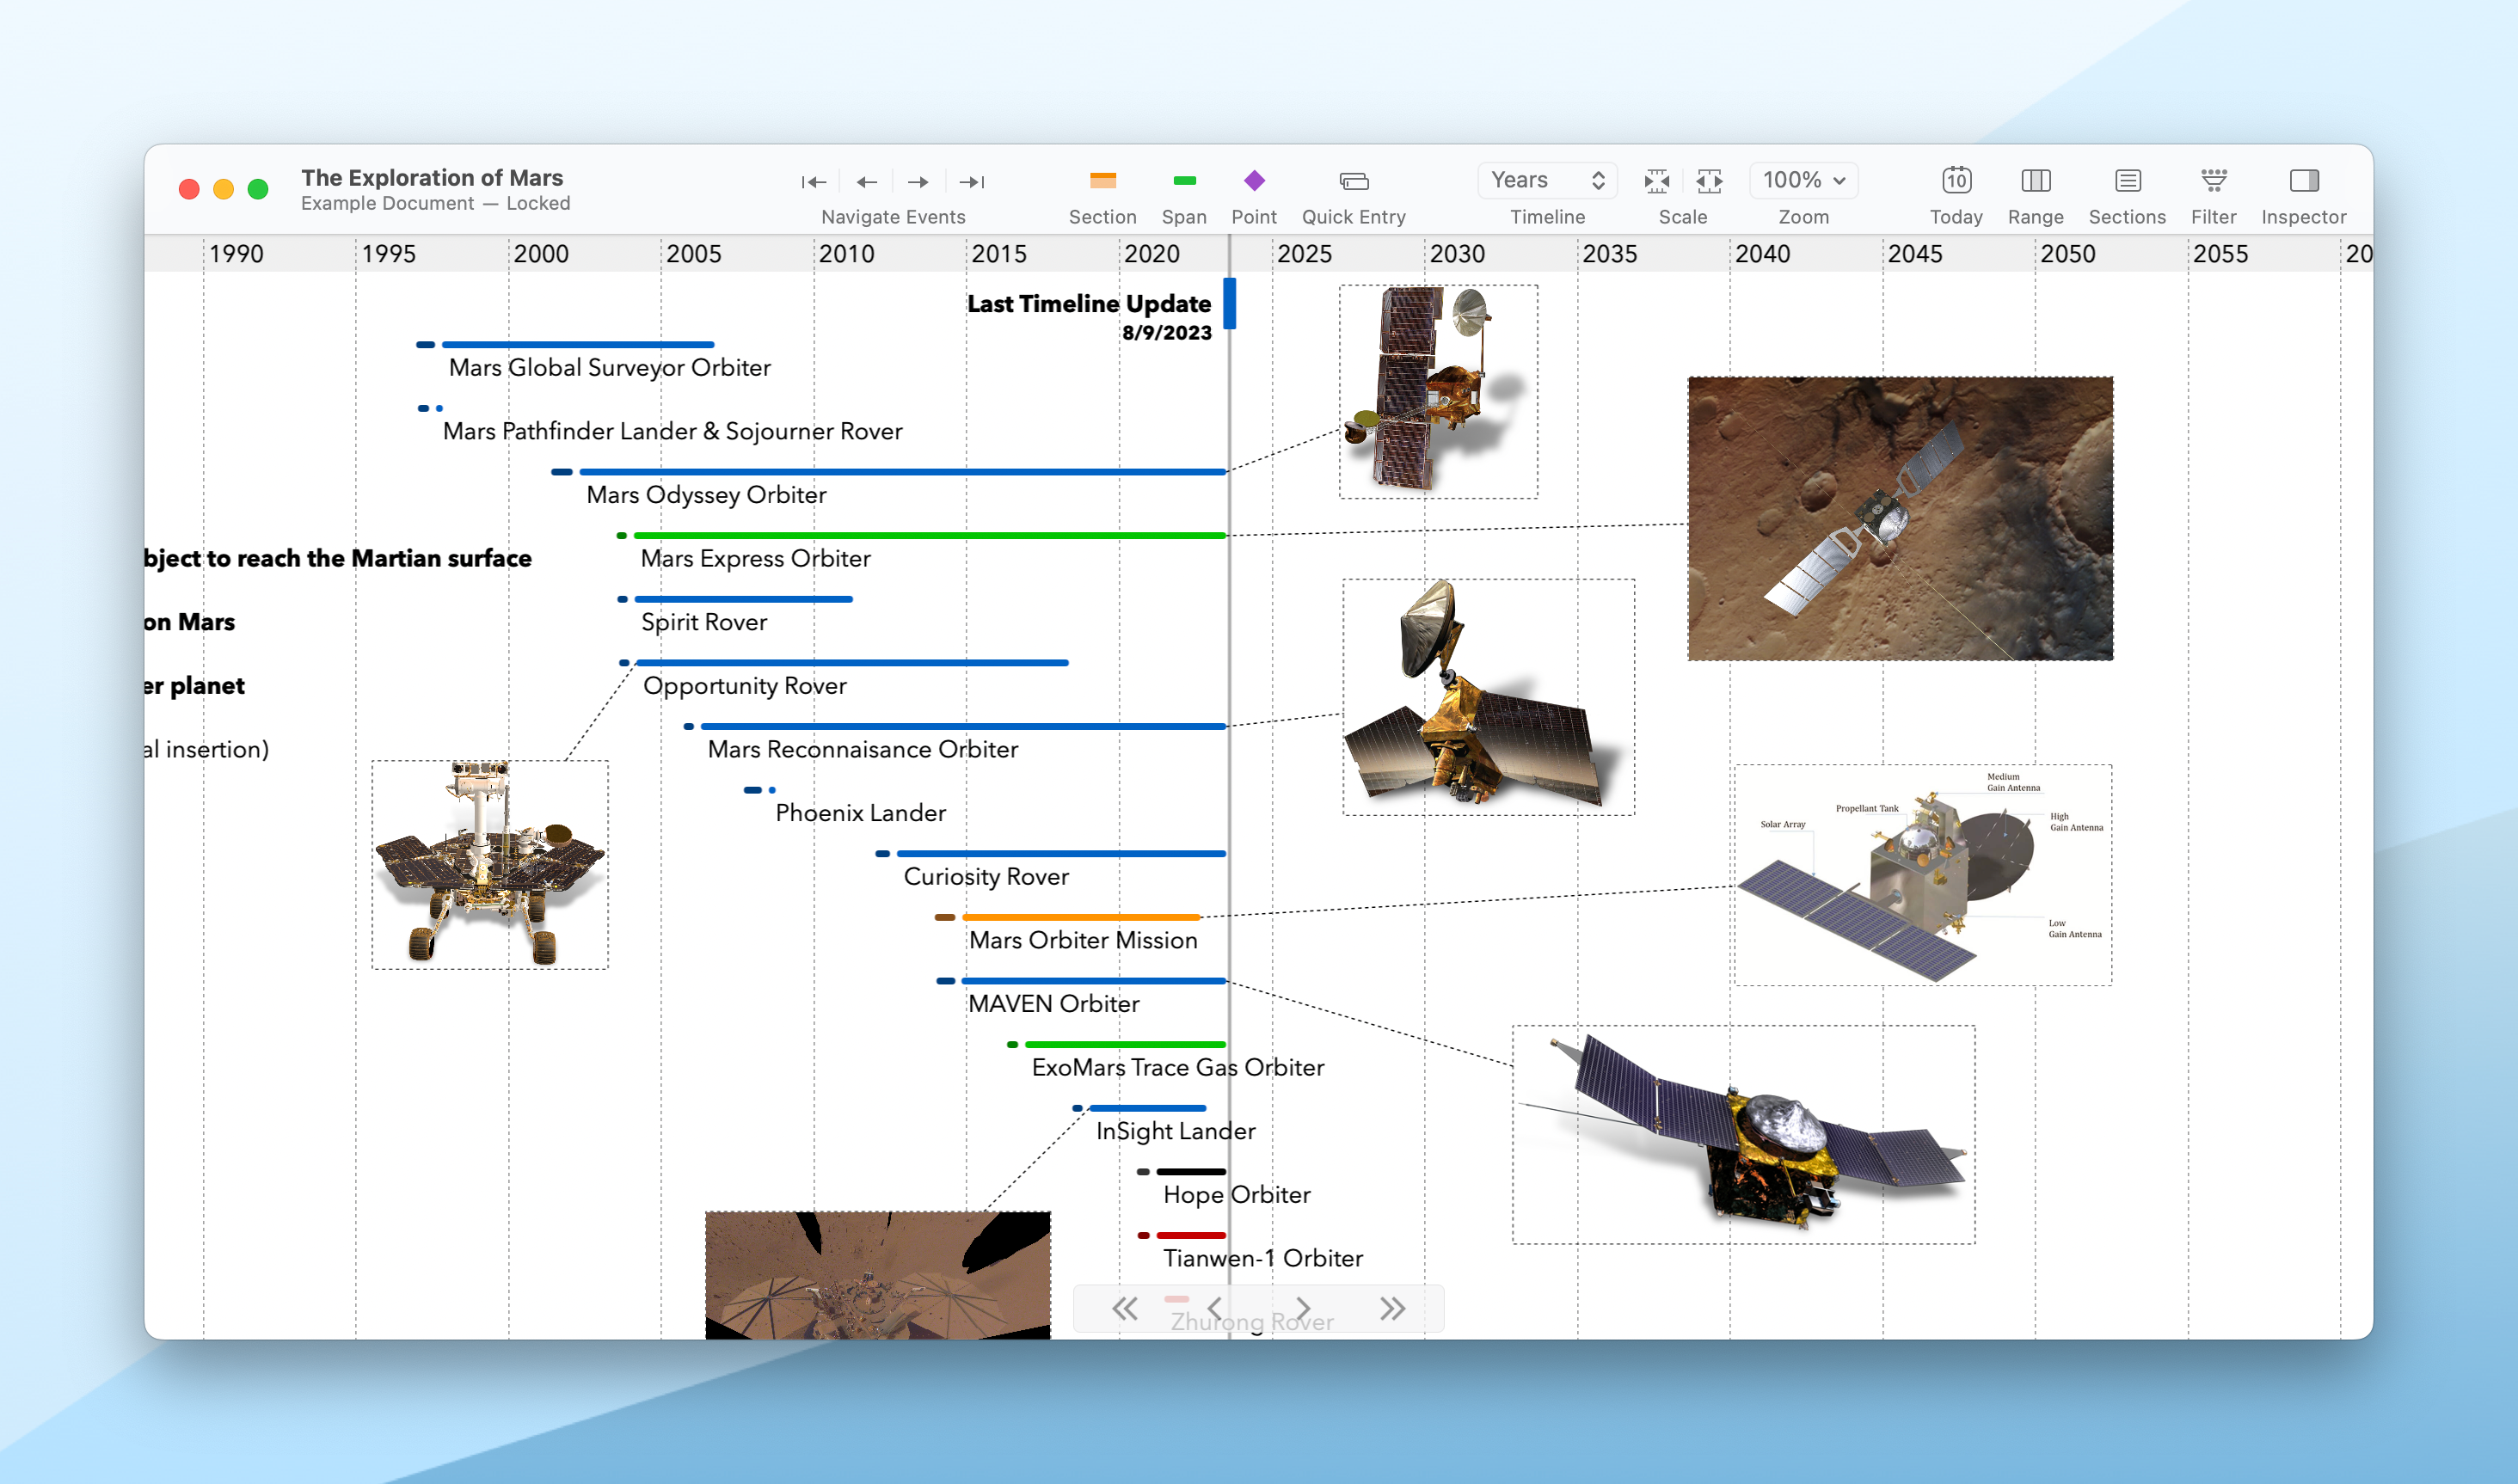
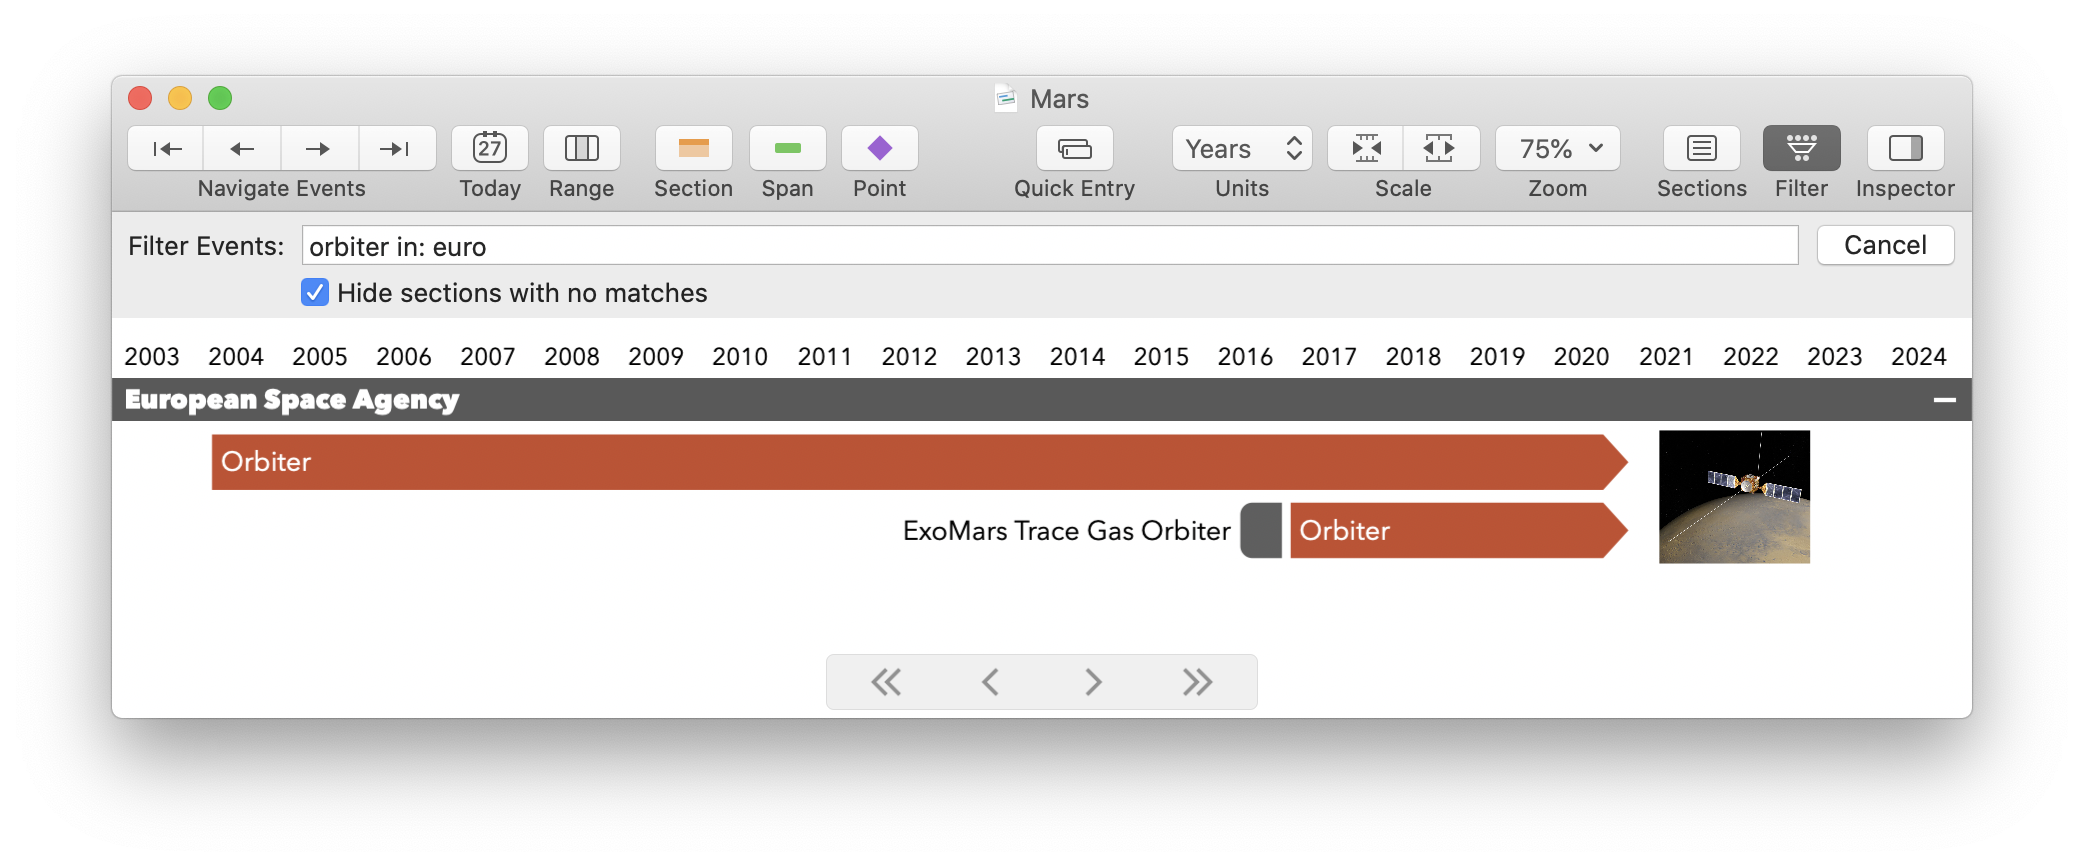
TimeStory allows you to attach one or more images to an event, positioning those images however you like relative to that event. With 3.4, you can now also configure a border around an image, and a line connecting it to its event, for clarity when you have multiple nearby events or images. You’ll now find this in use in the updated example timeline “The Exploration of Mars”:
Images now also support the same Copy/Paste Style, Set Default Style, and Apply Default Style as events and sections, so it’s easy to adopt this throughout your existing timelines.
3.3.2 fixes a small bug, speeds up large timeline updates during editing, and brings a couple of other minor improvements.
CSV export technical details: the code now inserts a Unicode byte-order mark to force Excel to properly detect its UTF-8 encoding. Every other modern app usually works fine with or without it. As always, please drop a note to support@timestory.app if you ever have problems with import/export or anything else!
This minor update picks up a couple of fixes for exporting to CSV.
3.3 adds a couple of new features to speed up creation of events and sections, and fixes another batch of bugs, including a couple related to Dark Mode.
Have a template event you want to replicate in multiple places? Hold the Option key and drag from that event, and TimeStory will create an exact copy of that event and start dragging it.
This long-requested feature is common among Mac drawing apps, and is a much smoother experience than using Duplicate and then dragging.
Option+drag in previous versions of TimeStory meant “drag this event and keep it on its own row”. In that mode, as you drag around, new rows will be inserted as needed to keep the event by itself. That function is now Shift+Option+drag (which was also valid in previous versions).
| Drag Modifier | Previously | TimeStory 3.3 |
|---|---|---|
| Option | Create new row | Duplicate and drag |
| Shift+Option | Create new row | |
| Shift | Allow spans to overlap | |
| Command | Don't snap to time-unit boundaries | |
Since this affects a longstanding and, for some people, often-used shortcut, I added a small notice in the app. The first time you launch TimeStory after updating to 3.3, you'll see it below the toolbar on any open document windows. Once you click on the notice, or on its dismiss button, you won't see it again.
Does your timeline need multiple sections following a common design? You can now duplicate a section with the Duplicate command (⌘D); this makes a new copy of that section, with the same style and contents (if any), including subsections and contained events.
You can also use the new Sections > Duplicate without Contents action if you just want an empty copy.
(Note that prior versions had an Events > Duplicate action, which only worked on events; now, event and section duplication are both handled by the single Edit > Duplicate action.)
Version 3.2 brings a great new feature for many common timeline styles, enables autosaving and some iCloud features, and fixes some important bugs.
For a simple, consistent look, you can now set up a standard event color for a section, and have that color automatically applied to any event created in or moved into that section. You can set events to match the section header color, or give events their own, separate color, and you can configure point and span events separately.
The built-in document template named “Colorful Weekly” now uses this feature; create a new document from that template and check it out!
MacOS autosave is now enabled by default for TimeStory. If you quit (or if the app crashes), all your documents (including untitled, never-saved drafts) will still be there when you reopen it. This also enables version browsing and the File > Revert To submenu, and rearranges several other menus (e.g., Save As is replaced by Duplicate).
For those of us who still prefer the old ways, you can go into TimeStory’s preferences and turn off autosaving; the app will now behave just as it always has.
Combine iCloud with autosaving, and you now have automatic sync of your documents between your Macs. Open the same document in iCloud Drive on two different computers, edit one of them, and a few seconds later, after the file syncs over, that edit will appear on the other screen.
Version 3.1.1 is a small bug-fix release for 3.1.
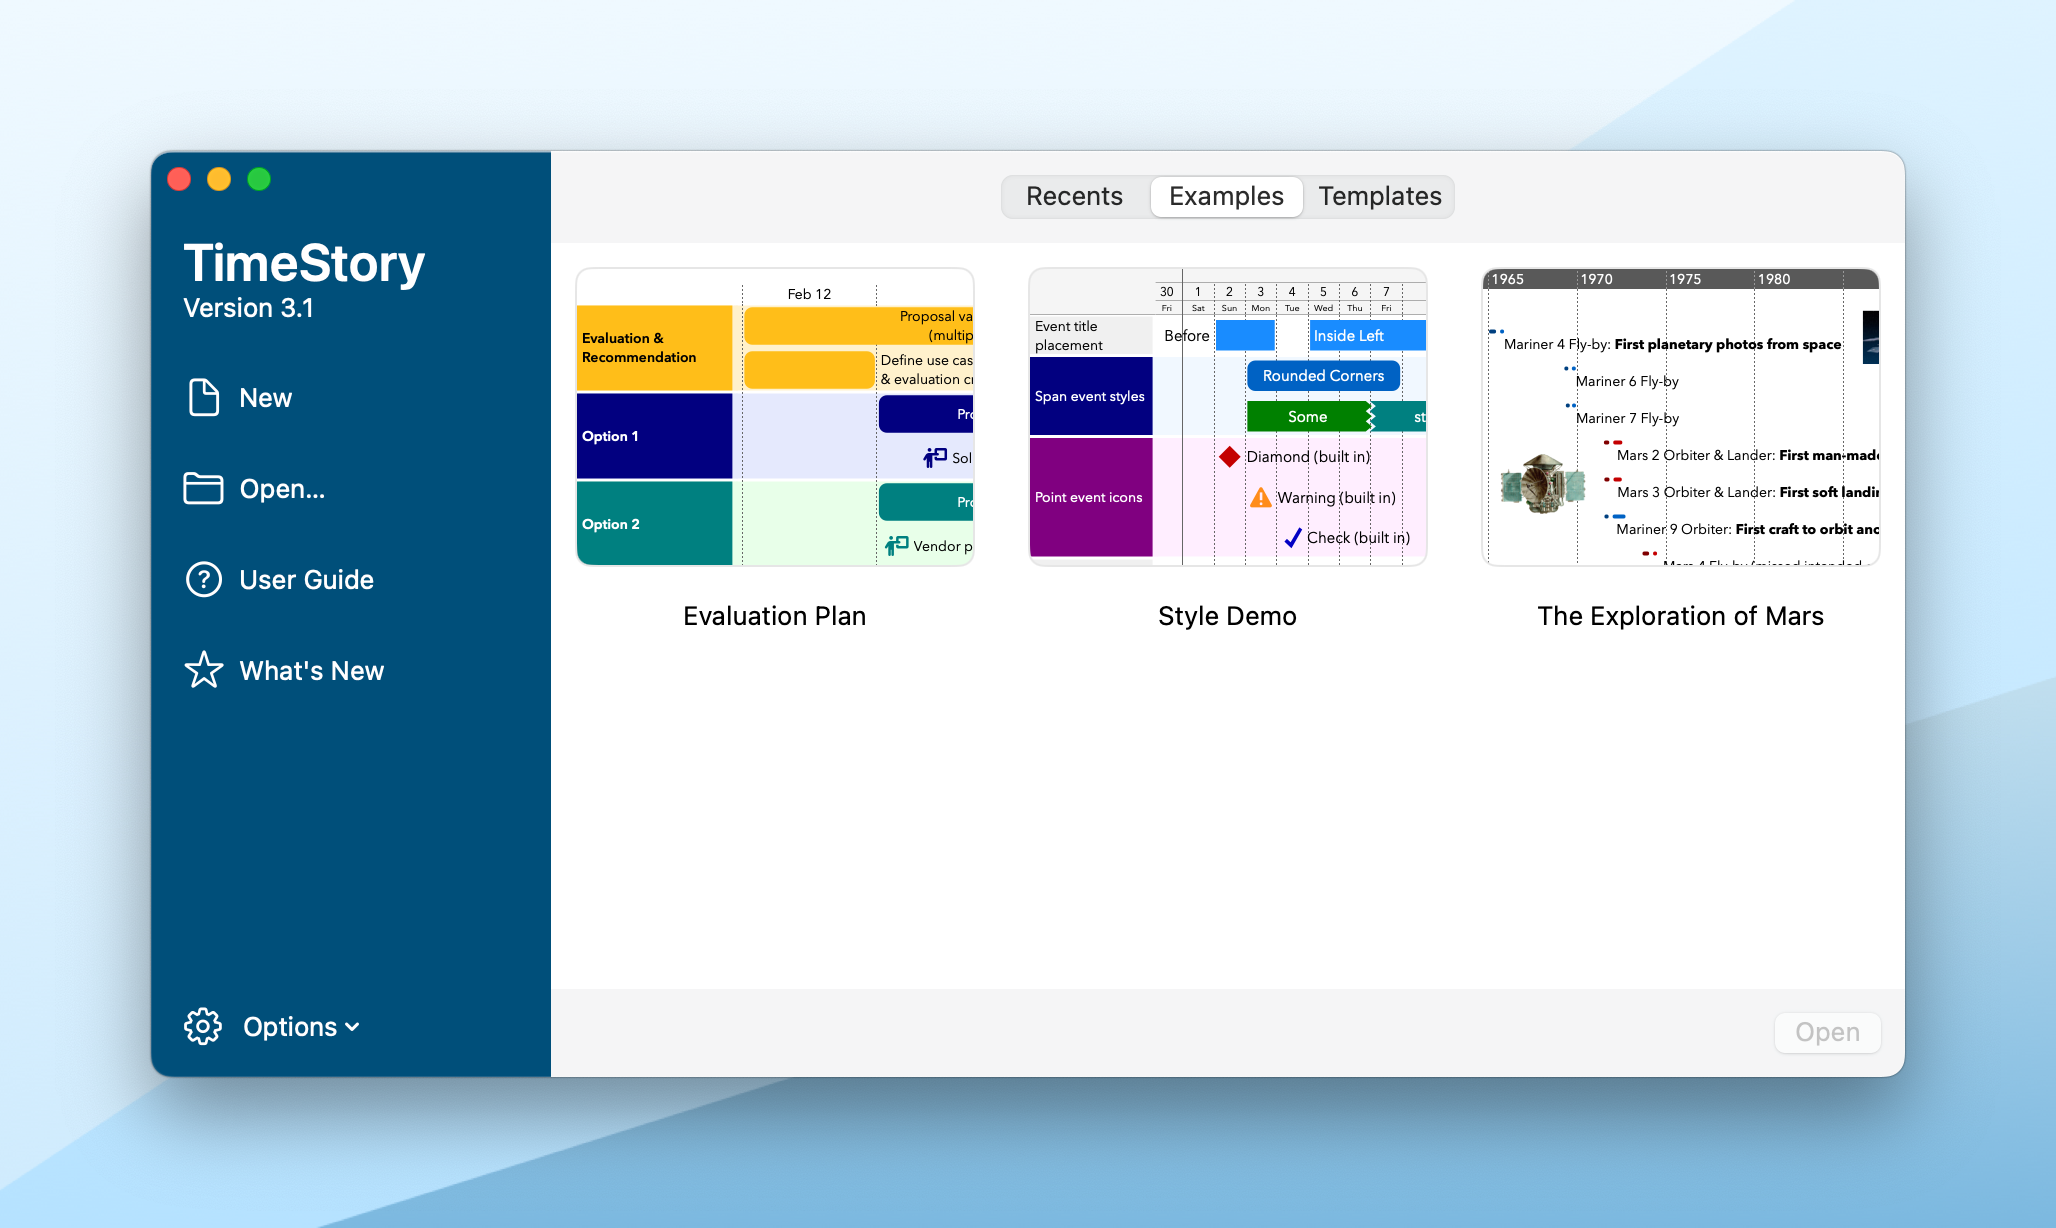
TimeStory’s Welcome Window has been completely redesigned, with previews for recently-opened files, built-in examples, and document templates, in a new, cleaner look.
This window appears whenever you launch TimeStory without an open document (although you can configure this), or when you choose Window > Welcome to TimeStory or File > New from Template.
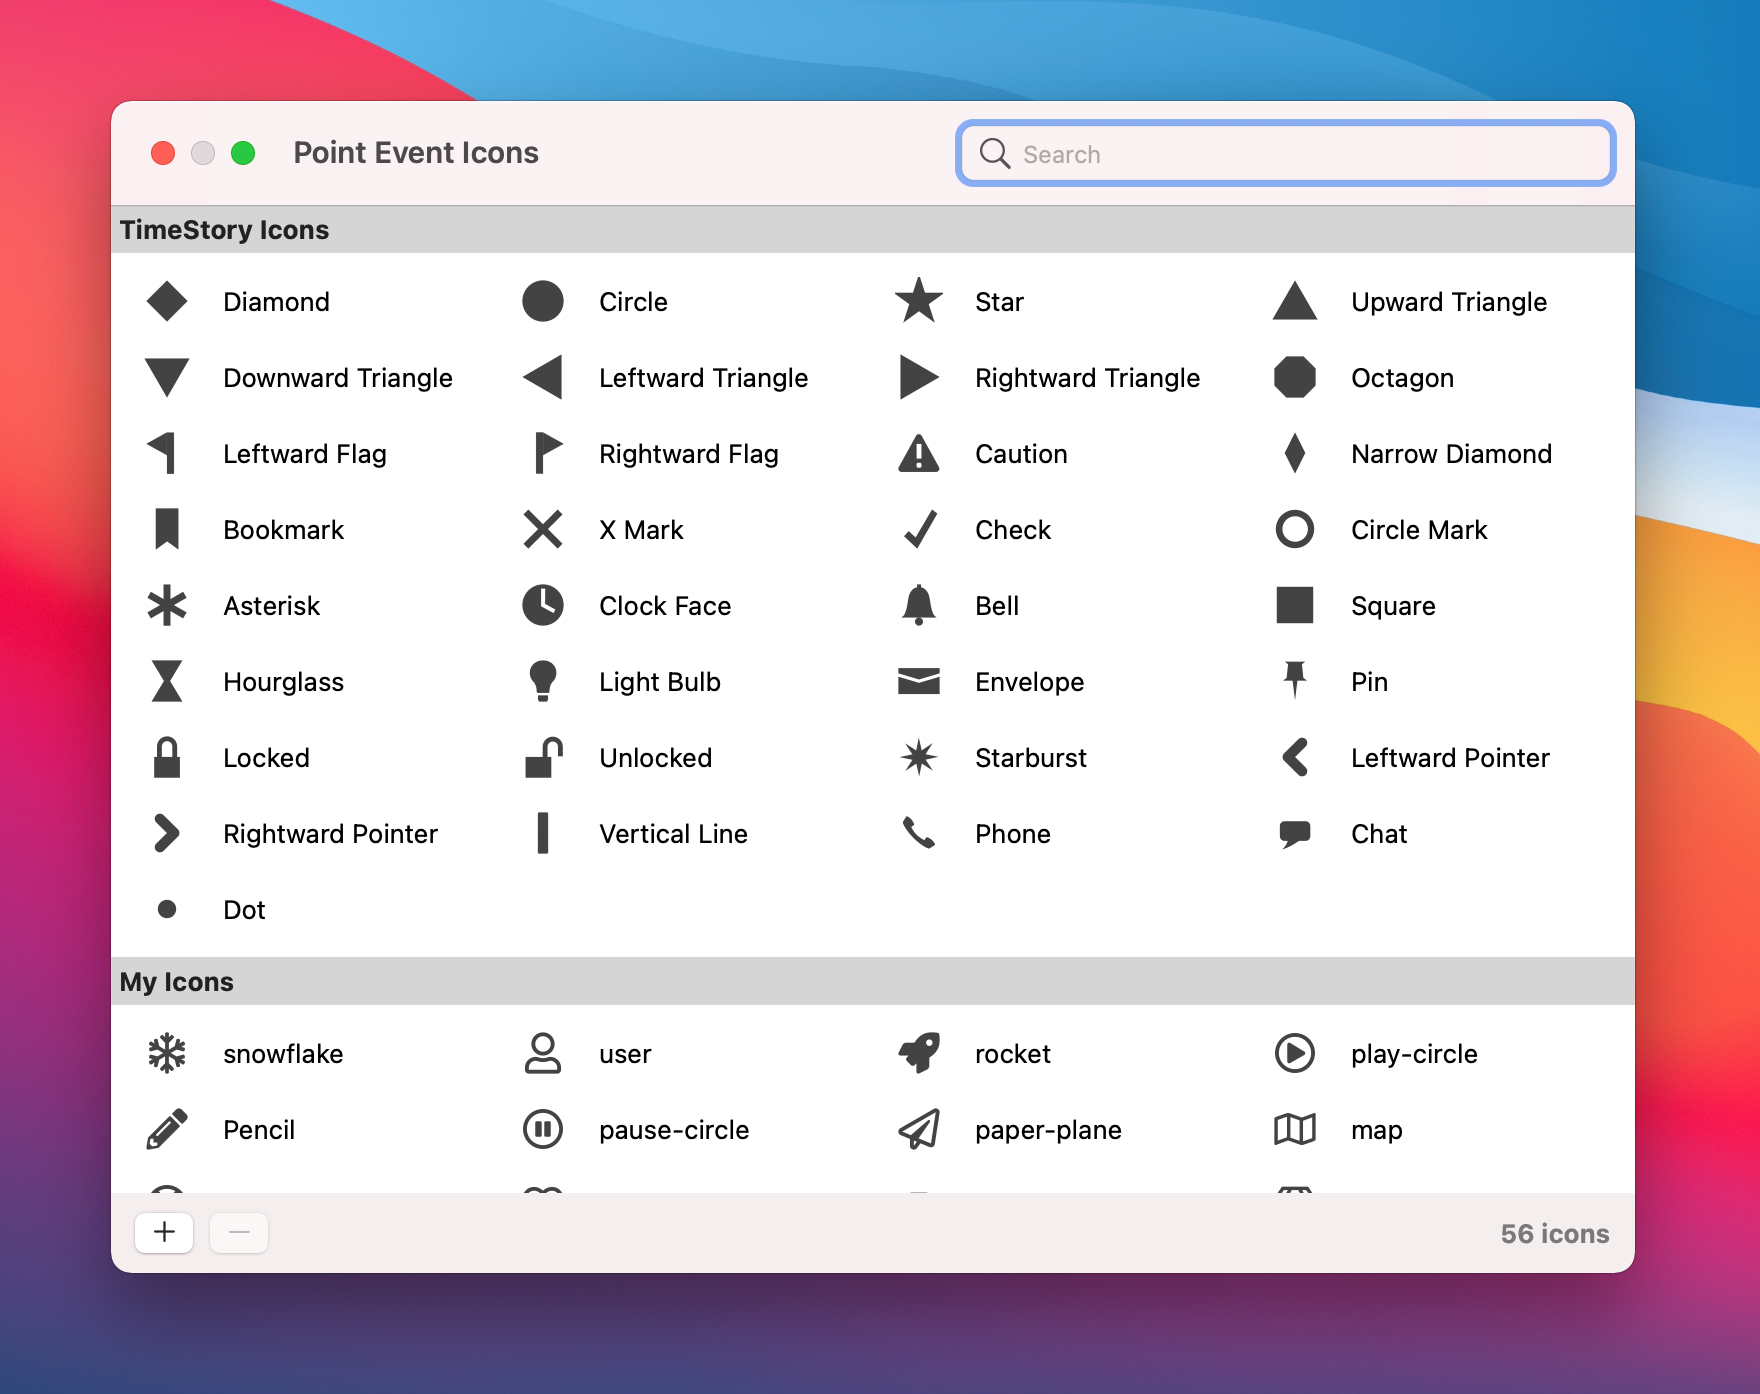
In the Point Event Icons window, your icons are now grouped into sets, which can be easily browsed on in the sidebar on the left. As before, you’ll find TimeStory Icons, the built-in set of general icons which are always available, and My Icons, where you’ll find any icons you individually added in this or previous versions of TimeStory.
And, new to 3.1, you can also use icon packs, which are single-file collections of any number of icons, prepackaged for easy installation, update, and removal.
With 3.1, I’m also releasing the first three free icon packs, which collect the entire set of SVG icons from FontAwesome Free, so you can quickly add hundreds of icons to your library. Download them, and learn more, at Icon Packs.
(FontAwesome Free is a popular, open-source icon set, widely used on the Web. TimeStory isn’t affiliated with that project; I just frequently use and recommend them as an icon source.)
Version 3.0.1 fixes a crash discovered in version 3.0.
(Specifically, selecting a section and choosing Style > Apply Default Style could trigger a crash. Apologies to anyone who ran into this bug.)
Create and update timelines with clean, flexible new options for headers and events. Import and export CSV files with far more power. Manage your document with a more consistent and cleaner user interface. And more!
3.0 introduces a ton of new ways to customize how your timelines are labeled and divided.
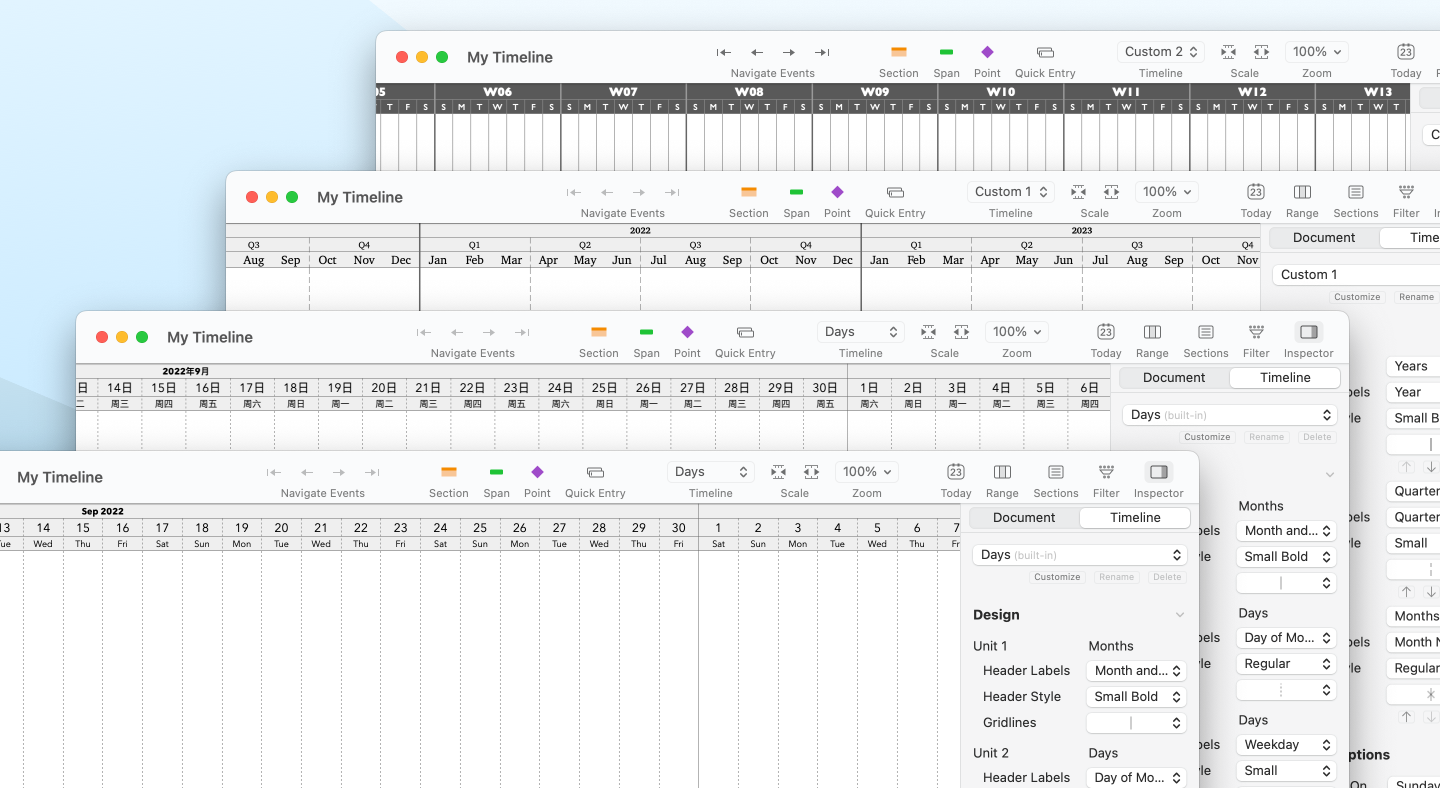
You still have the same five built-in views: years, quarters, months, weeks, and days, and you can still freely switch between them and scale up or down. But you can now control text alignment, give the header separate background colors, assign horizontal borders, and specify per-time-unit vertical gridlines of varying style and weight.
You can also create entirely new custom views, with your own mix of time units and label formats. A redesigned Timeline Inspector makes it just a few clicks to rearrange, add, or remove time units, or adjust their presentation.
There are new date formats to choose from (finally, including week numbers), a wide range of gridline weights, and more.
The new line style for span events give a great, lightweight, attractive look to busy timelines.
Because their text is outside their graphics, they allow text to freely flow out and down, when you have lots to say.
Seriously. With the new header styles and the new line spans, TimeStory timelines now support totally new, fresh looks. Check them out.
You can now tell TimeStory whether to put point icons at the start or middle of a day. You can mark today’s date with a line, as before, or by filling in that day on the timline.
You can set a separate background color for the past, so you can quickly see how much of a project timeline has passed. (Today’s day, and the future, use the document’s main background color.)
You can now choose from a variety of horizontal gridline styles and mix and match them as row dividers, section dividers, subsection dividers, and so on, making your document’s structure much clearer.
And you now have direct control over the default styles used when adding new sections and events. Select an event or section and choose Style > Set as Default Style to update the defaults, and if you want, choose Style > Apply Default Style to replace the selection’s current styles with your defaults.
You can now apply a document template’s style to an existing document, in addition to using it to create new ones. You can also change which template to use, by default, for new documents, if you want to use another style by default in new files.
(This replaces the older and less-capable “exported theme” feature. If you have any older TimeStory theme files, just drag them into the Template Chooser and they’ll be converted over for you.)
You can now more easily import your CSV files and create exactly the exports you need with a thoroughly reworked CSV feature.

You’ll find sections nicer to work with, too. There are new menu actions, improvements to existing ones, and bugfixes, plus clearer and more consistent main and context (right-click) menus. The context menu is now also available anywhere in a section background, and not only from its header.
Specific bugs fixed include the misbehavior of “Paste Events into Section” when pasting multiple rows; specific new features include more powerful “Split Section Here” and new “Select All Sections” action, and more.
The Inspector has a new, more compact layout, tidying up unnecessary titles so you can see more of your document with it open. You can now see how many events or other items are selected, at the top. Each segment of the Inspector now has its own expand/collapse button, so you can hide things you don’t care about. And several bugs were fixed, including the presentation of some fields when you have a mix of points and spans selected.
Version 3 contains quite a few minor tweaks and improvements. Here are a couple of key ones:
TimeStory 3.0 now requires at least macOS Catalina, and includes support for the upcoming macOS Ventura.
Verion 2.8.3 fixes a couple of uncommon crashes that could occur while editing.
Details, for the curious:
2.8.2 collects fixes for two user-reported problems:
This is a minor bugfix release. In the previous version’s Event Inspector, the end date field would sometimes diplay the date using the internal format “=date(yyyy-mm-dd)” instead of the normal date format used everywhere else. (The date was still stored and placed correctly.) 2.8.1 fixes this problem.
TimeStory 2.8 has been released, with a couple of key new features, a handful of fixes, and a ton of behind-the-scenes improvements.
When styling a document, you now have a new option for its background color: “Use System Theme”.
If you choose this color, your document background will now automatically switch between light and dark colors, following the rest of the system (and the rest of the app, which always supported dark mode). This is especially useful if you set your Mac to automatically switch between light and dark modes.
Normally, TimeStory formats all dates, weekday names, and month names using your system’s current language and region settings from System Preferences, and updates your timeline’s display when you change them.
But sometimes you’re preparing a timeline for another audience, and want it to use their conventions, without adjusting your system settings. This is now easily done, on a per-document basis:
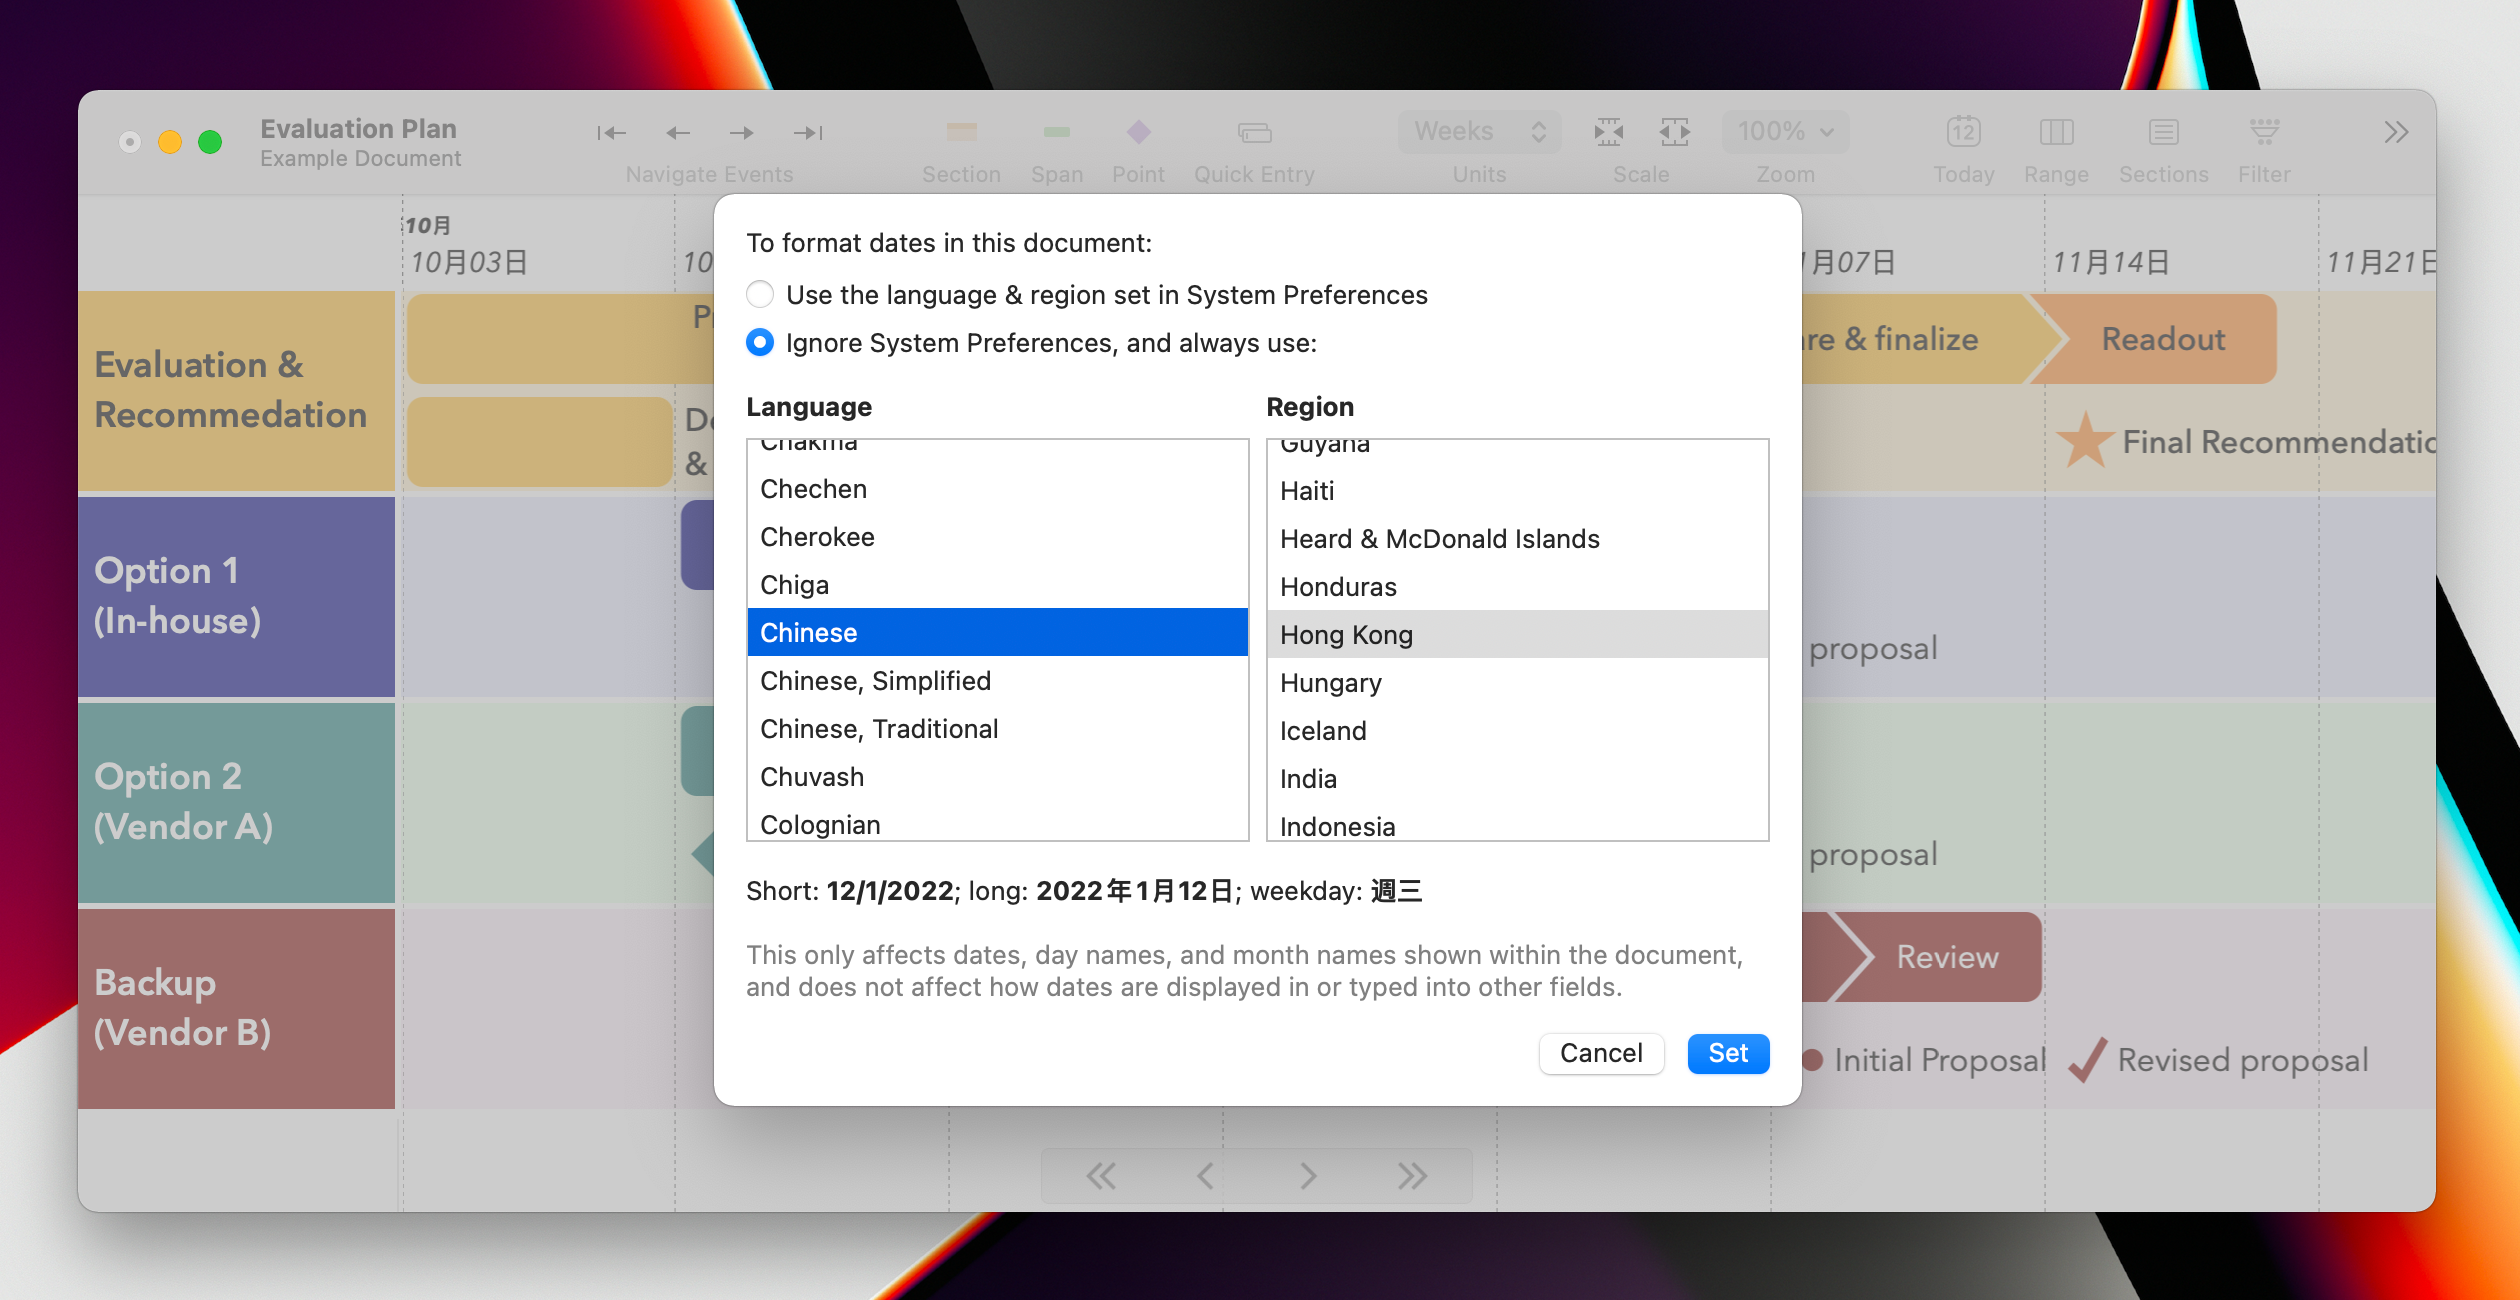
If you choose a language on this dialog, that’s how your document will be formatted on screen or in PDF/PNG exports. This is independent from other documents, or from your system settings, and is saved within the document itself.
Shortcuts are now available on macOS Monterey, and TimeStory 2.7 is ready!
With Shortcuts for Mac, you can graphically integrate apps and automate your workflows. And with TimeStory 2.7 installed, you’ll have the ability to create, edit, query, display, and export your timelines from within Shortcuts.
Copy events between TimeStory and other apps (like Calendar or Reminders), drive automated processes from a timeline, create quick actions to find, present, or export timeline data for regular tasks, and more.
Check out the Shortcuts pages for example shortcuts, ideas, and documentation. And if you create an interesting shortcut involving TimeStory, I’d love to hear about it!
2.7 also adds a couple of small fixes:
2.6.5 is a pure bugfix release.
Verison 2.6.4 includes one brand-new feature plus a batch of smaller enhancements and fixes.
Sometimes you’d like to navigate or present a timeline without worrying about accidentally dragging an event or making some other change. You can now enable “View-Only Mode”, from the View menu, to temporarily disable all edits and changes to the current timeline.
While in View-Only Mode, you can still change time units and scale, navigate around, turn on or off the Today line or a time-region highlight. You can also still save the document to make these changes persistent. You just can’t change any event, section, image, or other content.
You can now hold the Command key while moving your mouse’s scroll wheel to smoothly and precisely adjust the timescale. (This mirrors the pre-existing behavior of a pinch gesture on a trackpad.)
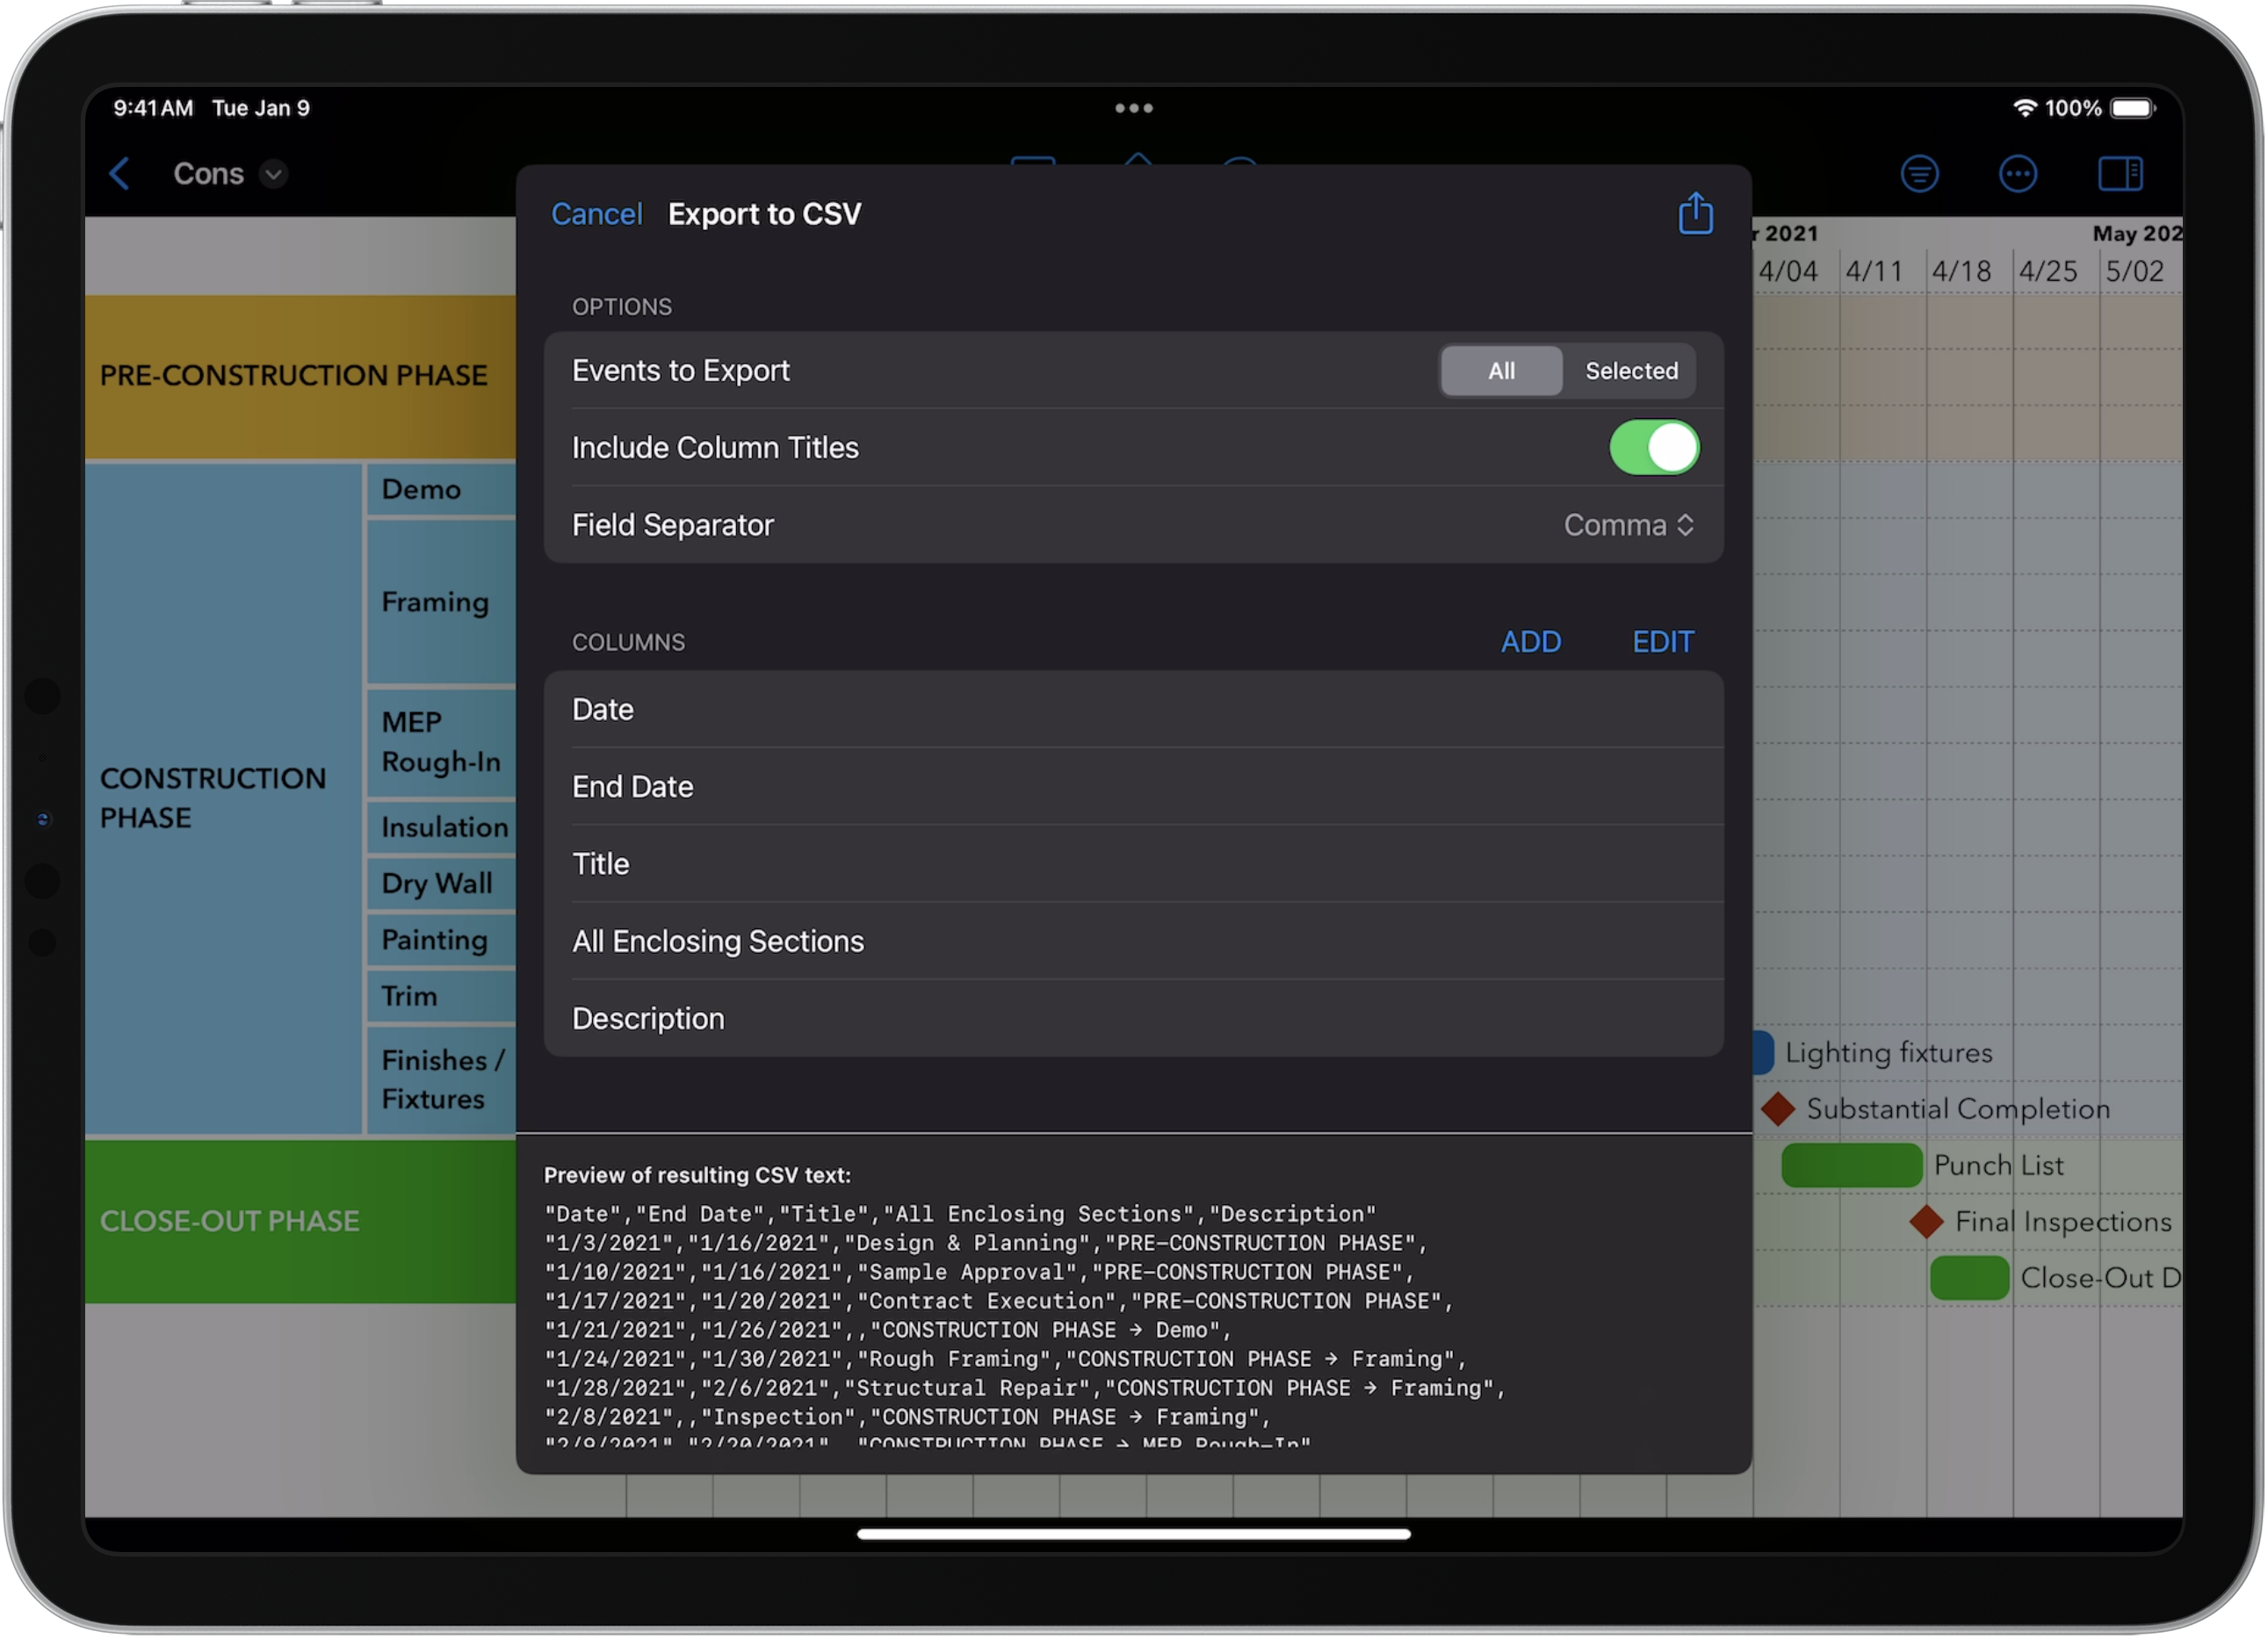
You can now choose to produce a CSV export of just the currently-selected events, instead of the whole document, and you can choose whether the export contains a header row or not.
Version 2.6.3 is another maintenance release, catching up on fixes and small improvements, while development is continuing on macOS Monterey features.
Version 2.6.2 brings a few usability improvements and fixes a couple of bugs.
Resizing a window, or showing or hiding its Inspector, no longer causes its timeline document to horizontally scroll.
The Details popover is now available for images as well as events, and has been renamed from “Event Details” to “Show Details”. This is a minor change, but makes it easier to see an image’s summary (or “alternative text”) while browsing a timeline.
Copy and Paste Style now works better. If you copy styles between point and span events, it will now avoid applying inapplicable shape styles. Copying now works between section headers and events, for the attributes which are common between them. And Paste Style now works on multiple selections again.
Documents containing images often took up more space than needed if saved by V2.6.1, due to a bug. (They were not damaged, just not compressed as much as possible.) This bug has been fixed.
Version 2.6.1 fixes several recently-found or customer-reported bugs:
Version 2.6 makes it easier to share timelines, particularly large ones, with new options and features in the Export function.
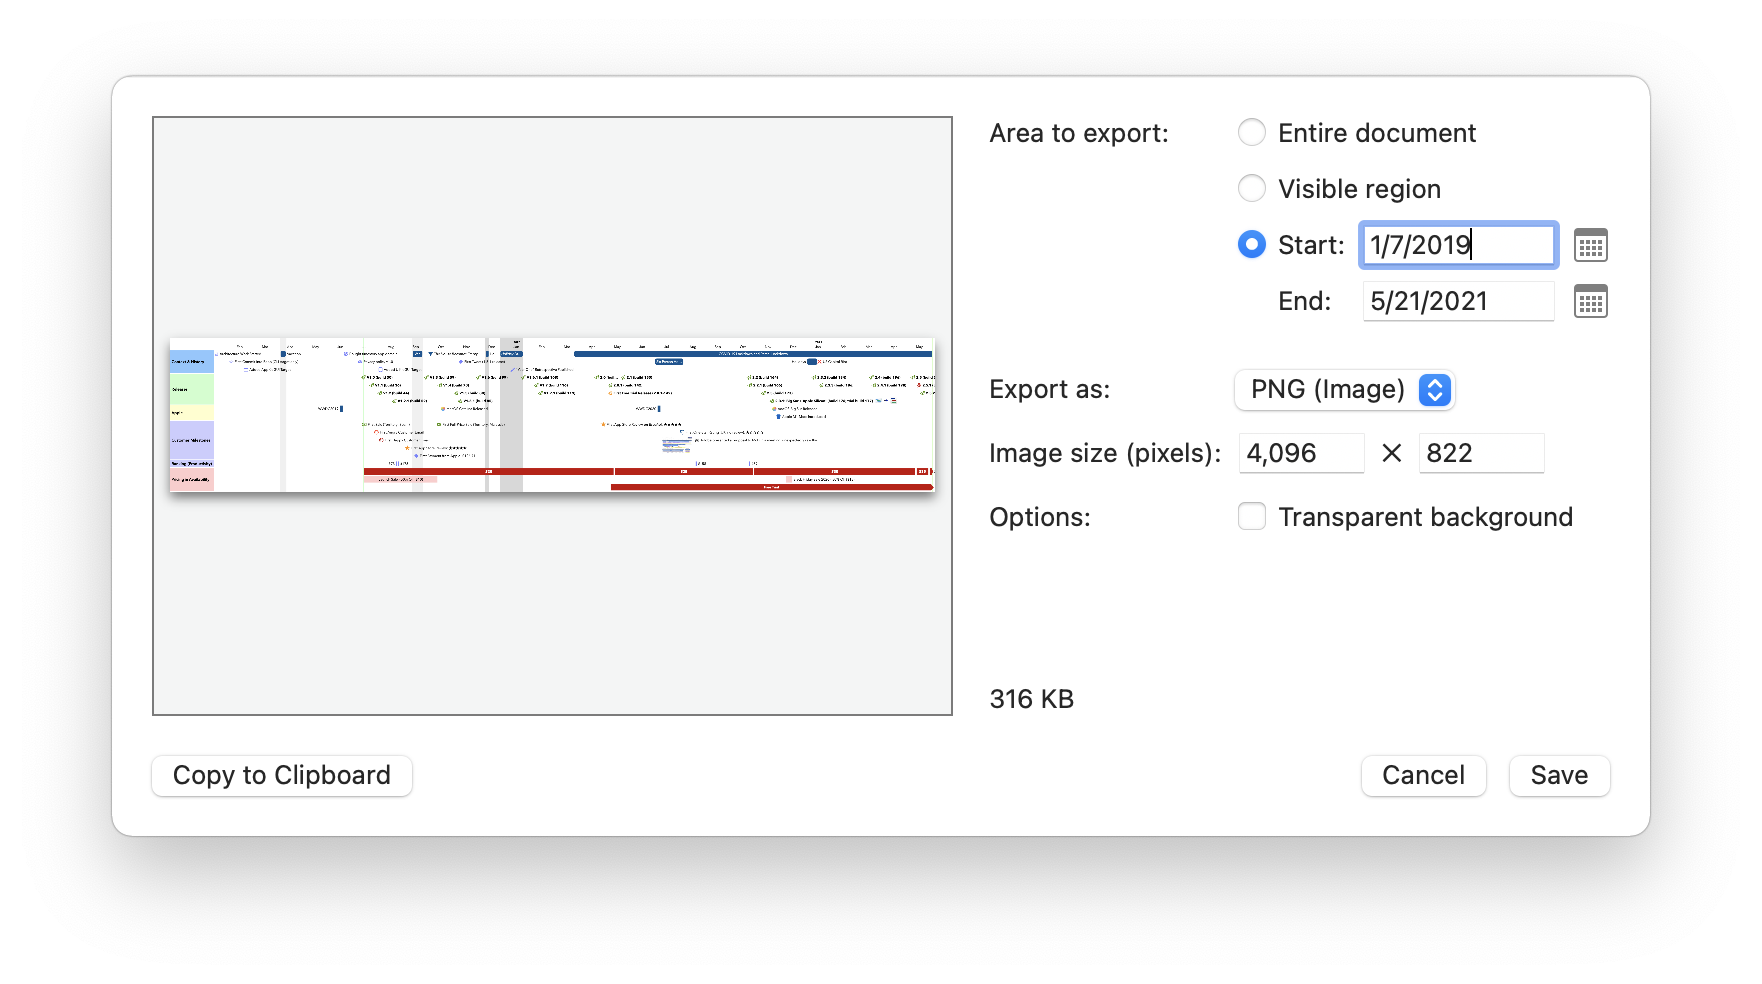
The Export dialog now offers an option to choose a particular range of dates to export. This is ideal when you have a longer timeline and want to share just a slice of it, or when you want to break your timeline up into more manageable exports.
You can now also export your timeline directly as a single-page PDF from the same Export window. A PDF-exported timeline can be scaled up or down without losing detail, its text can be searched and selected, and any hyperlinks will be preserved, making it a great option for sharing timelines with others.
(The existing PNG export still works the same, of course, if that’s what you need. So does the traditional “Print to PDF”, which produces a multi-page PDF using print settings such as paper size, margins, etc.)
Version 2.5.2 adds a single urgent fix: the color and icon pickers in the Inspector could, in some cases, stop responding to clicks.
Version 2.5.1 catches up on some bugfixes and user-interface improvements that didn’t make it into version 2.5.
Make your timelines more informative, attractive, and unique, by using your own icons to mark points in time! Save commonly-used document layouts as templates, for quicker new-document creation. And, of course, enjoy other fixes and improvements throughout the app.
Starting with 2.5, you can now add any symbol or image you want to TimeStory, and use it just like one of the built-in icons to mark a point in time.
![]()
In the rebuilt Icon Picker, the “TimeStory Icons” section contains the built-in, always-available set. “My Icons” starts out empty, but you can add your own from the new icon window:
When you save your document, it embeds copies of any icons you use, so it will look the same if you send it to someone else, or even if you later delete those icons from your own custom set.
If your icon is a simple, flat symbol, you can set its color with the Event Inspector like always. But if it has its own, built-in colors, you can choose to just use it as it is.
The TimeStory icon library can handle thousands of icons without slowing down. Each icon gets a user-editable name, and the interface offers a search field to quickly find the one you want. Use image formats like PNG or use vector images in the SVG format, for maximum flexibility to create your own or download them from the Web.
And finally, TimeStory now lets you adjust the size of each icon in a timeline individually. (By default, they all still use the common, document-level setting, as before.)
If you often need to create documents with the same sections, layout, or styles, you can use the new “document template” feature.
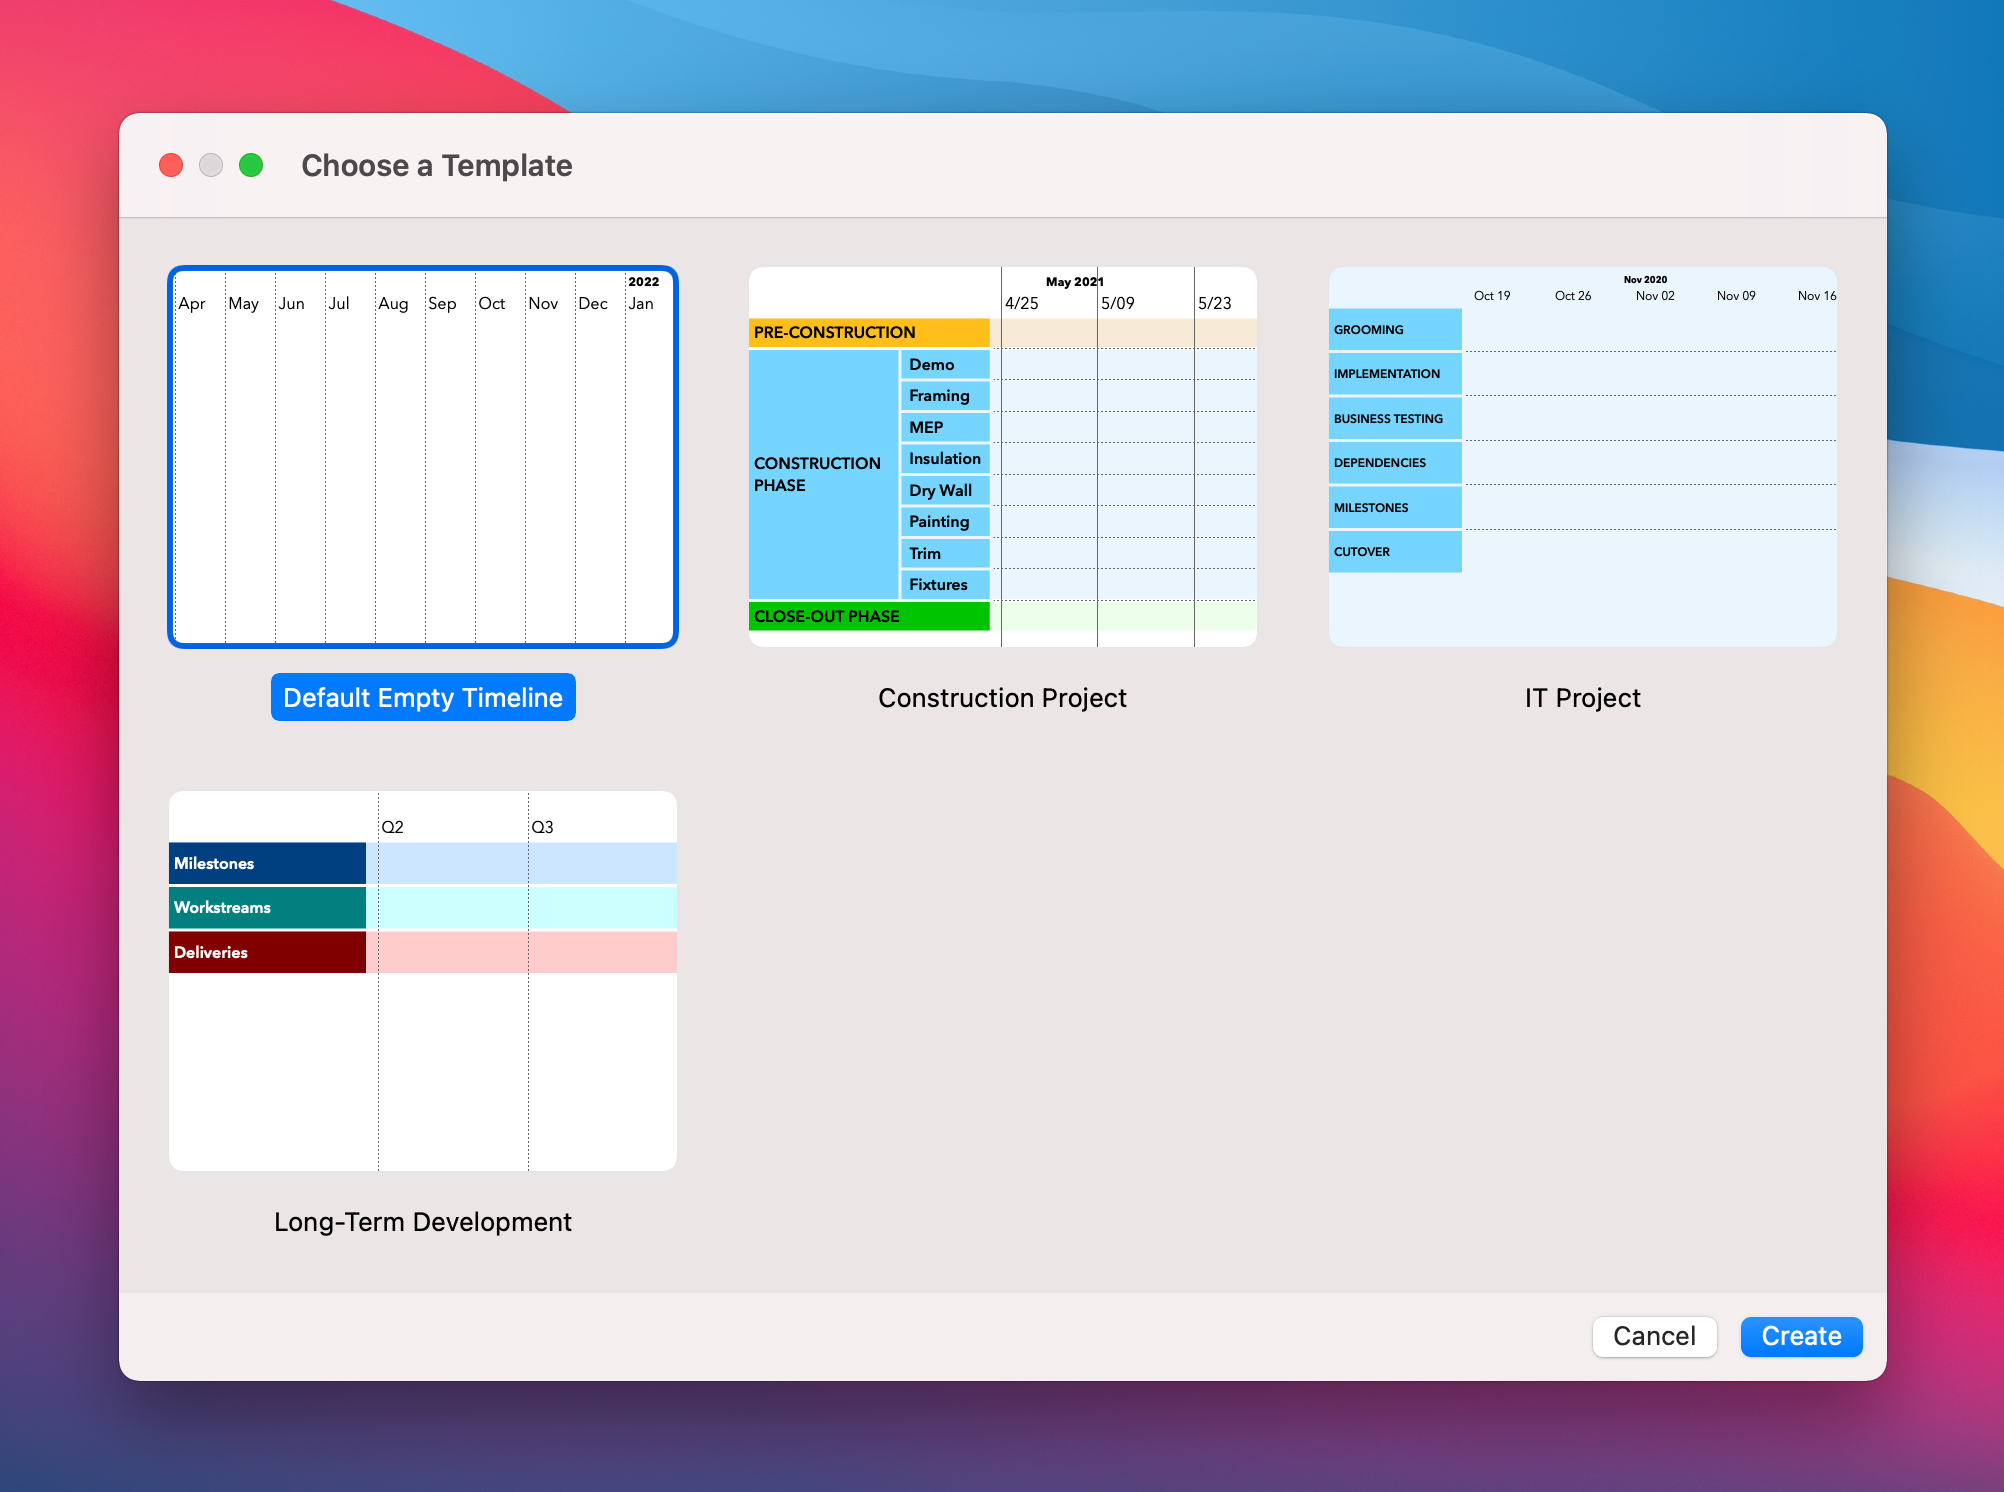
Set up your document how you’d like it, and choose File > Save as Template. This template will contain everything—any sections, events, colors, or styles—and will now be available from File > New from Template as a quick starting point.
(TimeStory 2.5 comes with “Default Empty Timeline”, which creates the same basic empty timeline that File > New does.)
2.5 includes a grab bag of smaller improvements and bug fixes. I’ve been working on this for quite a while!
Fixes a few bugs just found in PNG export and printing. (These wouldn’t have affected most users.)
This version adds tagging of content, summary text for images, a new span event shape, visual and usability improvements, and more!
You can now tag events and sections, to add small attributes and quickly filter the display.
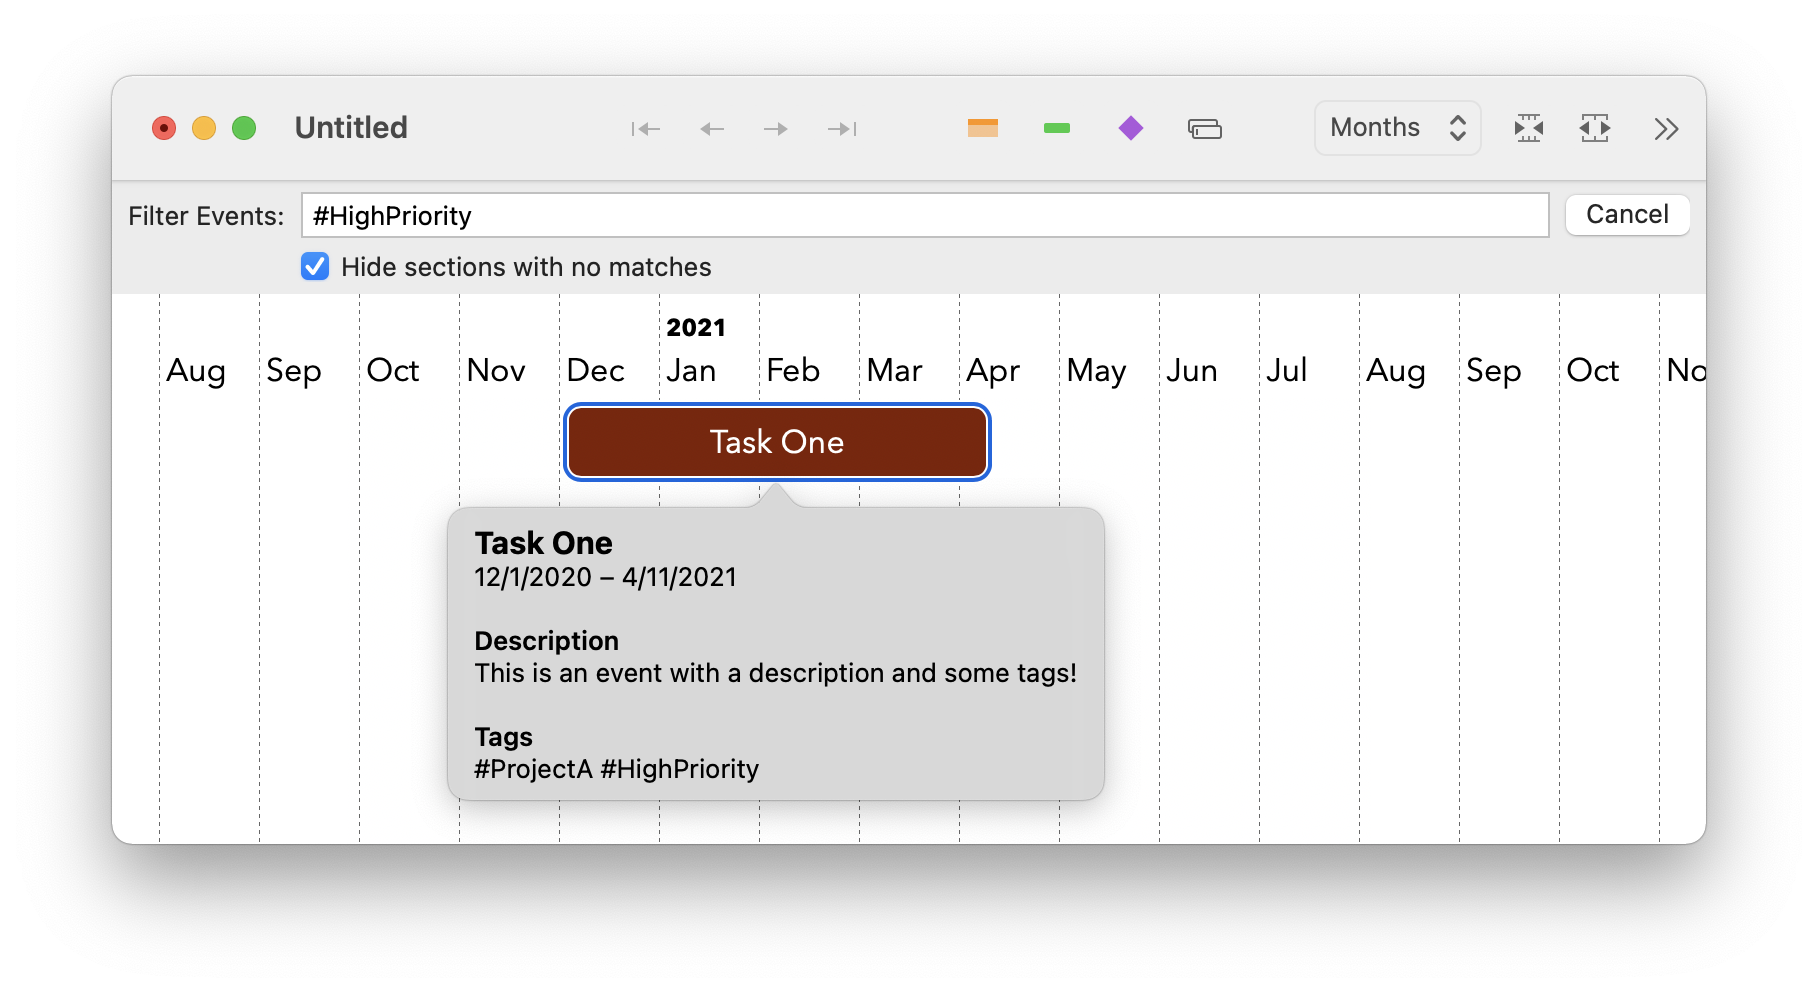
The Inspector has a new Tags field where you can add and edit tags on sections or events, or you can also simply tag them by typing #TagName in a title or description field. TimeStory keeps track of any tags you add, and provides completion suggestions as you type. Tags can then be used in the Event Filter, as seen above, to quickly limit your display.
See Tagging in the User Guide for more!
(Note that if you have existing documents containing #-style tags in their title or description fields, they will automatically work as tags in the new version; some users have been using a similar technique for a while, and it will now just work better.)
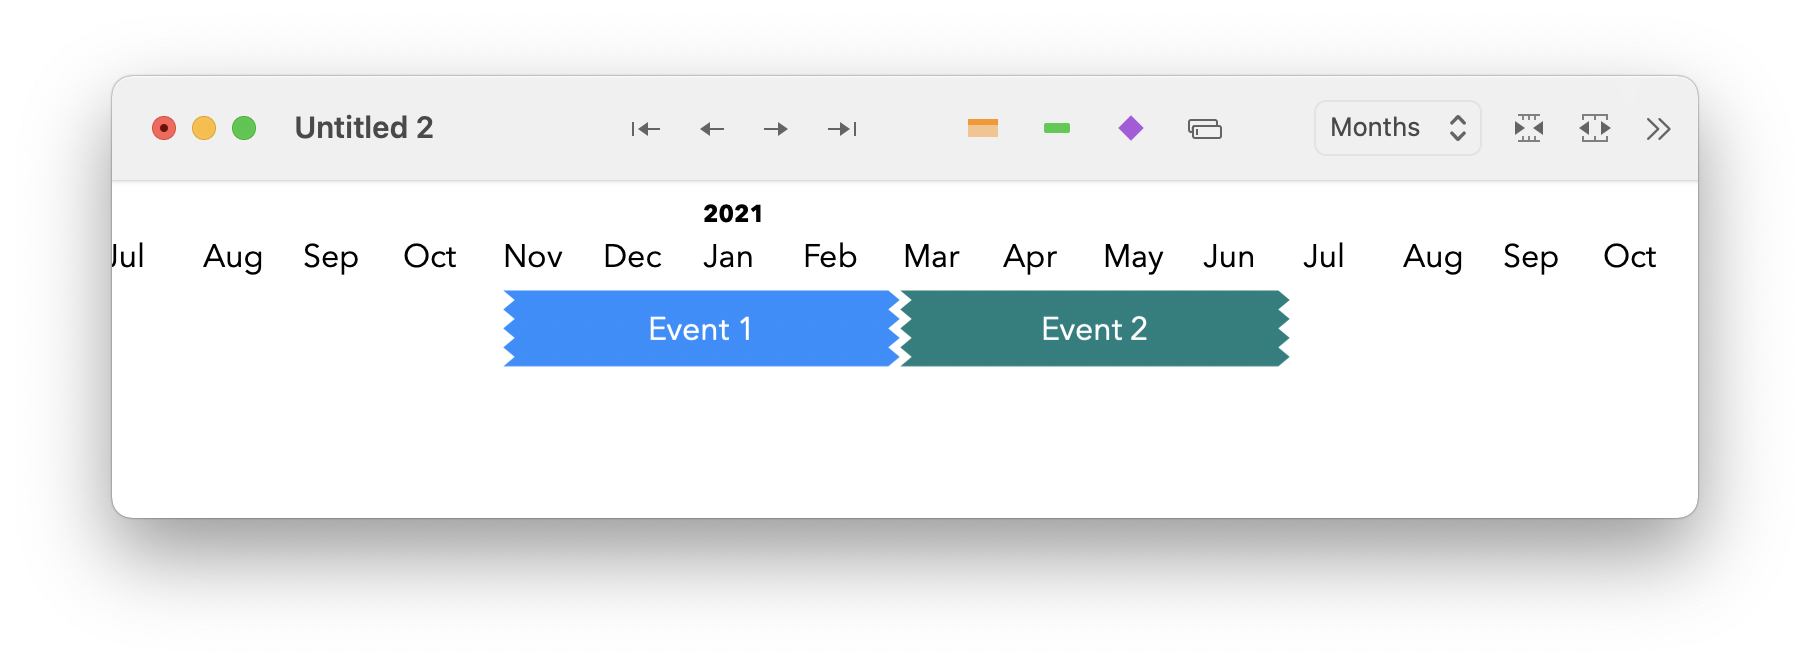
Span events can now be assigned “jagged” right or left ends; if you have two jagged ends next to each other, they fit together.
This release sees a few small improvements to the overall appearance of timelines:
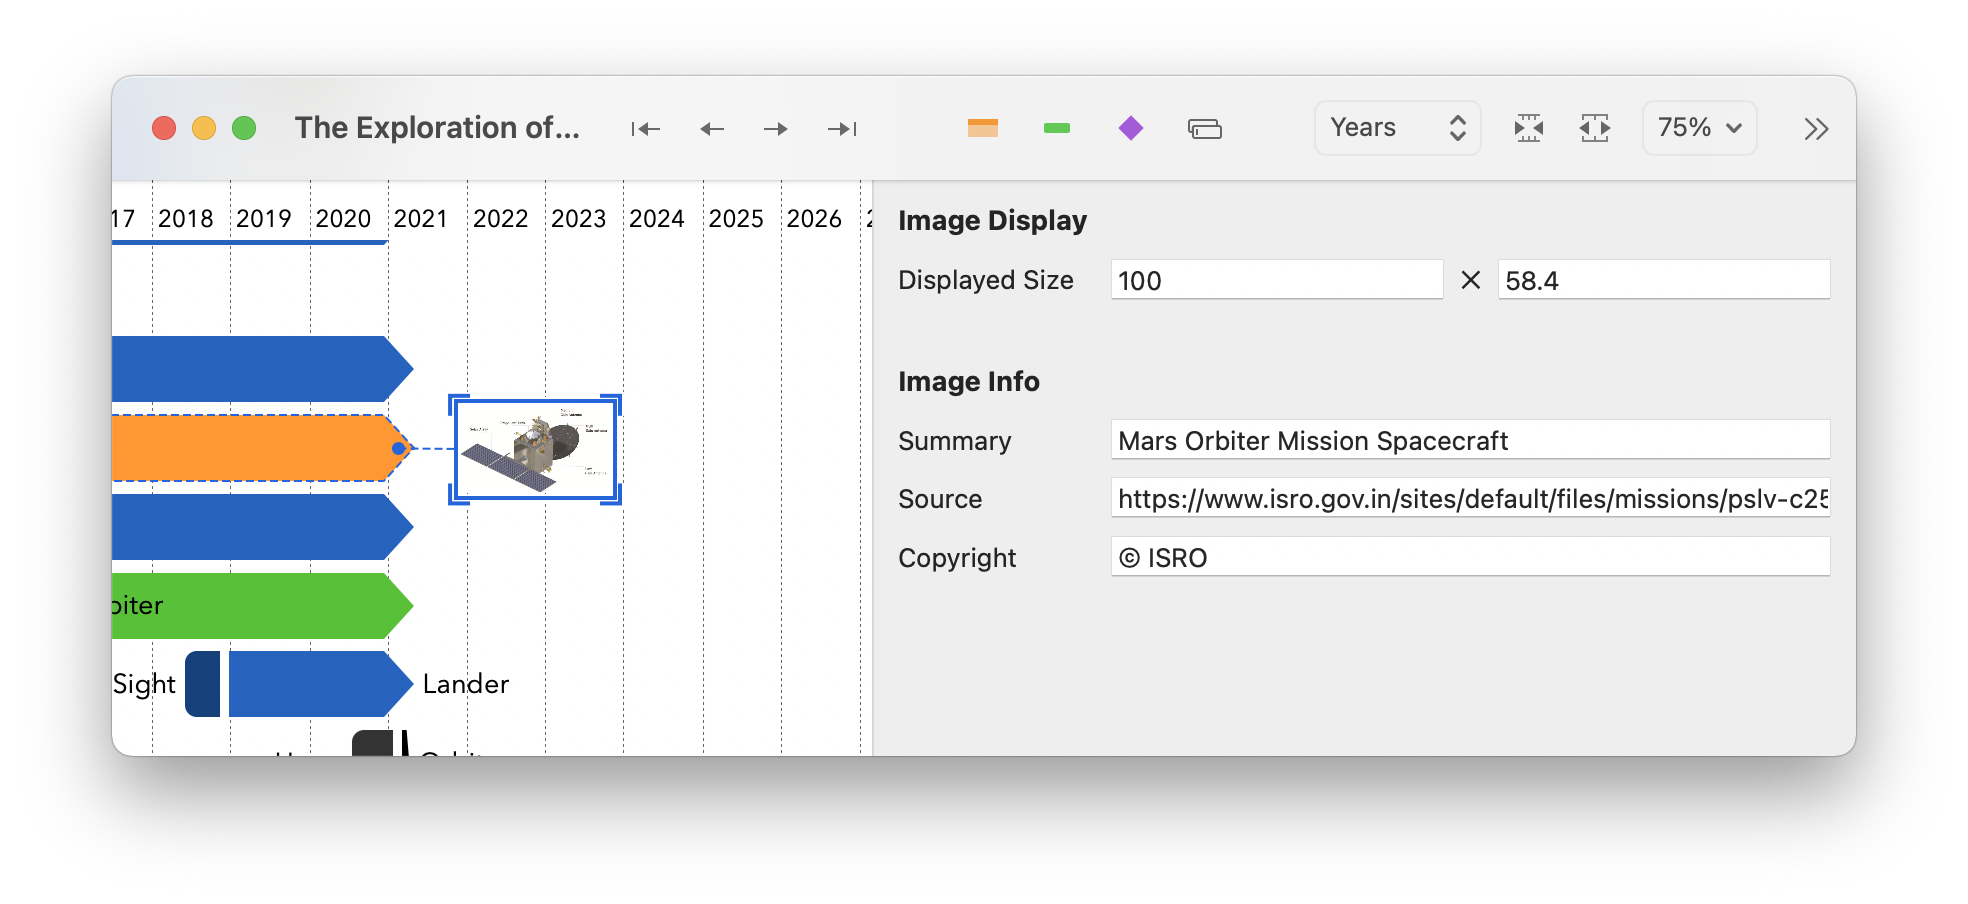
Attached images can now be assigned a text summary (which shows up as a tooltip for the image), and you can now place the source of the image and any copyright info if you’d like. If you paste a complete image from a Web browser, TimeStory will often be able to automatically populate some of these fields.
The Mars exploration timeline has been visually refreshed, but more importantly, has been updated with the successful arrivals in 2021 of the UAE’s Hope orbiter, China’s Tianwen-1 orbiter, and the US’s Perseverence rover!
This document now also uses the new tagging feature to tag each mission by country or agency (e.g., #USA, #ESA, and #India), and uses the new Image Info feature to tell you where each embedded picture came from.
Under Preferences, you can now choose to “Show the Event Details popover when hovering over an event”. This makes it behave like a tooltip: just pause your mouse over any event, and its details will appear; move your mouse away from that popover, and it disappears. (The default is still to require a keypress, like before; I welcome any input from users on this topic!)
In addition:
Finally, 2.4 includes a batch of bug fixes:
Version 2.3.3 is a pure bug fix release. A couple of related bugs were found within the Inspector logic; over time, it could use more and more memory, and typing within an event or section title could get noticeably slower.
This version collects a couple of small features and a few accumulated fixes.
Welcome to TimeStory 2.3.1, updated for the next generation of macOS and Mac hardware! This makes visual changes to sync up with macOS 11 Big Sur, and has been built to run natively on Apple Silicon.
Aside from these changes, there are no other new features or fixes; check out the 2.3 release notes for the latest feature changes and fixes.
With Big Sur’s new design language come new guidelines for Mac icons, bringing them closer in many ways to iOS icon design. New icons are built within (or around) a consistent rounded square shape and shadow, and abandon the classic 9º tilt. TimeStory 2.3.1 adopts these changes, for the first icon refresh since version 1.0.
![]()
With macOS 11, Apple introduced a new unified toolbar style. This puts the document title and the toolbar buttons in a single row across the top of each window, taking up less vertical space. By default, TimeStory now uses this new style on Big Sur; however, you can switch back to the classic layout in Preferences.
(Users of Catalina or Mojave won’t see any toolbar changes.)
When presenting a timeline, you may want to show the visual layout and relative sizes and orderings of events, while omitting specific dates. This can help focus conversations during early planning or while scoping out uncommitted projects.
With version 2.3, simply choose View > Hide All Dates, and TimeStory will remove the time index across the top and any dates automatically added to event titles (if enabled), and won’t even show the date tooltip as you drag or resize events. (If you enabled vertical gridlines, you still have those to help you visualize weeks, months, or however you set them up.) The dates still exist—every event is saved in the document with a concrete date—they just aren’t visible.
Press and hold the space bar to enable the panning tool. The mouse pointer will become a hand; click anywhere on the document to grab it and drag the document around. This can be quicker and easier than using the scroller controls, gestures, or arrow keys.
(In the above video, you can see when the spacebar was pressed and released by when the mouse pointer turned into a hand and then reverted.)
If you maintain timelines with many parallel sections, and use the Event Filter to filter down your document, there’s a new syntax that lets you filter down to specific sections, or to sections whose names match a given term. Combine this with the other filtering options, like event titles, event dates, and Boolean operators, to quickly zoom in and see just what you want.
Have a look at the filtering help in the updated User Guide for full documentation on this feature.
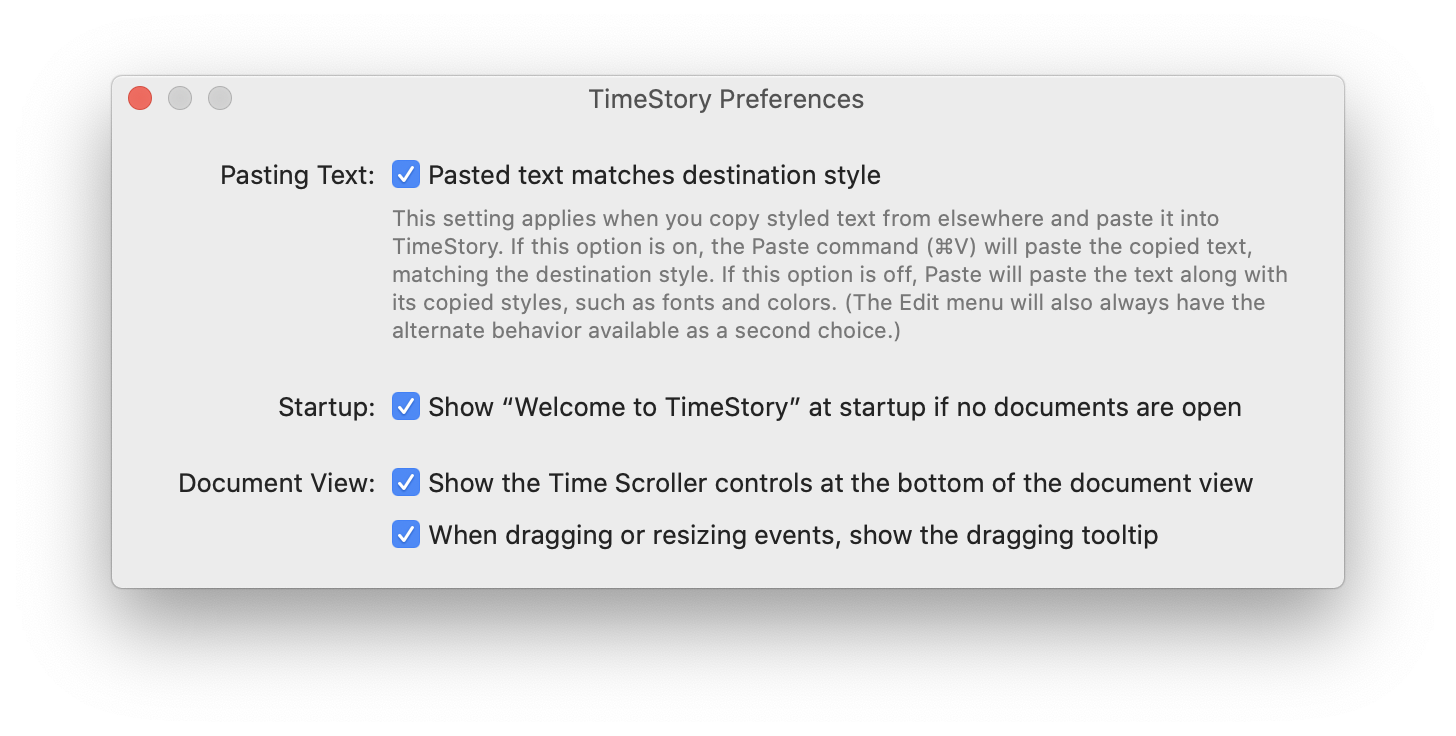
When pasting text into TimeStory, it will now by default just paste in that text, not any fonts or colors copied from the origin.
This operation used to require choosing Paste and Match Style; it’s now the default behavior for plain old Paste. If you want to keep the copied styling, just choose the new command Paste and Keep Style.
If you prefer it the old way, however, the new Preferences dialog offers an option to switch it back. This new Preferences feature also collects and exposes a couple of other settings.
This is a minor change, but one requested several times: you can now adjust the Today highlight line’s width. This is especially useful to increase visibility when presenting documents on screen, or when using a light highlight color with vertical gridlines enabld.
Extending the subsection support introduced in 2.2, you can now select one or more sections and group them together, making them subsections of a new, higher-level section.
This new feature makes it much easier to restructure existing section layouts, or to start using subsections in existing documents. See Working with Sections in the 2.3 User Guide for more details.
Right after the release of 2.2, a few problems were discovered and fixed immediately in 2.2.1:
Version 2.2 introduces a new document layout option: the ability to put section headers in a column on the left of the document.
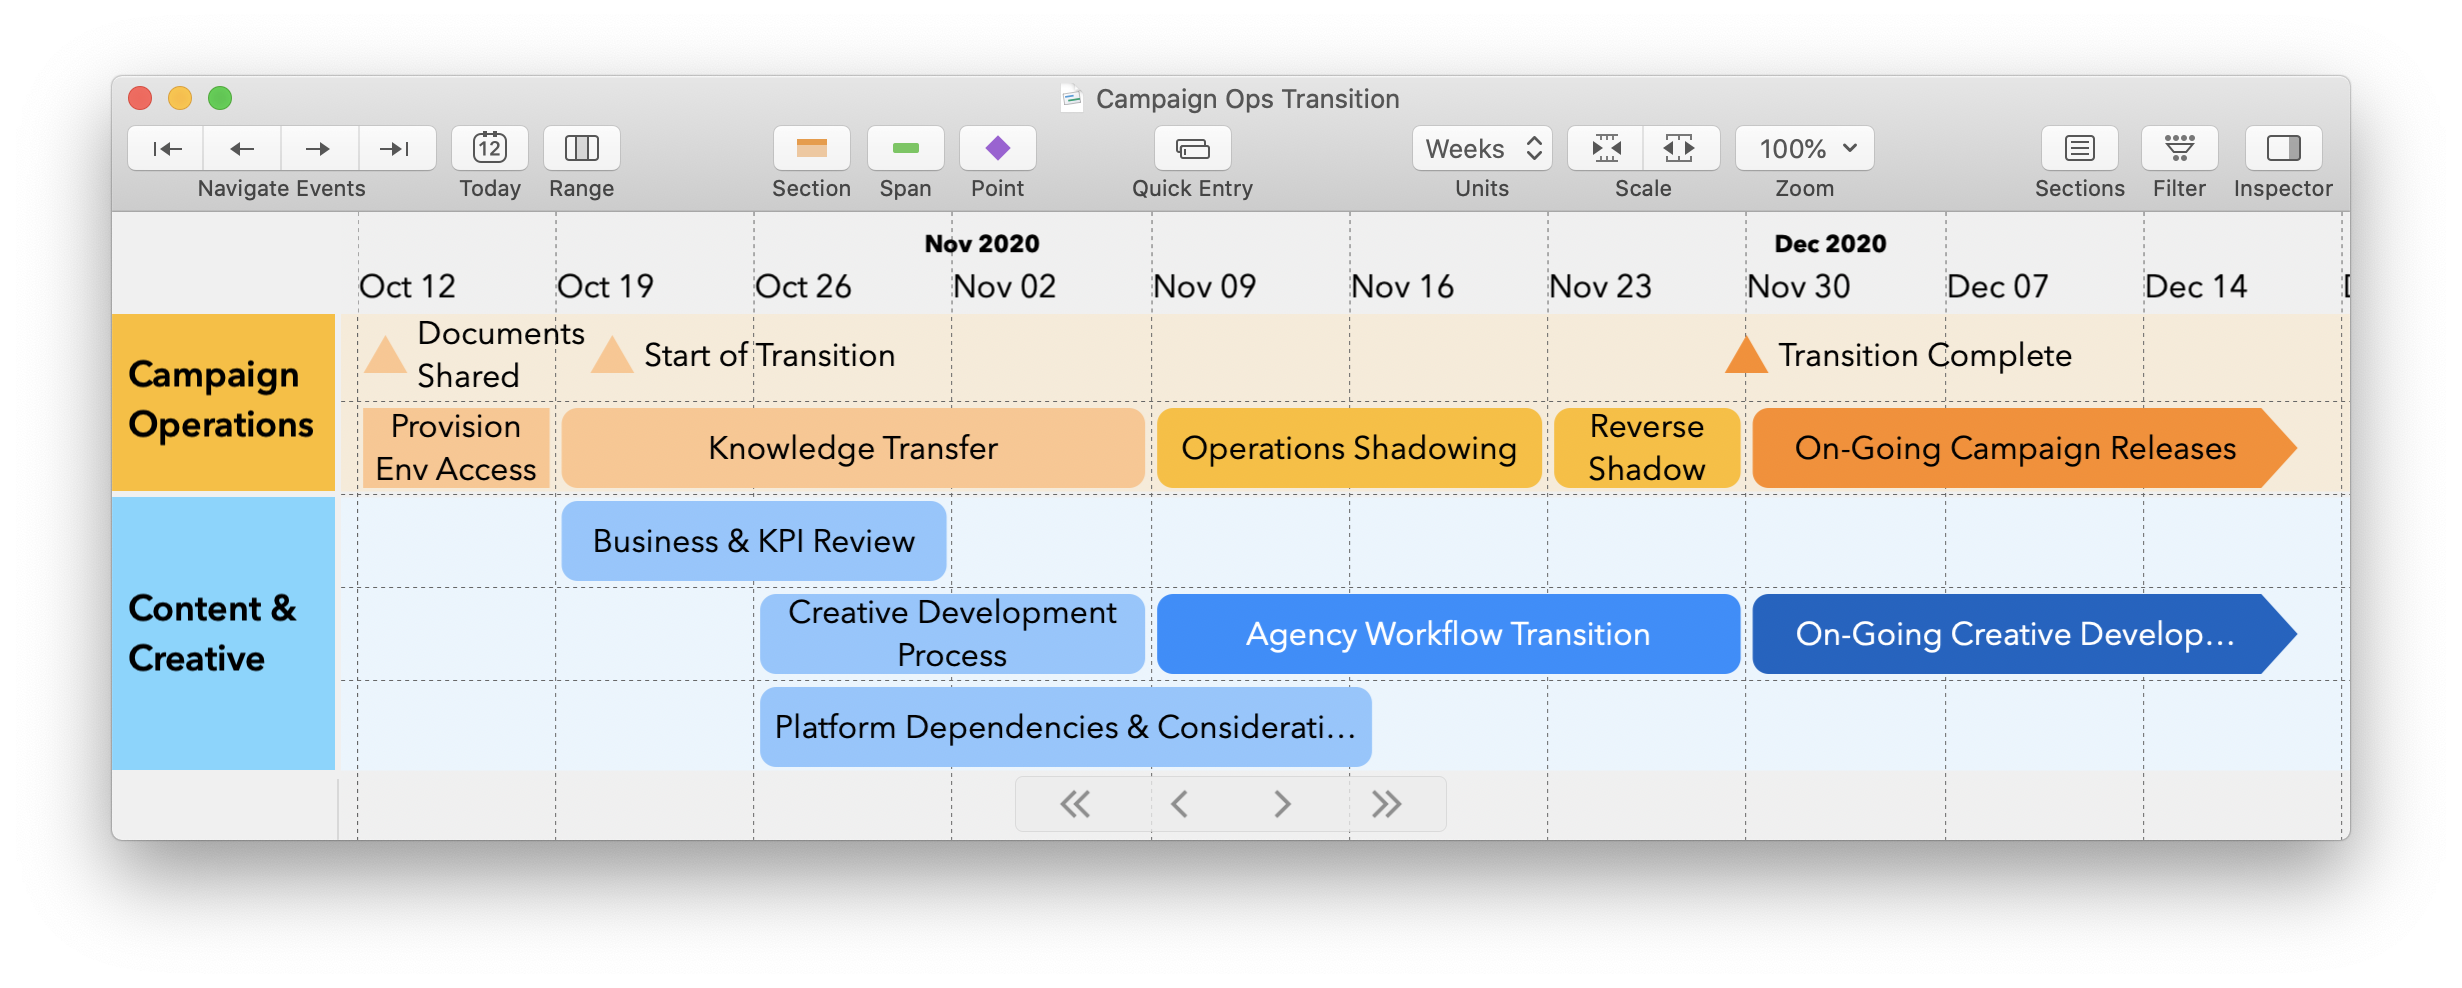
You can now put section headers on the left side of the document view, in a resizeable column. This looks great for a compact, clean presentation of parallel tracks. Switch between this view and the classic “headers on top” view freely, by changing one setting in the Document Inspector.
For more complex timelines, this left-side view also allows subsections:
(Note: These two styles aren’t exactly the same; only above-section headers can be collapsed, and only left-side headers can have subsections.)
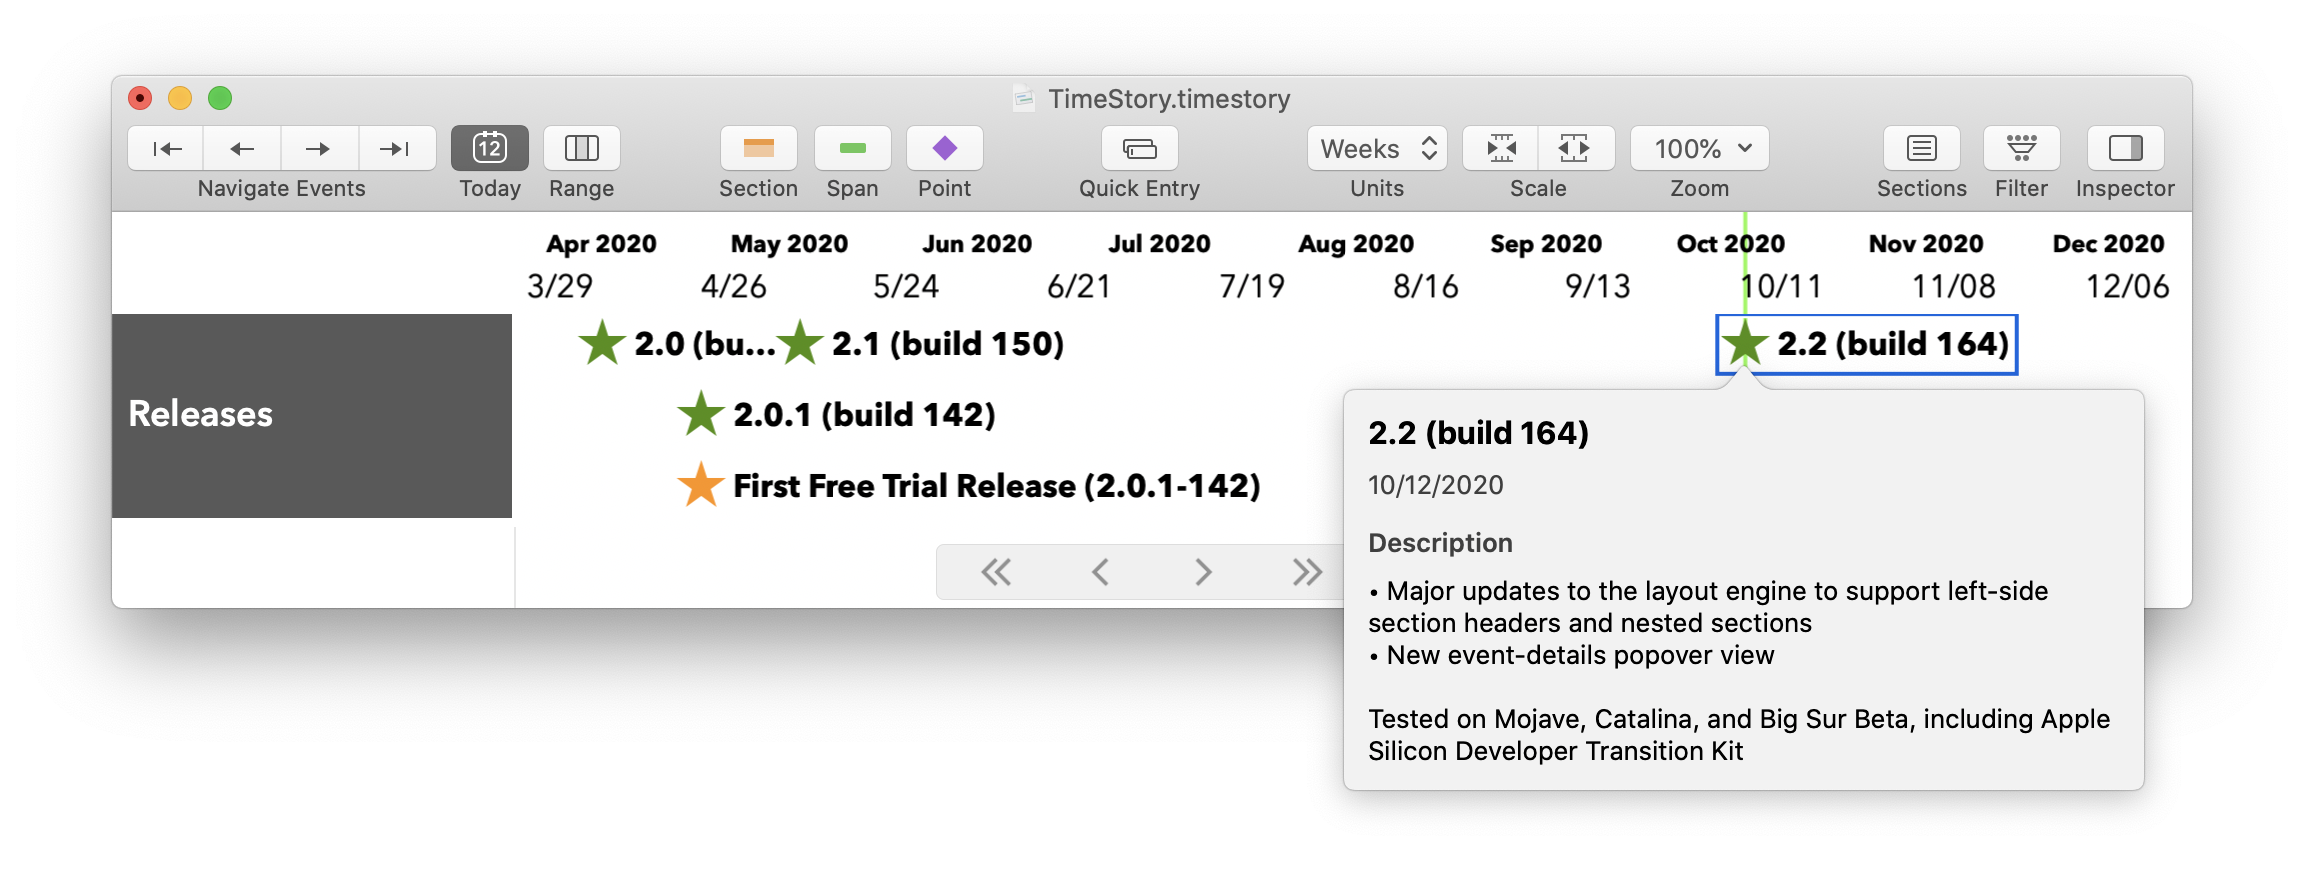
Putting lots of content in your event description fields? Have a busy timeline with lots of events next to each other, making dates or titles hard to pick out? Now you can just select any event, press the ? key (or choose Events > Details from the menu), and get a quick pop-over view of title, dates, and descriptions.
A release in progress for so long will pick up quite a few small refinements as it goes. Here are the ones worth noting:
Updated the Exploration of Mars timeline to include the exciting new programs launched in 2020 by the United Arab Emirates, China, and the United States.
Version 2.1 brings new features, some customer-requested, along with other improvements and fixes, on top of 2.0’s foundation.
You can now have an event’s date or date range displayed along with its title. This optional feature can be enabled and configured per event.
Full details can be found in the TimeStory 2.1 User Guide under Working with Events.
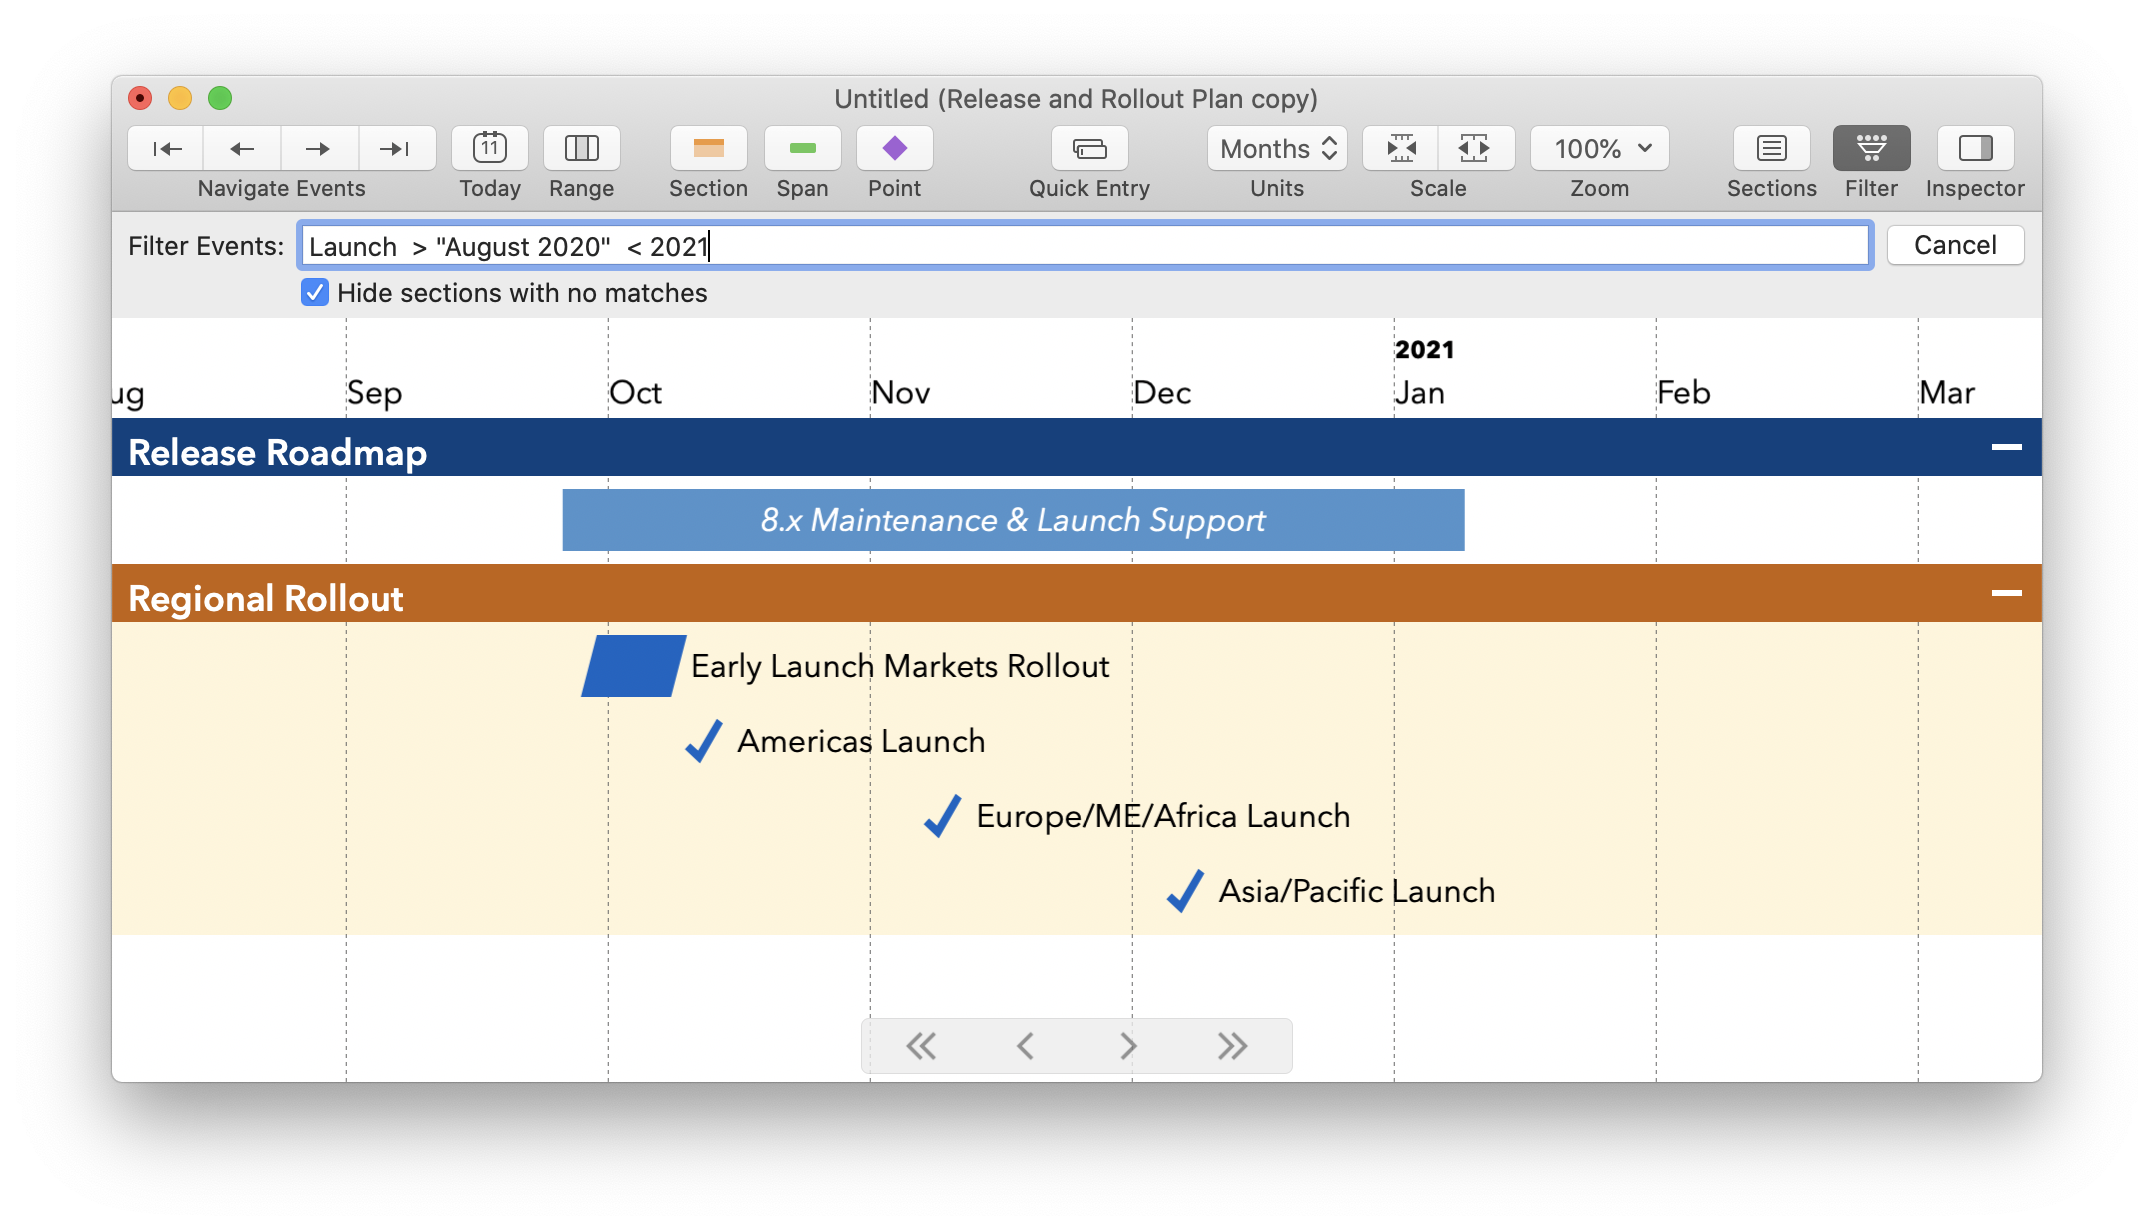
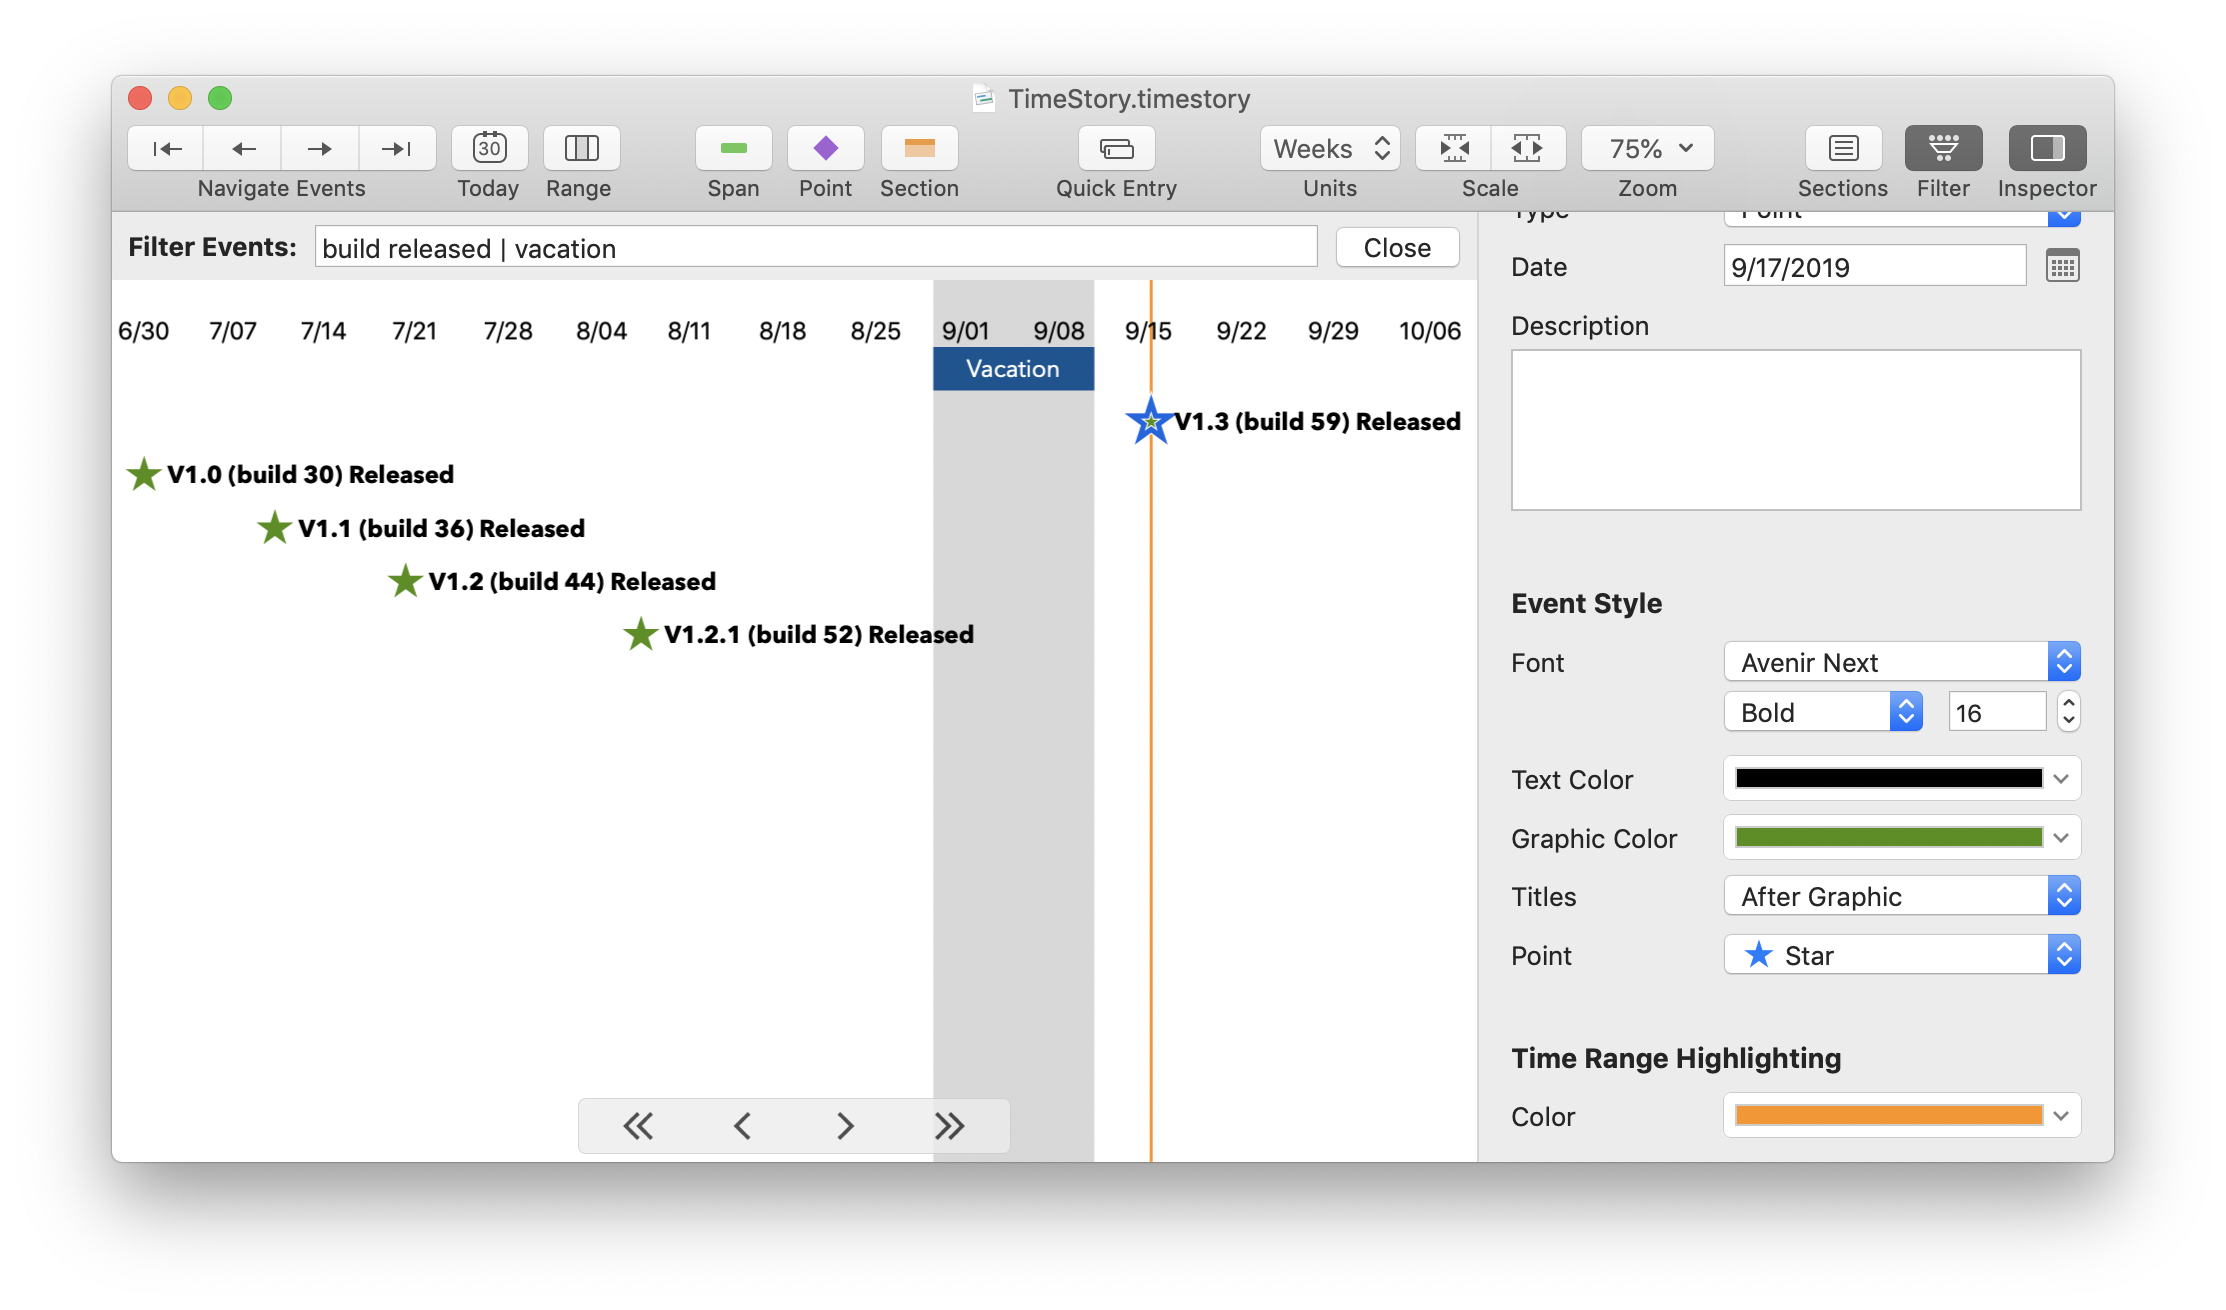
Have a large document containing old, completed events, or events from time ranges you don’t want to see all the time? The Filter Events feature now supports filtering events which have ended by a given date, which haven’t begun by a given date, or any combination of those (and other filters).
Have a large document with many sections? The Event Filter now, by default, hides any sections which don’t contain any matching events, collapsing the timeline to make it easier to spot and navigate the events of interest.
Have a filter you want to leave on all the time? Now, when you save a document with an active filter, that filter is saved too, and re-applied when you later open it again.
Full details can be found in the TimeStory 2.1 User Guide under Filtering.
TimeStory now preserves and restores the window position and size for any document you close and later reopen, using the standard Mac window restoration system. (Version 2.0 fixed window restoration when quitting and restarting the app, but did not handle regular closing and re-opening.)
As discussed on the blog, version 2.1 removes support for macOS High Sierra. If you are still running High Sierra, as of this writing, your newest TimeStory version will remain 2.0.1; however, you can still get support if needed.
Version 2.0.1 contains fixes only for users of macOS 10.13 High Sierra. Catalina or Mojave users should see no differences at all with 2.0.1.
On High Sierra, there were some display problems, fixed in this release:
(This will most likely be the final new version for High Sierra users. If you are still using that version of macOS, version 2.0.1 should continue to work for you, but future versions will soon no longer support that operating system.)
(As I write this, our world is in the midst of the COVID-19 crisis. I'm happy to be able to release this new version, and I hope you will find it enjoyable and useful. But as I do so, I am mindful of what's actually important right now. Please take care of yourself, and of others.)
TimeStory 2.0 is here! The version increment from 1.x to 2.x signifies some key updates, as well as the beginning of a 2.x journey with some great plans in store. But, as always, the focus remains on simplicity—on the ability to capture your events with a minimum of ceremony and complexity, and refine and grow from there. Read on for the full details!
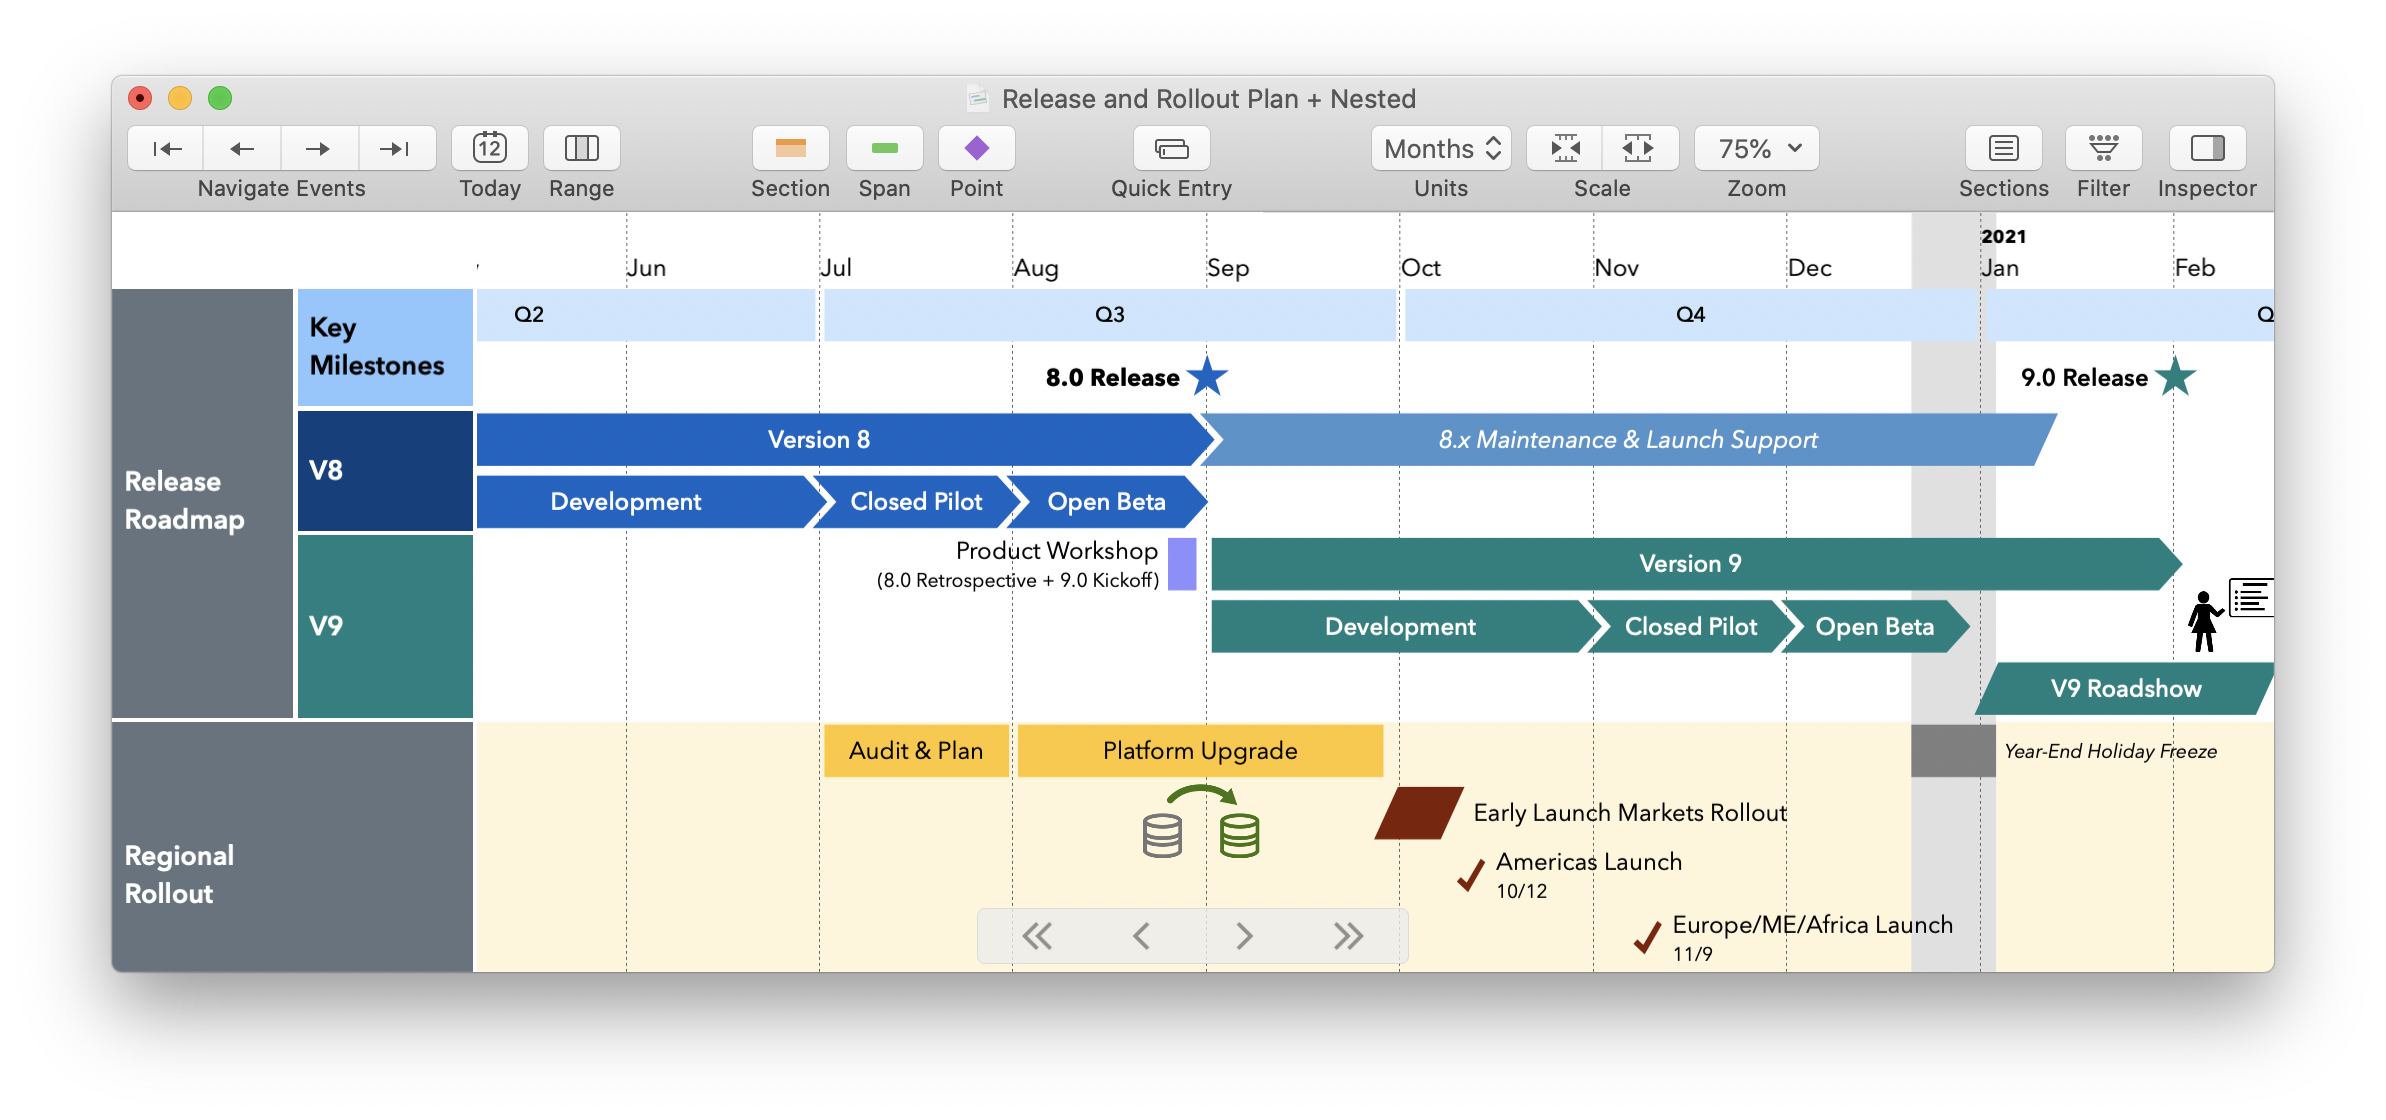
You can now illustrate your timelines with photos or other images, directly pasting or importing them into your TimeStory documents!
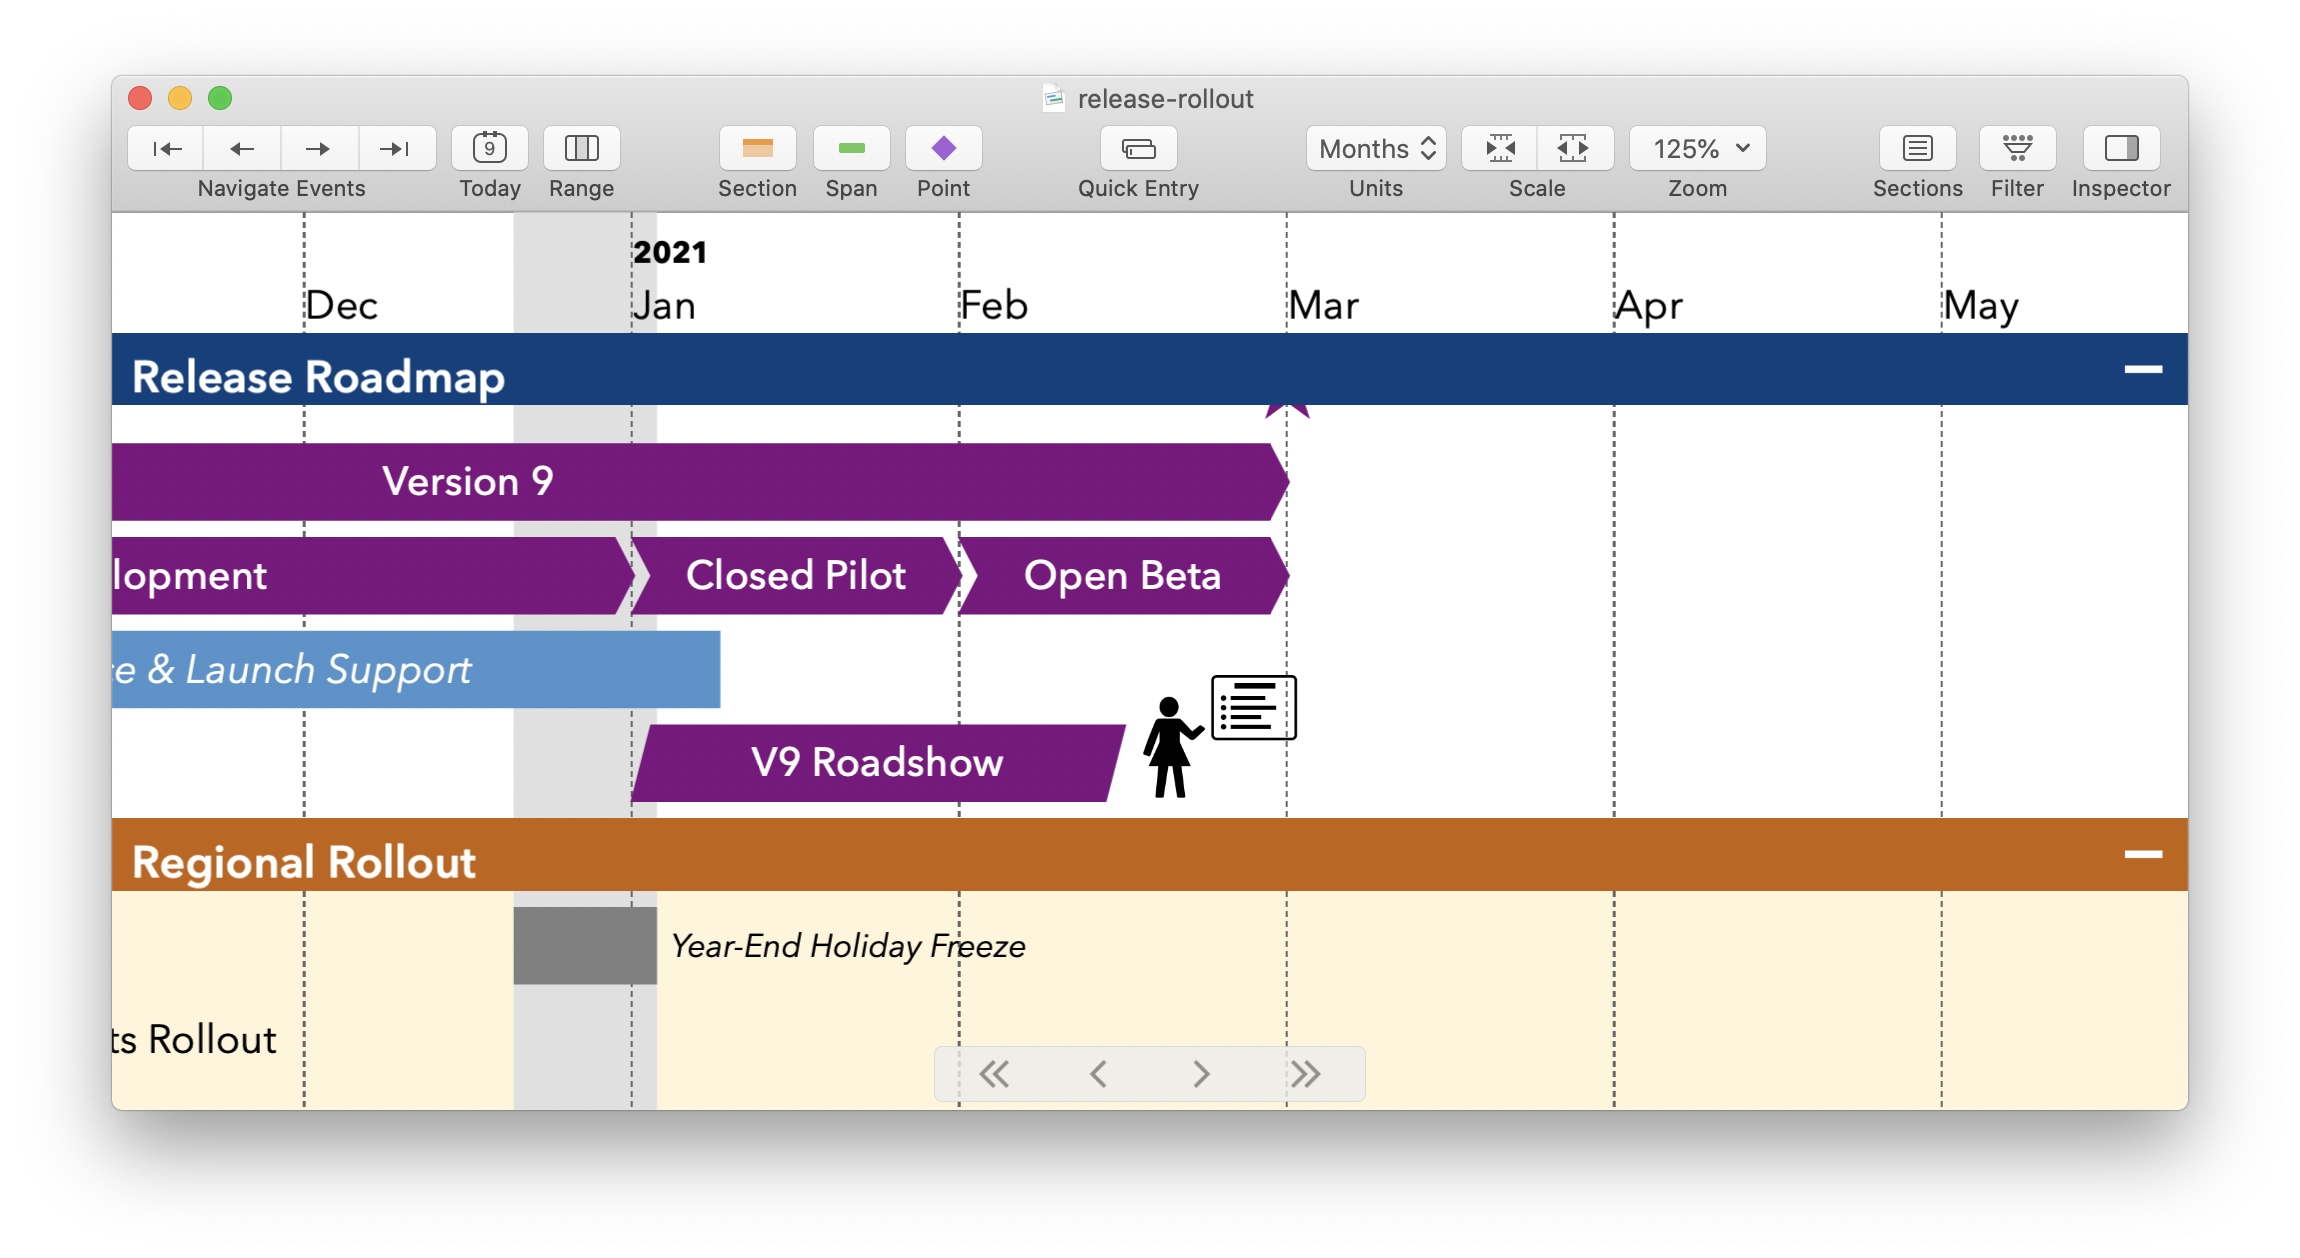
Images are positioned relative to events, and manipulated using direct drag and drop operations. (That presenter icon is one I drew elsewhere and pasted in; you’ll find it in the Example Document titled “Release and Rollout Plan”.)
When moving events or dates around with your mouse (or with the arrow keys), you can now freely pick any day, even when viewing your timelines in a week, month, or year view. (The start and end of each month, week, or year still act as guides, and your mouse will “snap” to them if it gets close, unless you hold the Command key).
The little date tips that show up as you drag have also been improved, including showing up even when you use the arrow keys, and the included User Guide now provides a full breakdown of dragging actions from the mouse and keyboard.
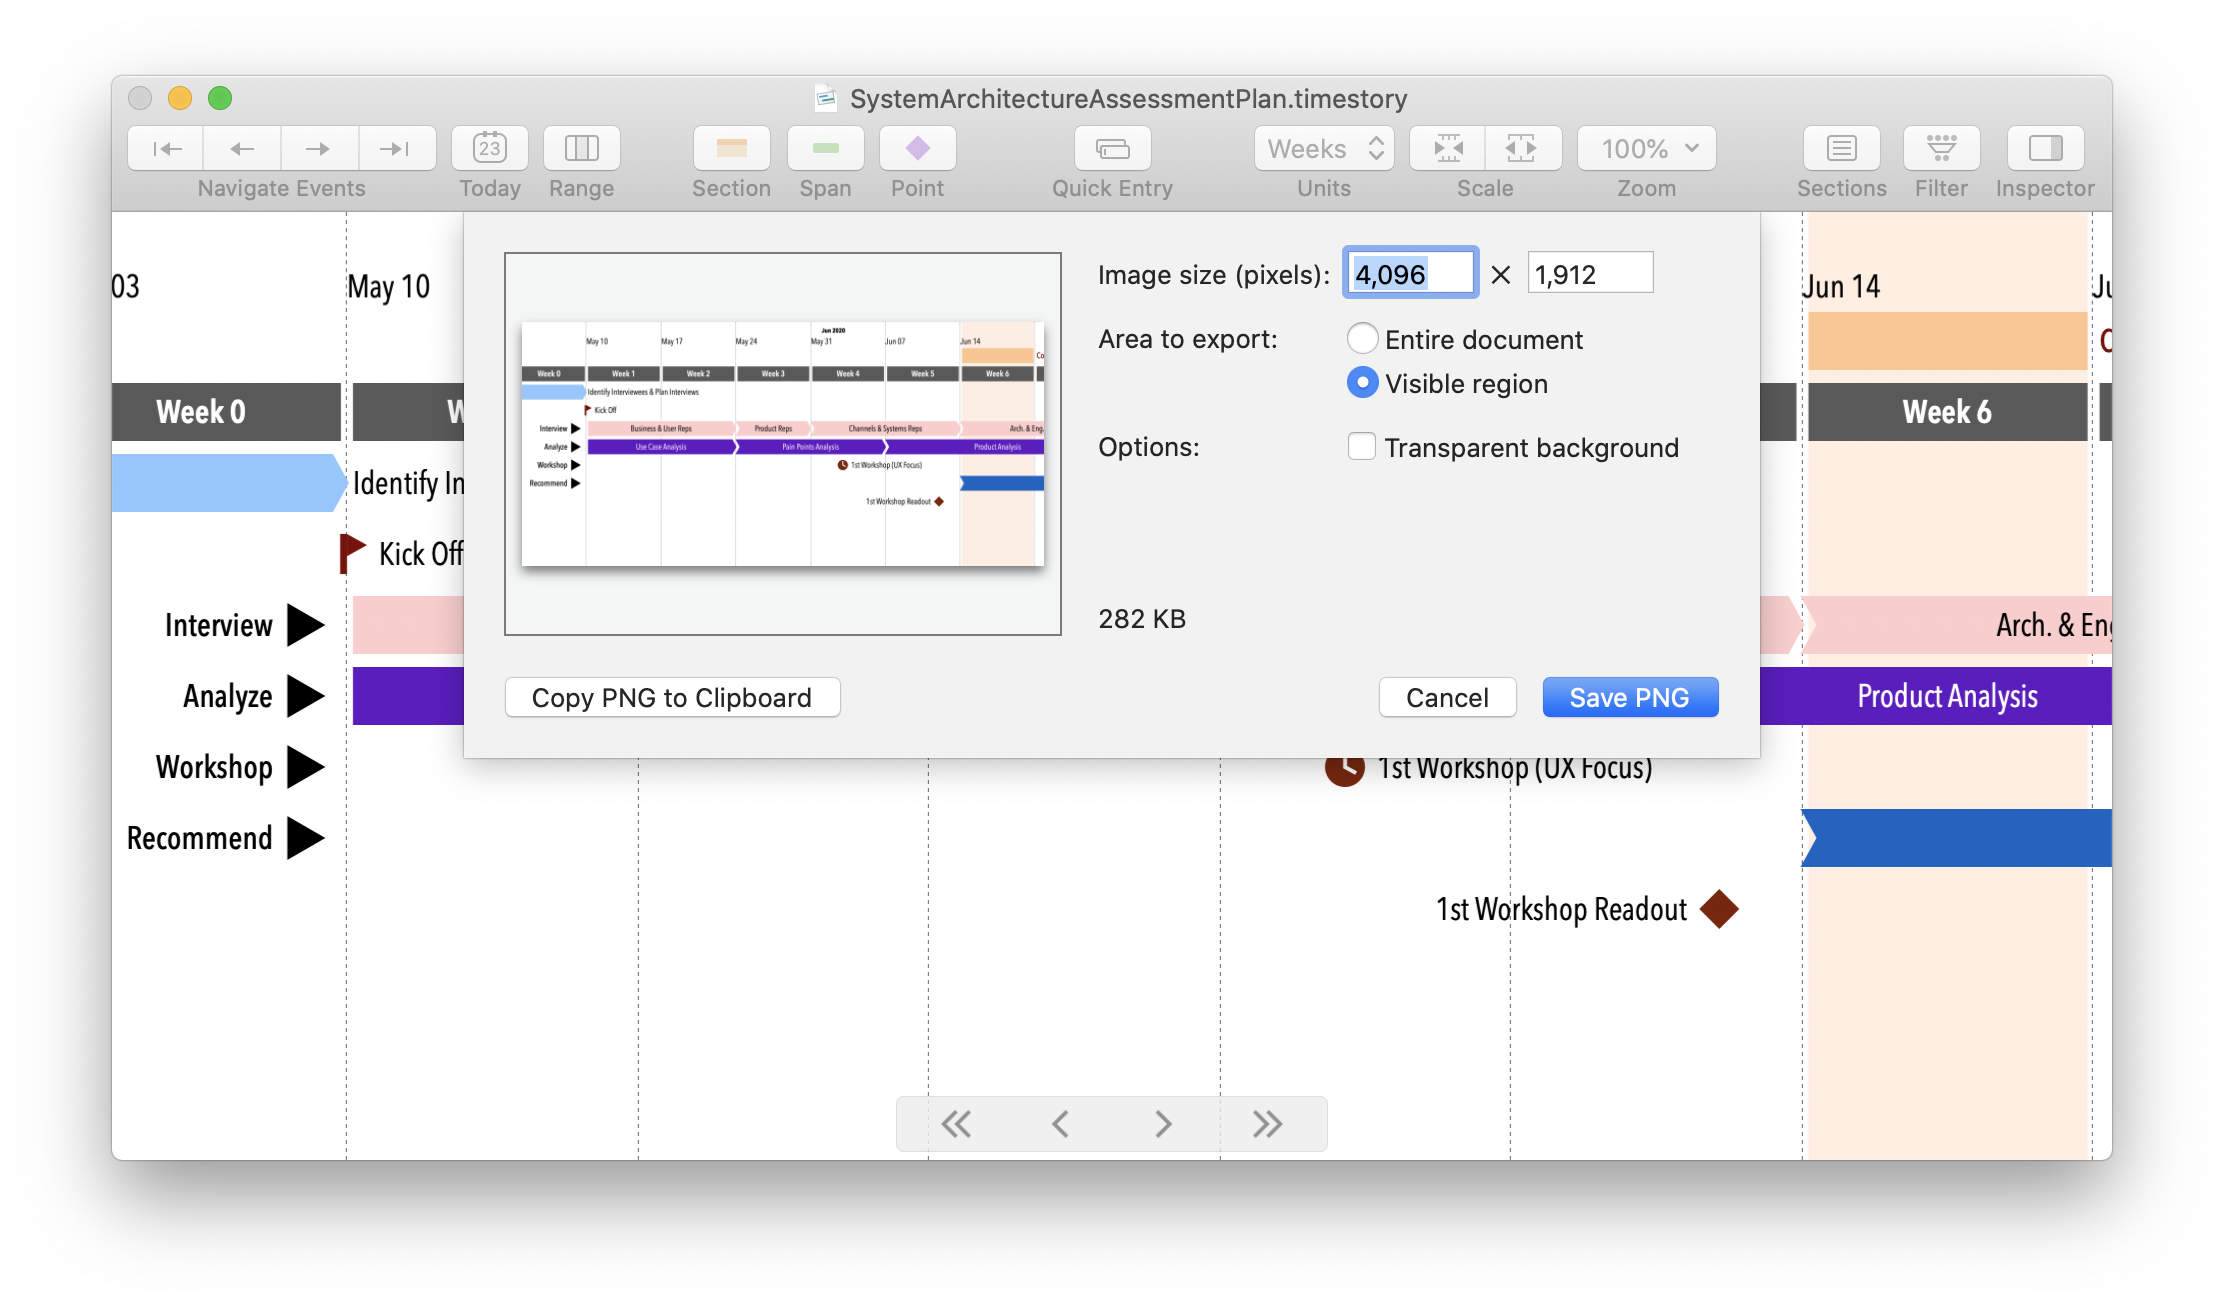
Often you’ll have a large timeline, but want to capture only a fixed part of it for presentation or sharing. When doing an image export (Export to PNG), it’s now possible to request just the visible area in the window, saving you the trouble of cropping the image or making a screenshot.
Event titles can now contain line breaks, so that you can put more details into the visible parts of your documents.
(As always, TimeStory will cut off text as needed to avoid overlapping other events, other text areas, or section headers.)
You can now choose the font used to draw date labels across the top of your document. TimeStory will use variations on this font by size and weight automatically to add other context as needed.
(Event and section title fonts were already configurable. Previously, however, this date-label area across the top was always drawn using your Mac’s system font; if you have existing documents from before 2.0, when you first open them in 2.0, they will be assigned the new default font.)
Throughout the 1.x series, TimeStory continued to use the menu layout set up in 1.0. As its capabilities grew, this buried several important tools for event and section management down inside the Edit and View menus. The menus were reorganized in 2.0 for clarity and discoverability.
This version contains a few accumulated bug fixes and improvements, and no major new features.
Please see the version 1.7 release notes for the recent feature changes prior to this fix release.
1.7 adds several new shapes and symbols to mark points in time, to liven up and bring more meaning to your documents.

Now, add direct links to Web resources (or to anything with a URL) to provide more context and documentation to your timelines. Any region of text can be turned into a custom link, in section headings, event titles, and description fields.

On macOS Catalina, when browsing TimeStory documents in Finder, you now get a graphical thumbnail showing part or all of your document, instead of just a document icon. (Mojave and High Sierra users will still see the same icon as before; this feature depends on new capabilities in Catalina.)

(That’s Finder, not TimeStory.)
This is a refinement release, with a handful of minor features and bug fixes, and some internal work in preparation for exciting upcoming features.

To show an ongoing or current event, you can now set an event’s end date to “today”, and ask TimeStory to keep it updated as today’s date changes. You can also create a point-in-time event which tracks today’s date.
Just type =today into the Inspector for the corresponding date field. TimeStory will follow the date, updating your document around midnight or whenever you next open it.

If you have a trackpad, you can now use the two-finger “pinch” or “expand” gesture to smoothly adjust the time scale up or down.
(The existing methods, using the toolbar buttons or the menu, still work as before.)
Select “Automatic” as the color of an event title or section title, and TimeStory will automatically select black or white based on the background it’s being presented over. This takes into account your document background, your section background, the graphic color, and where your title is positioned.
This lets you choose your background and graphic colors more freely, and be assured that you can read your title text regardless of position.
Automatic is now the default. If you need to achieve a specific color for an event or section, you can still always pick specific colors, as always.
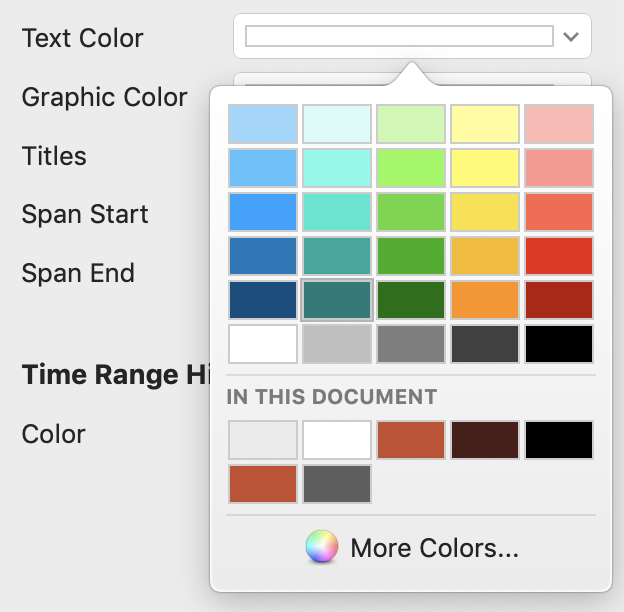
The color picker has been extended, with a broader and more useful set of default colors, and with a visible selection of the current color, if any. (It also introduces Automatic for all text colors, as noted above.)
The default theme for new documents has been refreshed, offering a cleaner and more contrasting look, and taking advantage of automatic text colors. The new default theme is visible above in the color picker screenshot.
(Existing documents will retain their current appearance. If you’d like to update an existing document to the new defaults, you can choose Style > Revert to Default Document Theme from the main menu.)
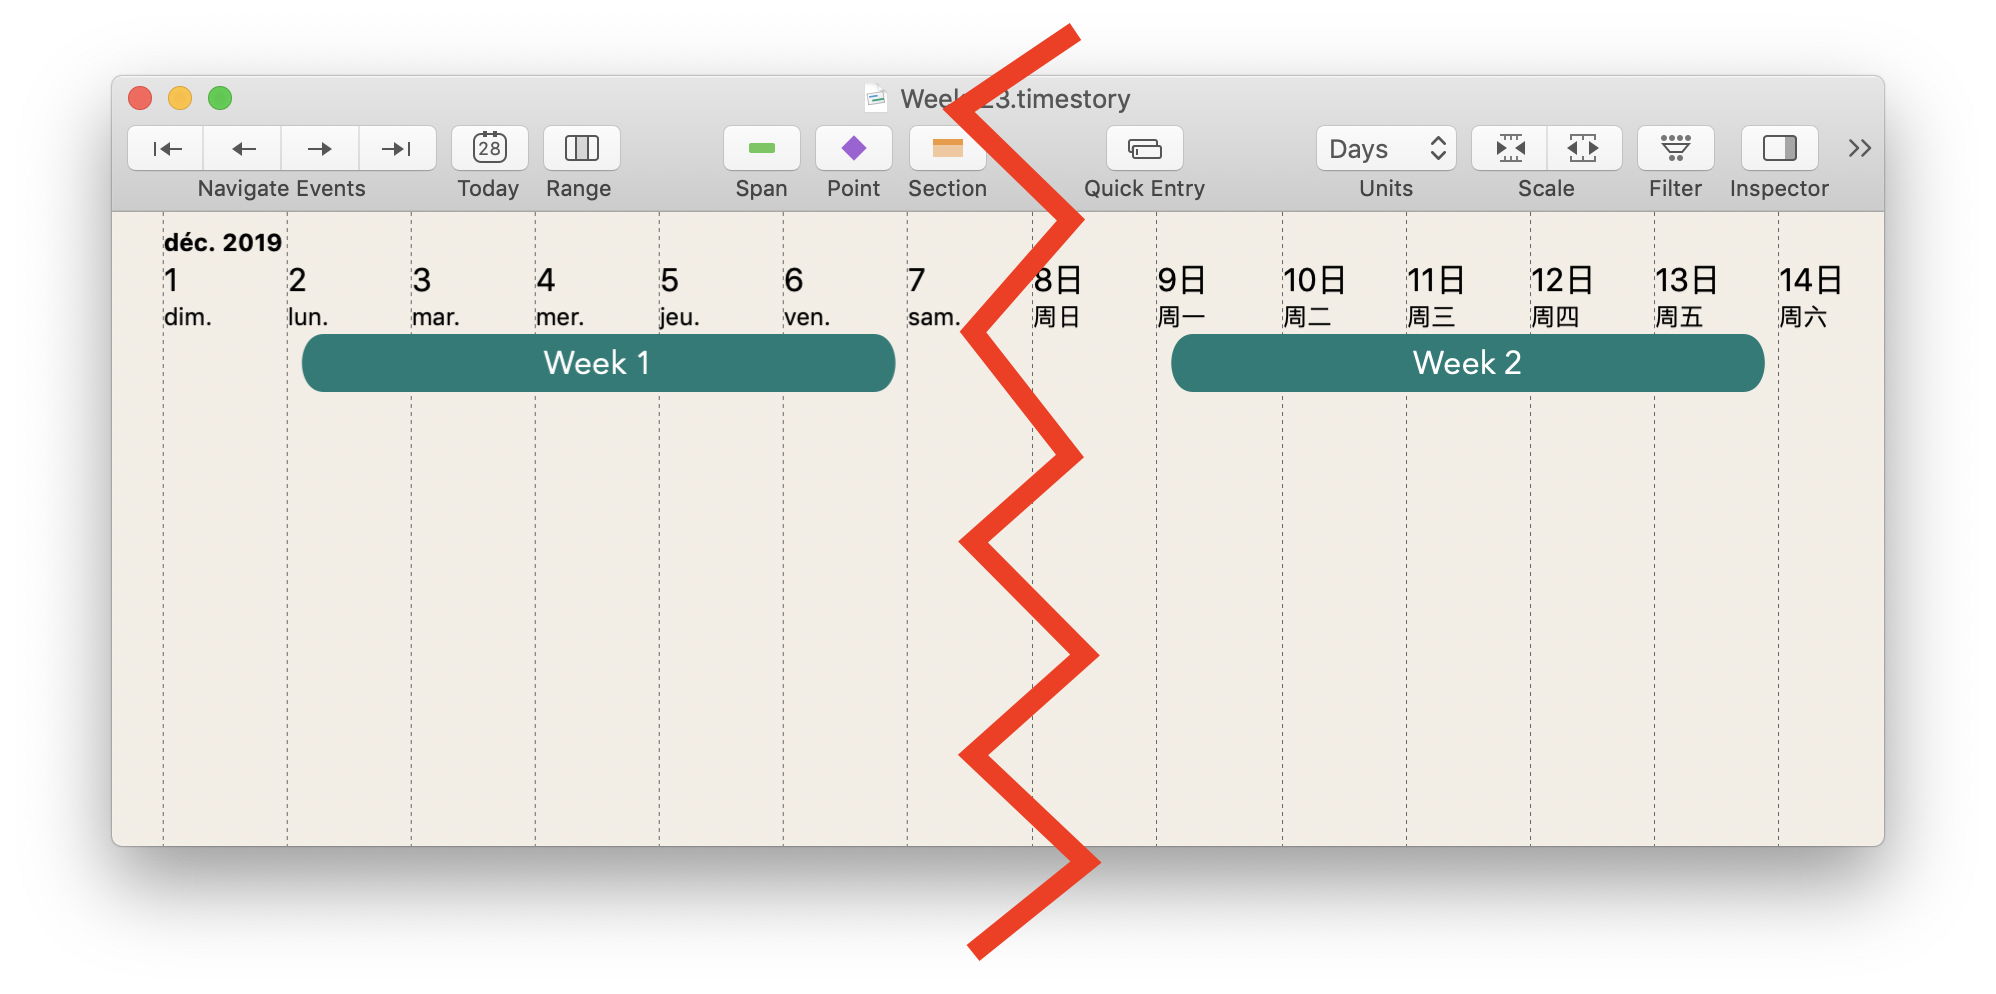
TimeStory now uses your system’s language for all date labels, including weekday names and month names. The rules for abbreviating date labels have also been made a little more consistent, and the week view now includes month names for context.
(The following image was assembled from two screenshots, taken with different system language settings.)
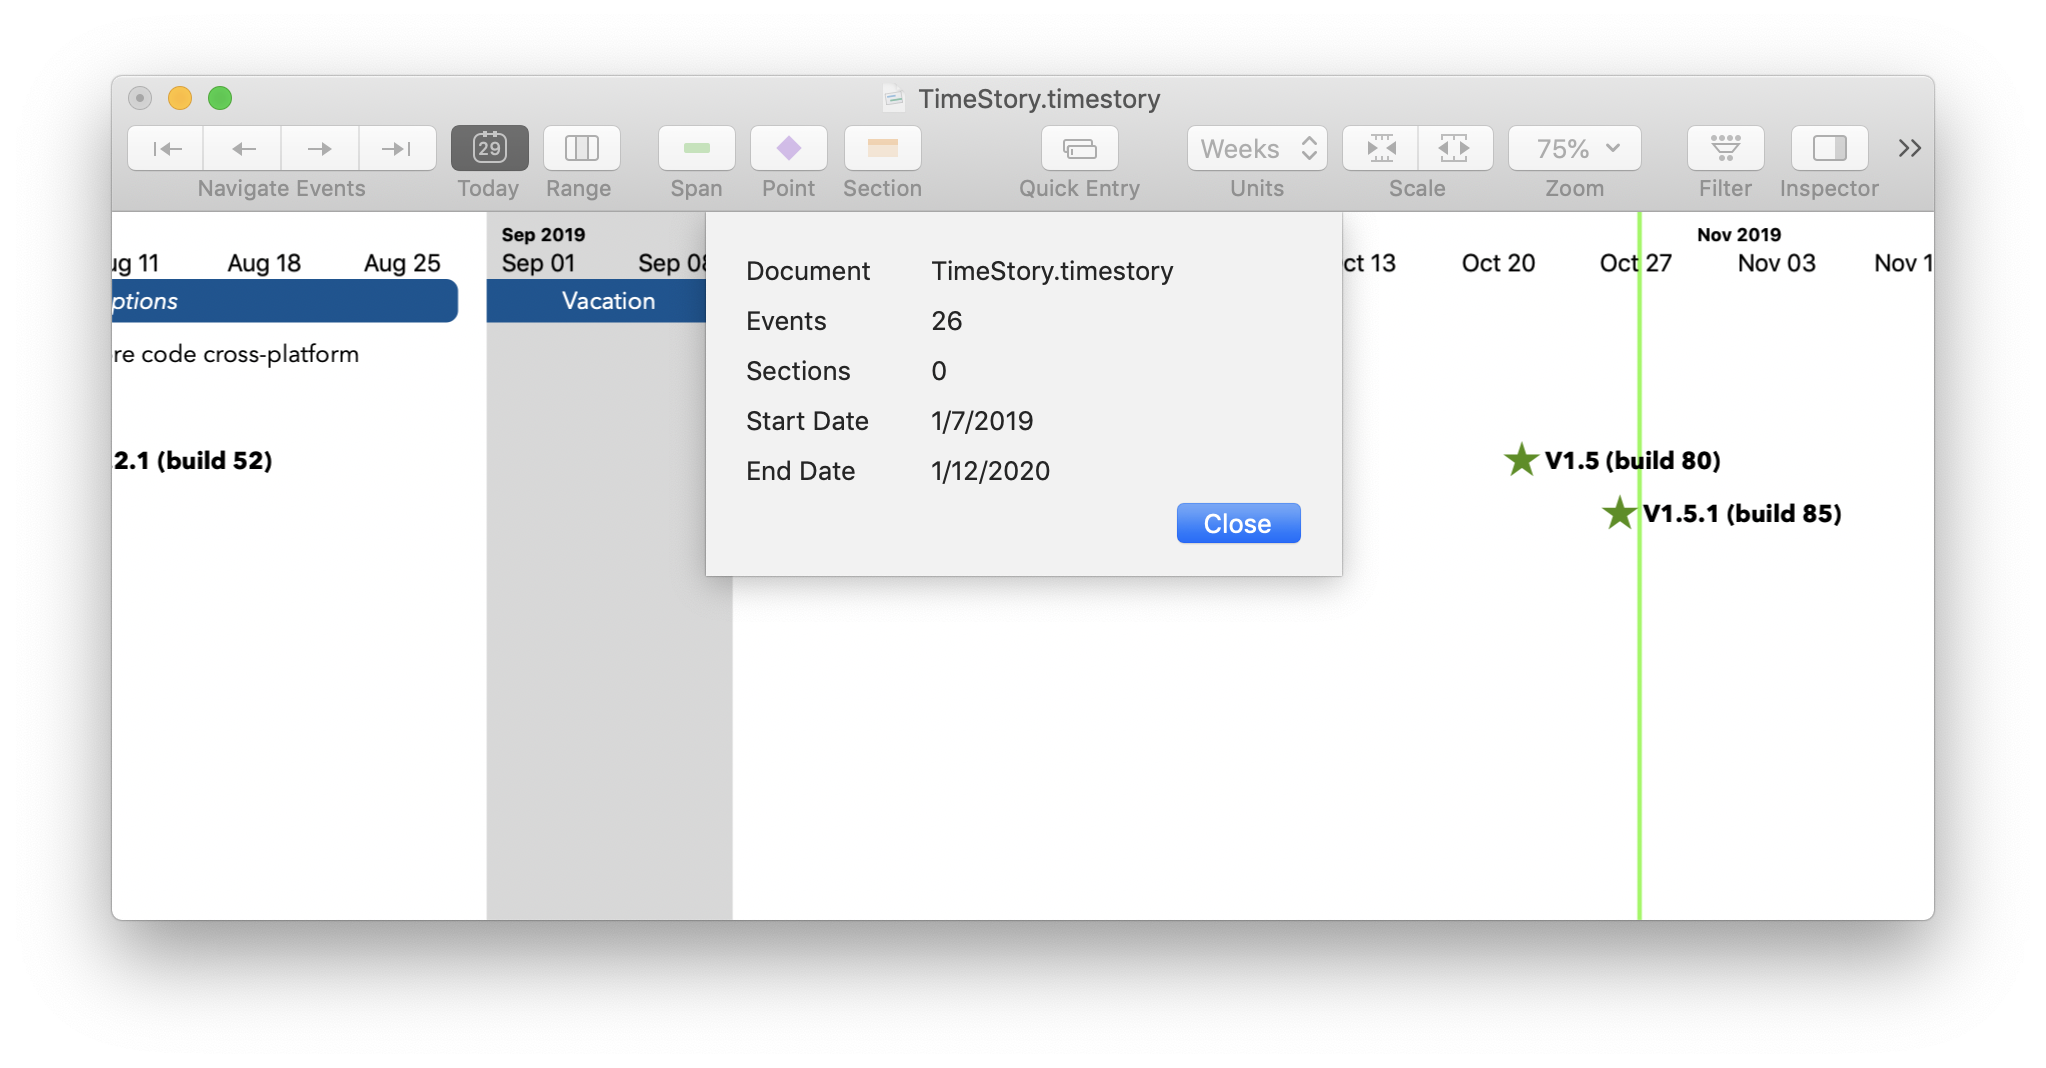
You can now use File > Summary to get a quick summary of the size of your document. This includes the total date range, from earliest date to latest date, as well as the counts of events and sections.
Create a sense of direction and flow across your timeline by selecting inward-pointing side shapes, which complement the existing outward-pointing arrow-style shapes.
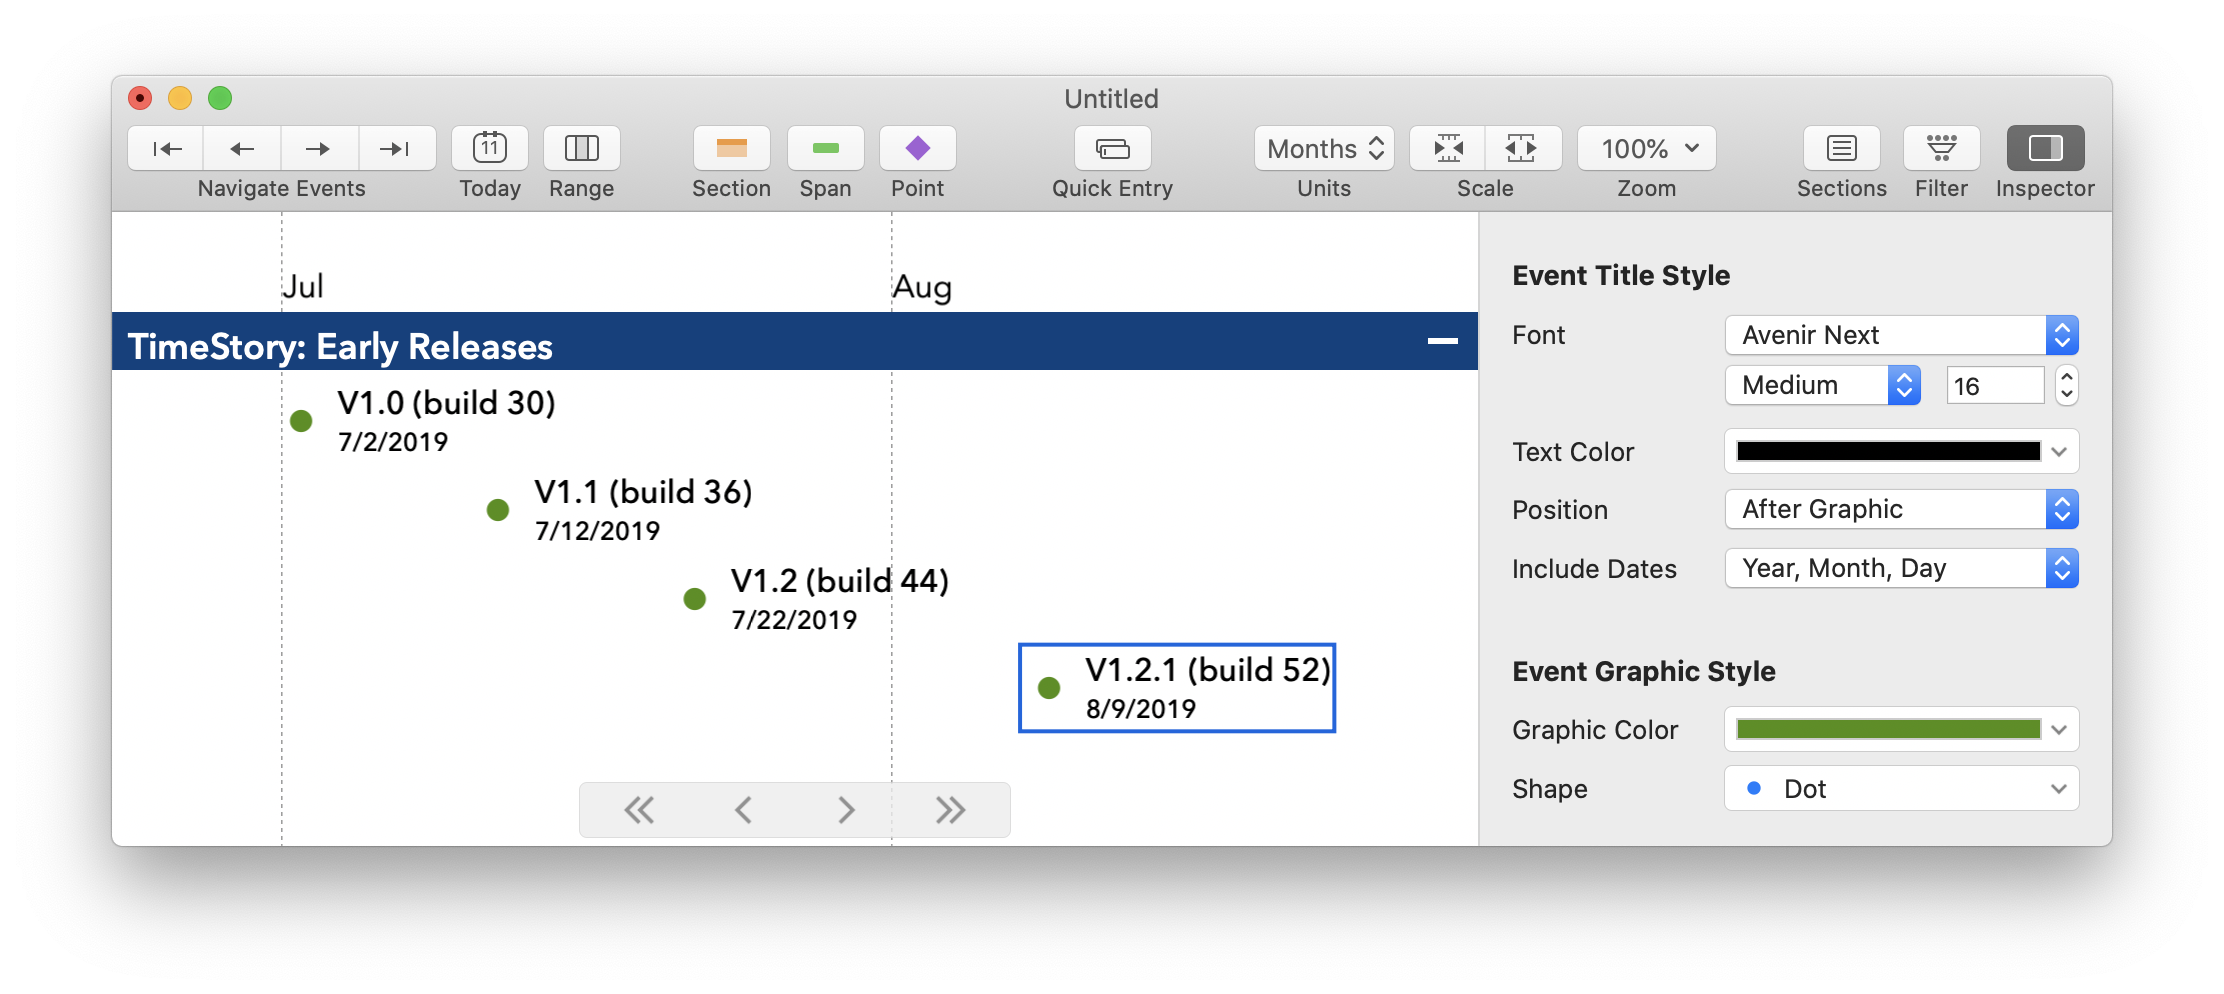
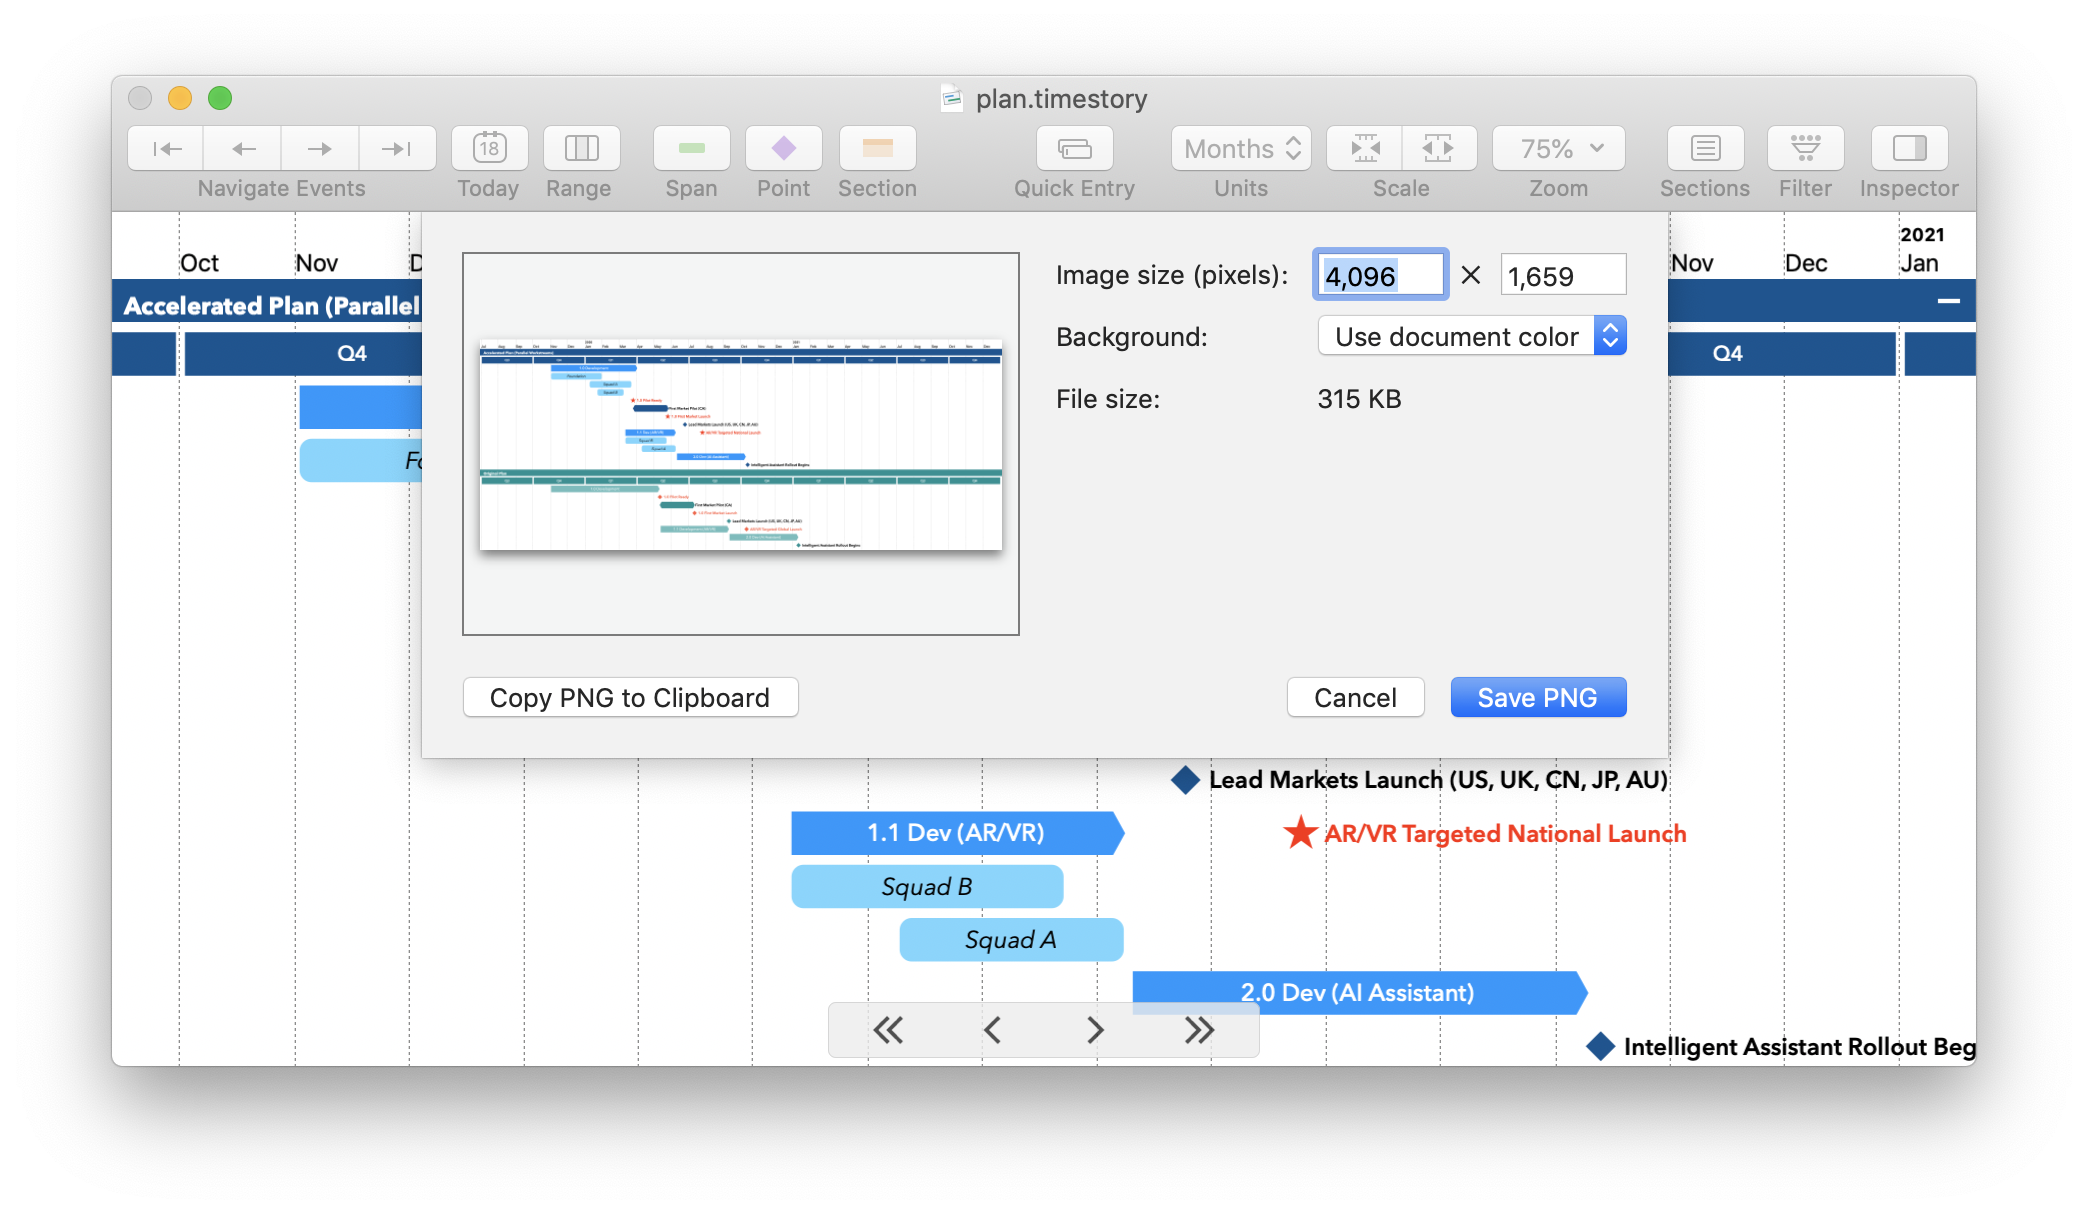
Embed your timeline in another document, a Web page, and email, or elsewhere, by directly converting it to an image in the standard PNG format. Select your desired pixel size, and choose a transparent background if needed.
To scroll directly to any date, just press G (or use the Go to Date menu) and type in that date.
When using the “Fit to N x M pages” option in a printout, TimeStory normally just reduces your document proportionally, keeping its time scale. For documents covering long periods, this can make it difficult to fit to a small number of pages. With 1.5, you can choose to have TimeStory automatically adjust the time scale and units to fit to a give page size, if you don’t need to preserve the document time scale.
⌘{, ⌘|, and
⌘}, to put the title on the left, center, or right, respectively, of the
graphic.A special thanks goes to the users who have been pushing TimeStory forward by trying new things and applying it to real problems. Your feedback has been invaluable. Every release since 1.0 has had at least one feature or fix driven by unsolicited user feedback.
If you are a TimeStory user with any feedback at all, whether it’s a feature request, a bug, a limitation, please take a moment to send an email to support@timestory.app. All comments are welcome.
This new feature lets you easily highlight a range of time, to assist in presenting or viewing a document. It also lets you configure any event in your document to highlight its underlying time range, to provide context to other events.
TimeStory now saves your preferred start-of-week day in your documents.
When you create a new document, or first open an existing document from an earlier version, TimeStory reads your Mac’s preferences to determine whether you normally prefer weeks to start on Sunday, Monday, or otherwise. You can edit this on a per-document basis, if you want; if you send such a document to someone with different preferences, they will see the weeks as you intended.
(Prior versions of TimeStory always treated weeks as starting on Sunday.)
While moving or resizing events, TimeStory now shows a small date label next to the event, so you can more precisely position it. If you press and hold the Option or Shift keys while dragging, this label also indicates the effect of that key (to allow events to overlap, or to keep the event on its own row).
Color choices now use a new, streamlined Color Picker control, allowing one-click use of existing colors from the rest of the document or from a standard palette. These controls also now clearly present options such as “Automatic” colors for date labels, which previously were hidden behind checkboxes.
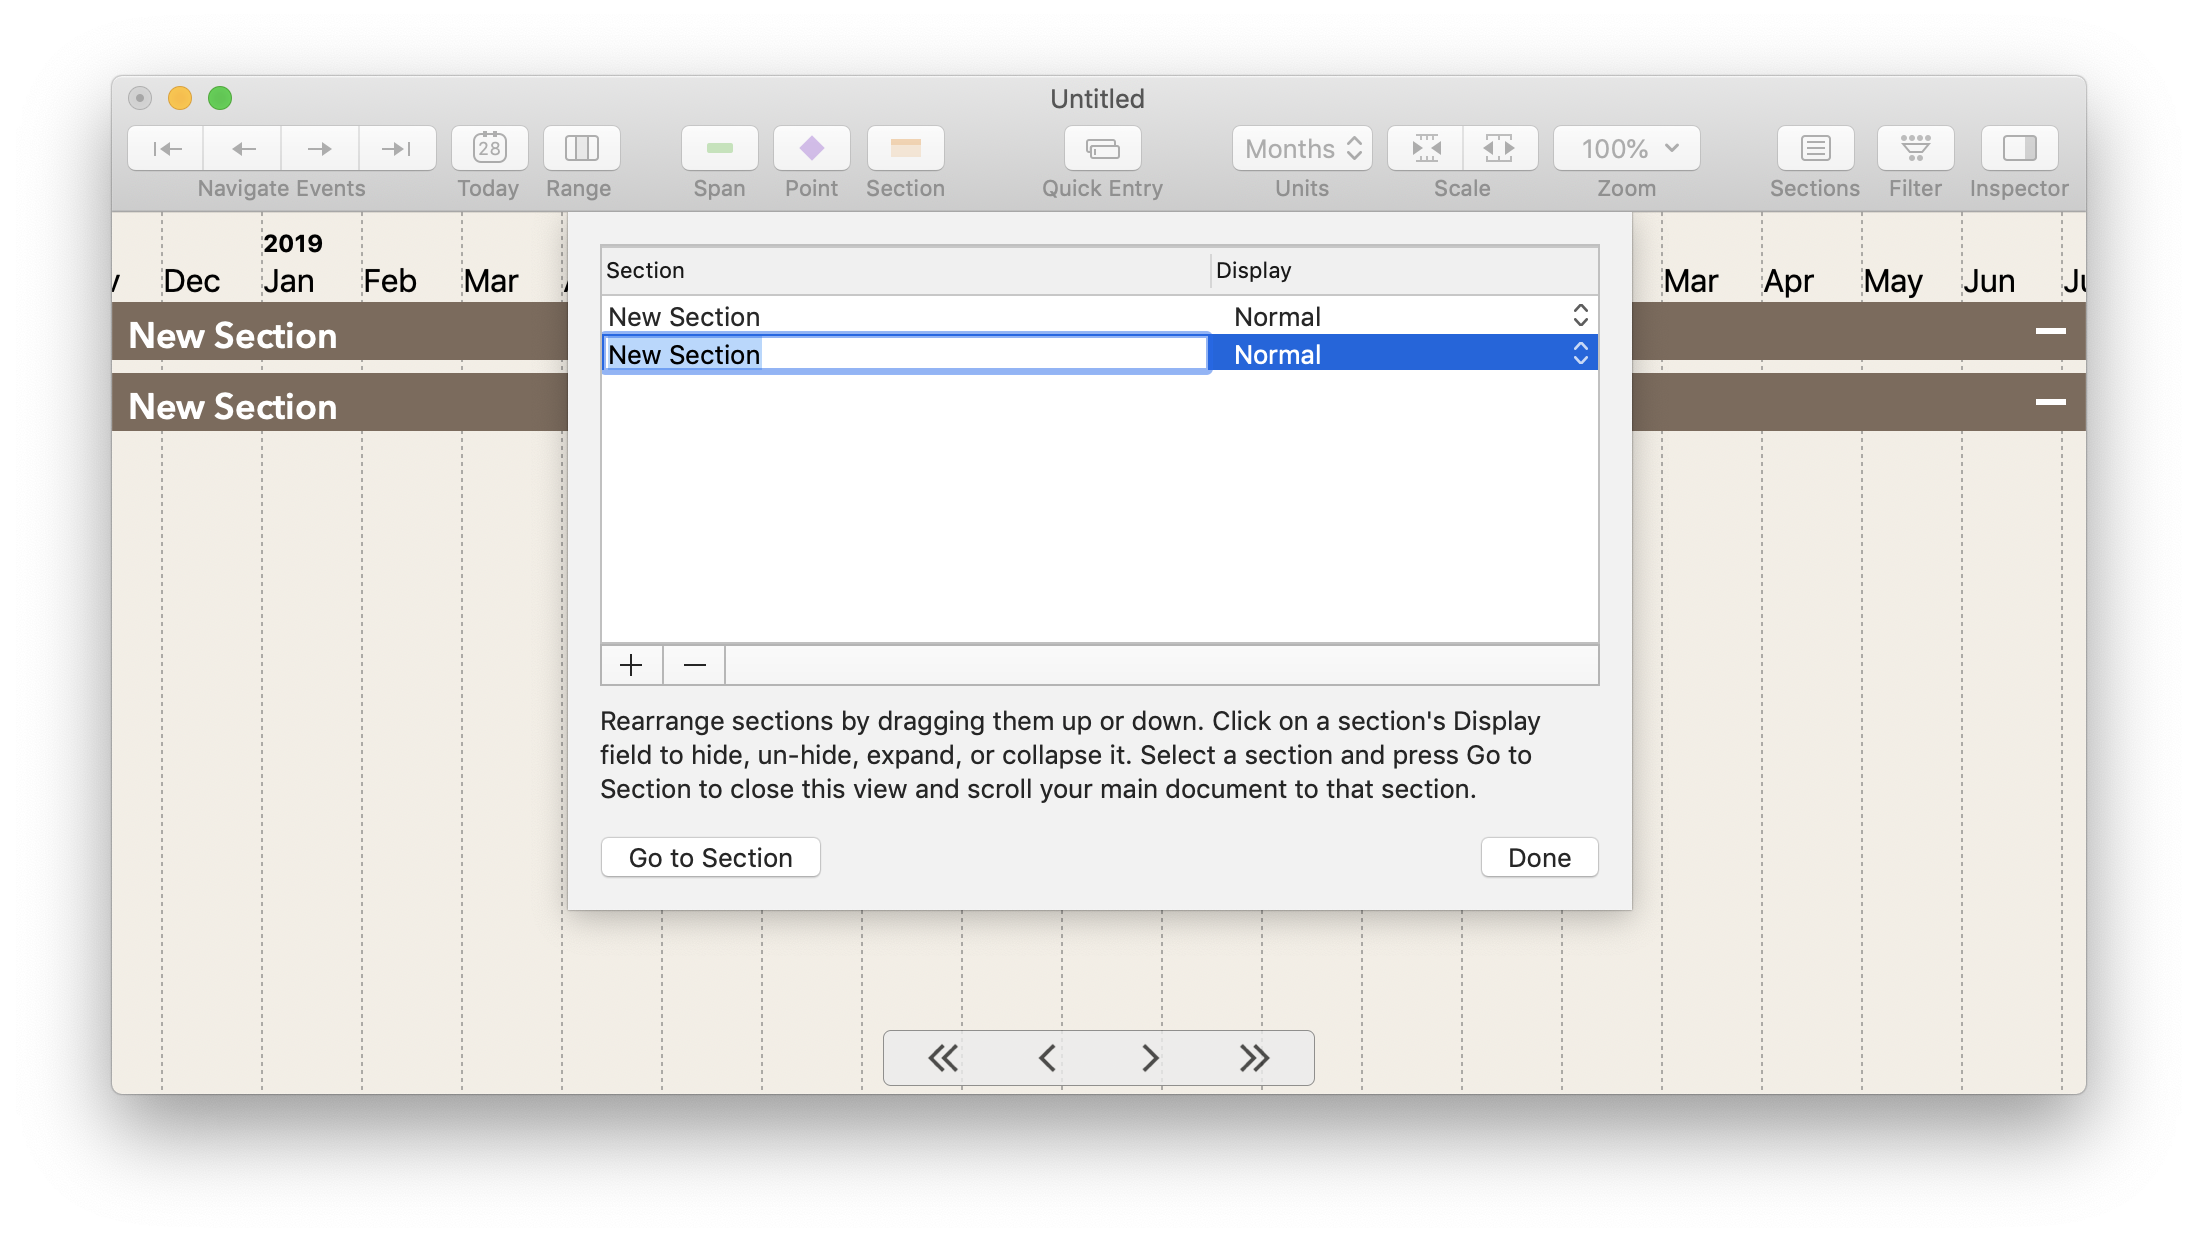
You can now perform more section edits within the Section Management dialog itself, including double-clicking to rename a section, deleting an empty section, and adding a new section.
Use the Today button on the toolbar, or the View > Show Today menu option, to toggle a vertical line highlighting today’s date. This helps you visually separate past from future when working on active projects. Showing this line will also bring today’s date into the center of the view if you’ve scrolled away.
New custom options were added to the Print panel to allow better control over printing and PDF generation:

There were also a couple of printing-related fixes:
The Event Filter now supports a “not” operator (using the character ~), so you can more easily exclude events from a view instead of just including them.
TimeStory 1.2.1 was focused on continuing to refine the app, and does not introduce any major new features.
The Time Scroller is a new control which hovers at the bottom of your timeline and provides buttons to scroll horizontally (forward and backward in time) by different amounts.
You can still navigate your timeline just as before, with regular trackpad scrolling gestures and arrow keys, and if you want to hide the Time Scroller, just use the View menu (or right-click on it and press Hide).
TimeStory has always let you divide your document into sections. Starting in version 1.2:
Points in time can now be marked with triangles pointing in four different directions.
Having used TimeStory to map out a series of events, you can now export those events into a simple, plain-text comma-separated values (CSV) file. This lets you bring these events into other tools, like spreadsheets. This export omits all of your formatting and positioning, but contains all the event data: dates, title text, description text, and section assignments.
You can now import any number of events from comma-separated value files, which can be produced by Excel or any number of other tools, including other project management and time planning software.
A CSV file is just a text file, containing one table, each row of which is on another line, with comma-separated values. (TimeStory also supports a variant of this, where values are separated by a tab instead of a comma, often called tab-separated values; other than the separator, these files behave the same.)
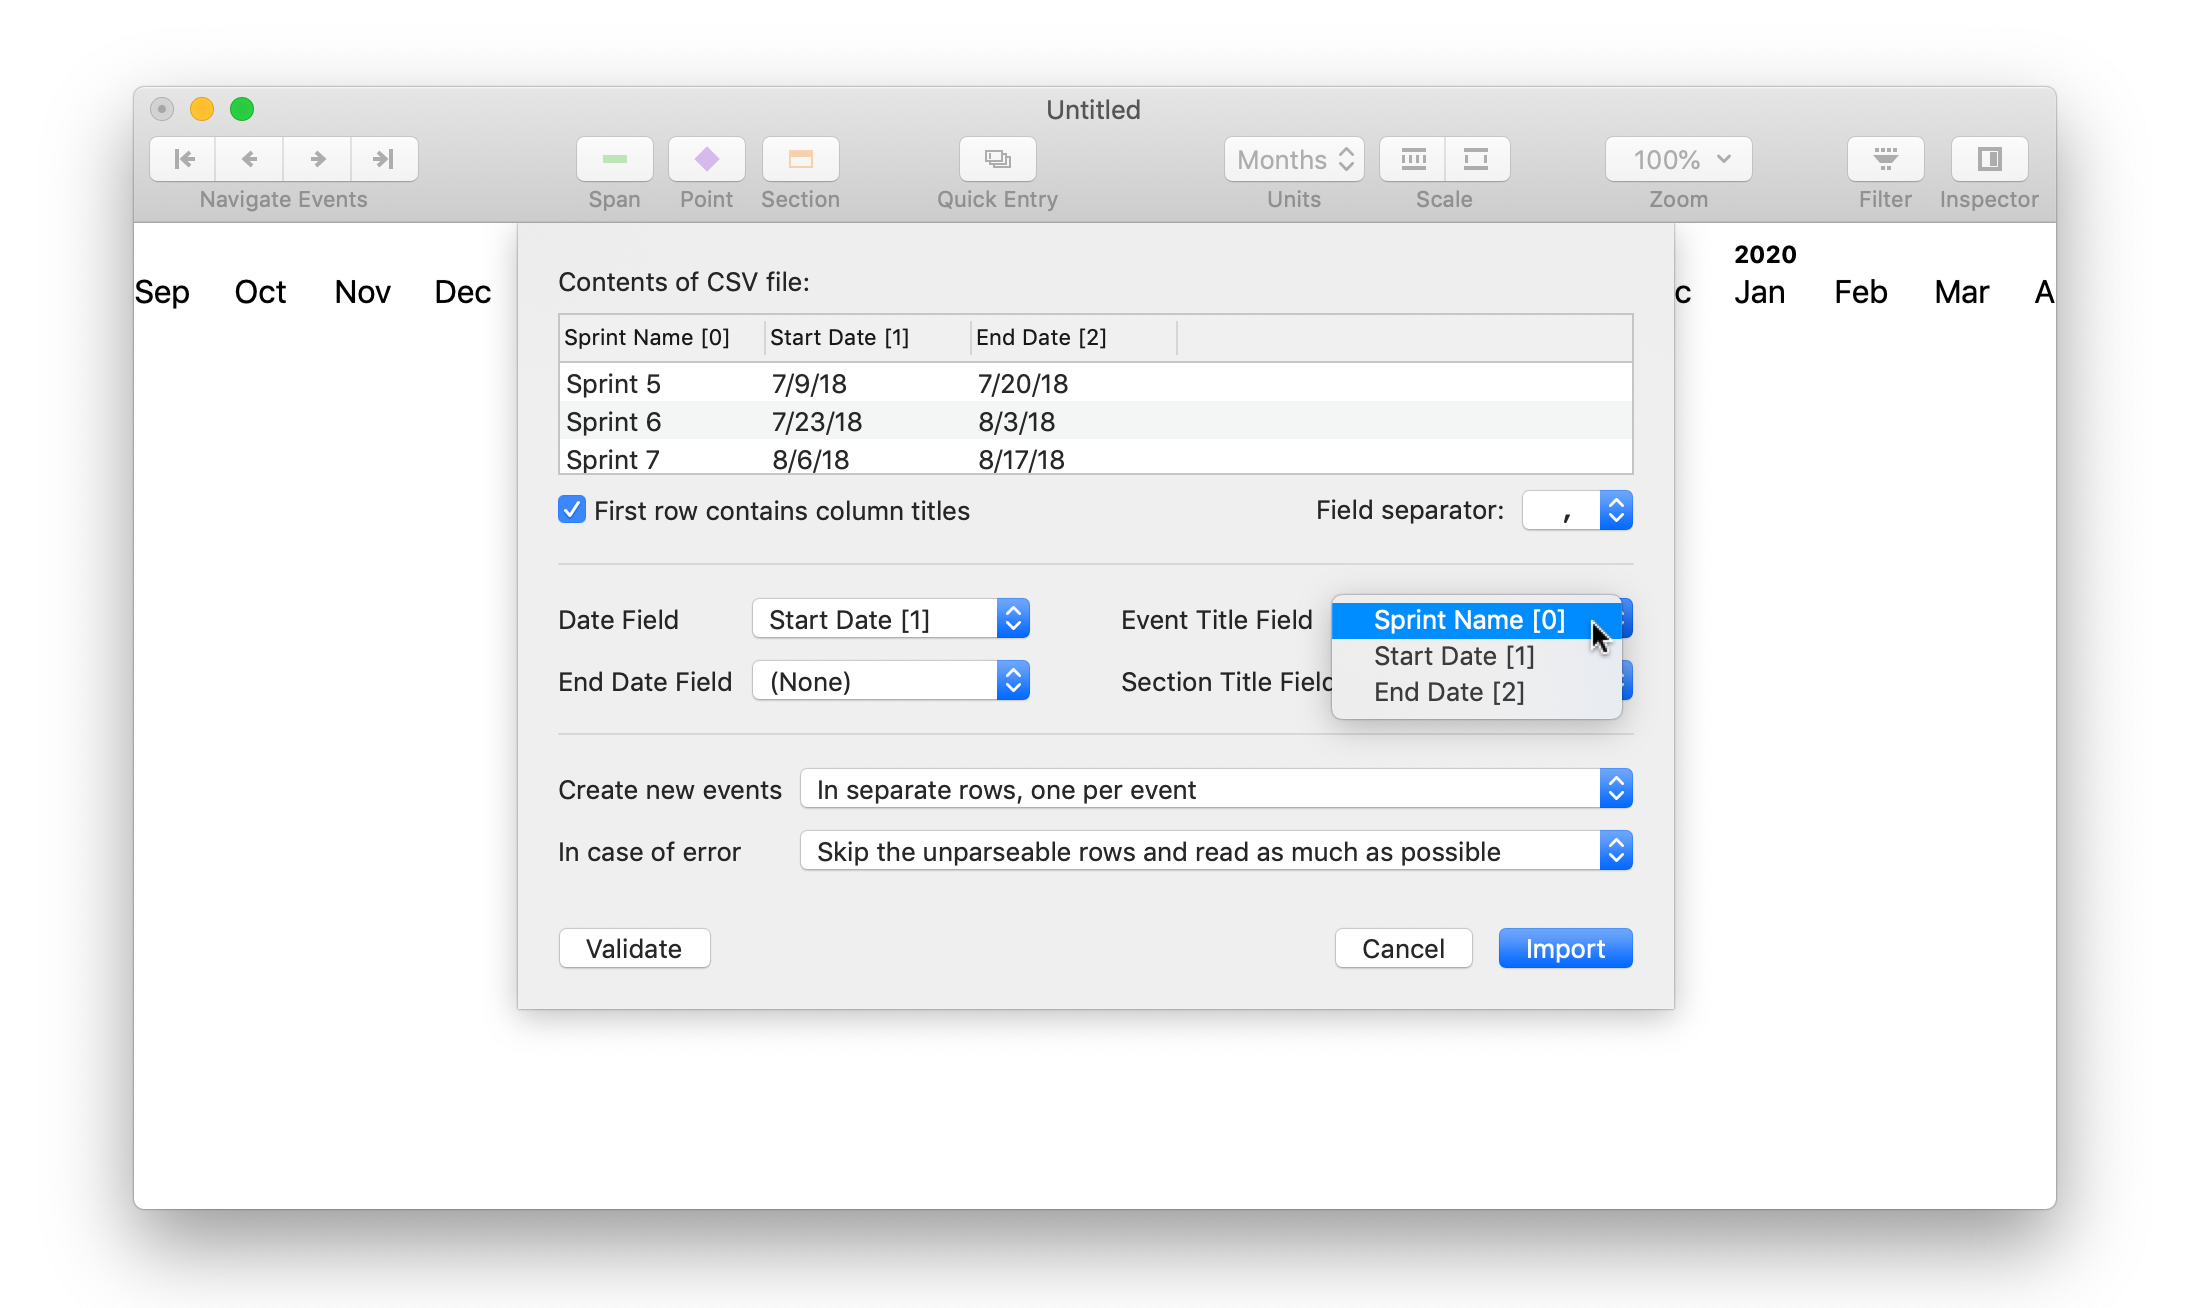
Importing a CSV file adds any events found to your current TimeStory document. Start this process by selecting the Import Events from CSV option under the Insert menu. After picking the file to import, TimeStory lets you extract event titles, dates, and sections from the fields, and control import. More info available in TimeStory’s built-in Help.
TimeStory 1.0 only supported macOS Mojave, the newest version as of its release. TimeStory 1.1 adds support for the prior version of macOS, High Sierra, for users who may not yet have updated to Mojave. There are no feature differences, other than Mojave-specific things like Dark Mode support.
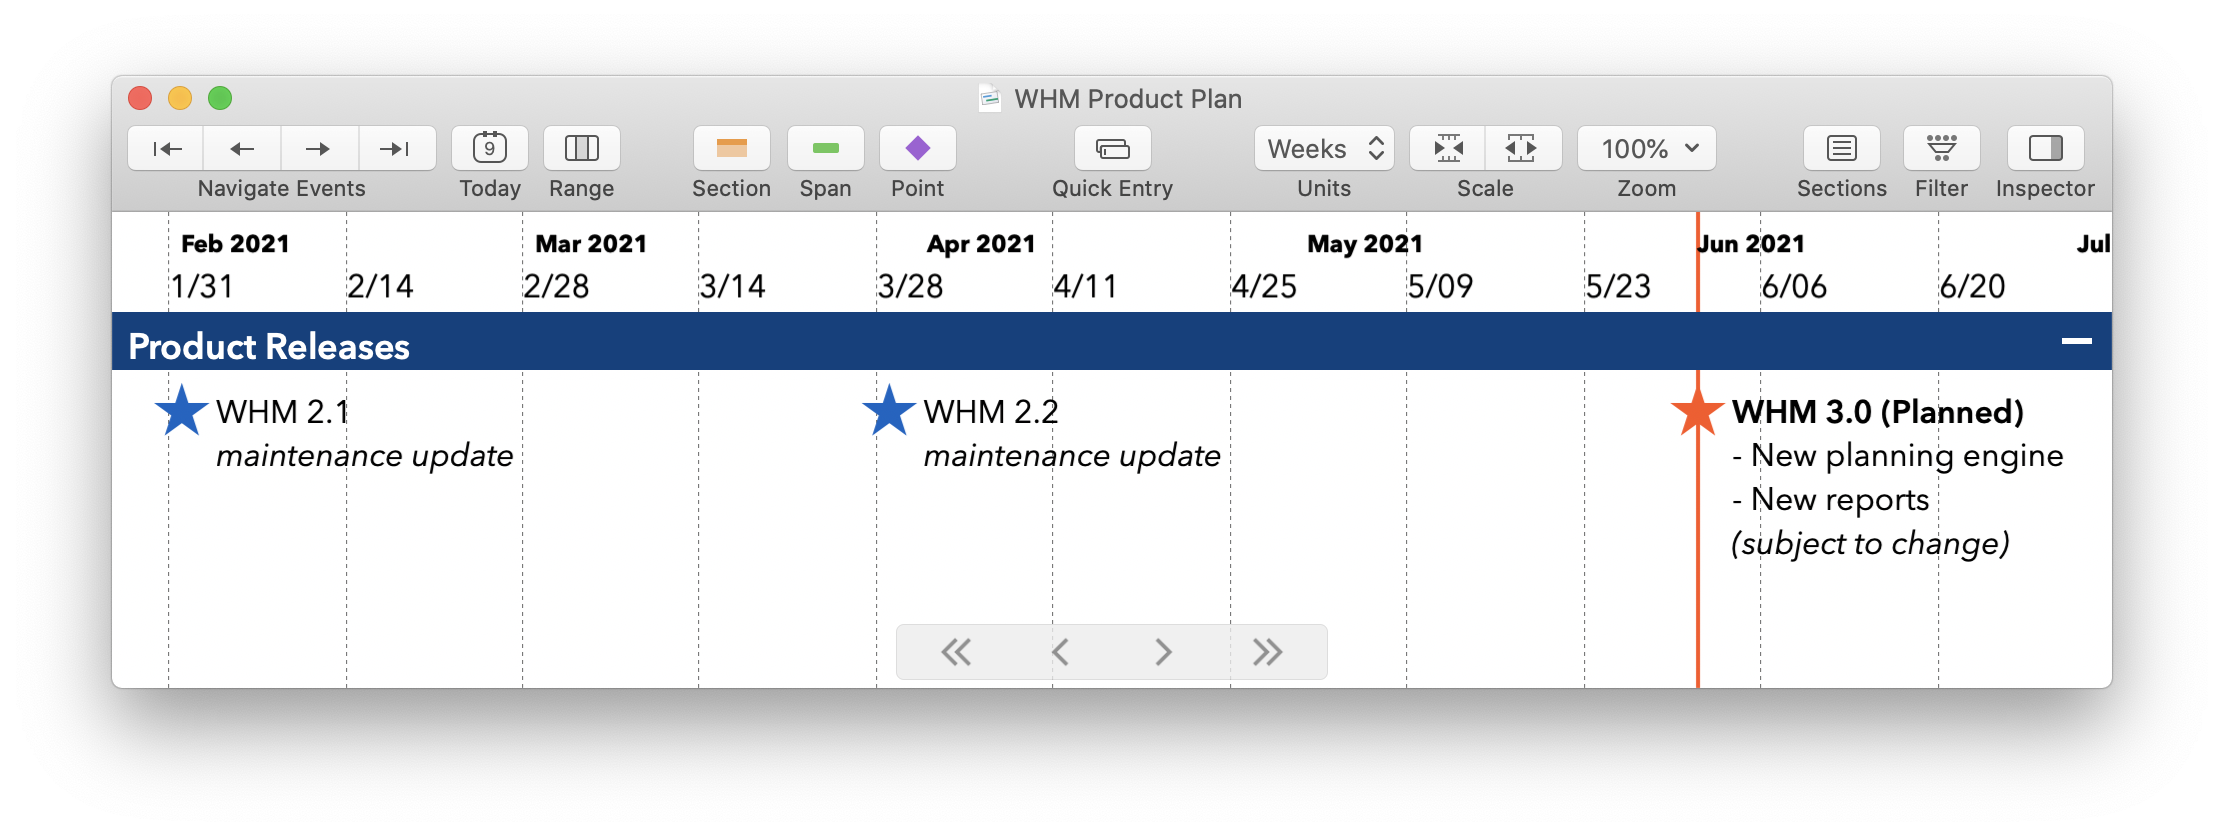
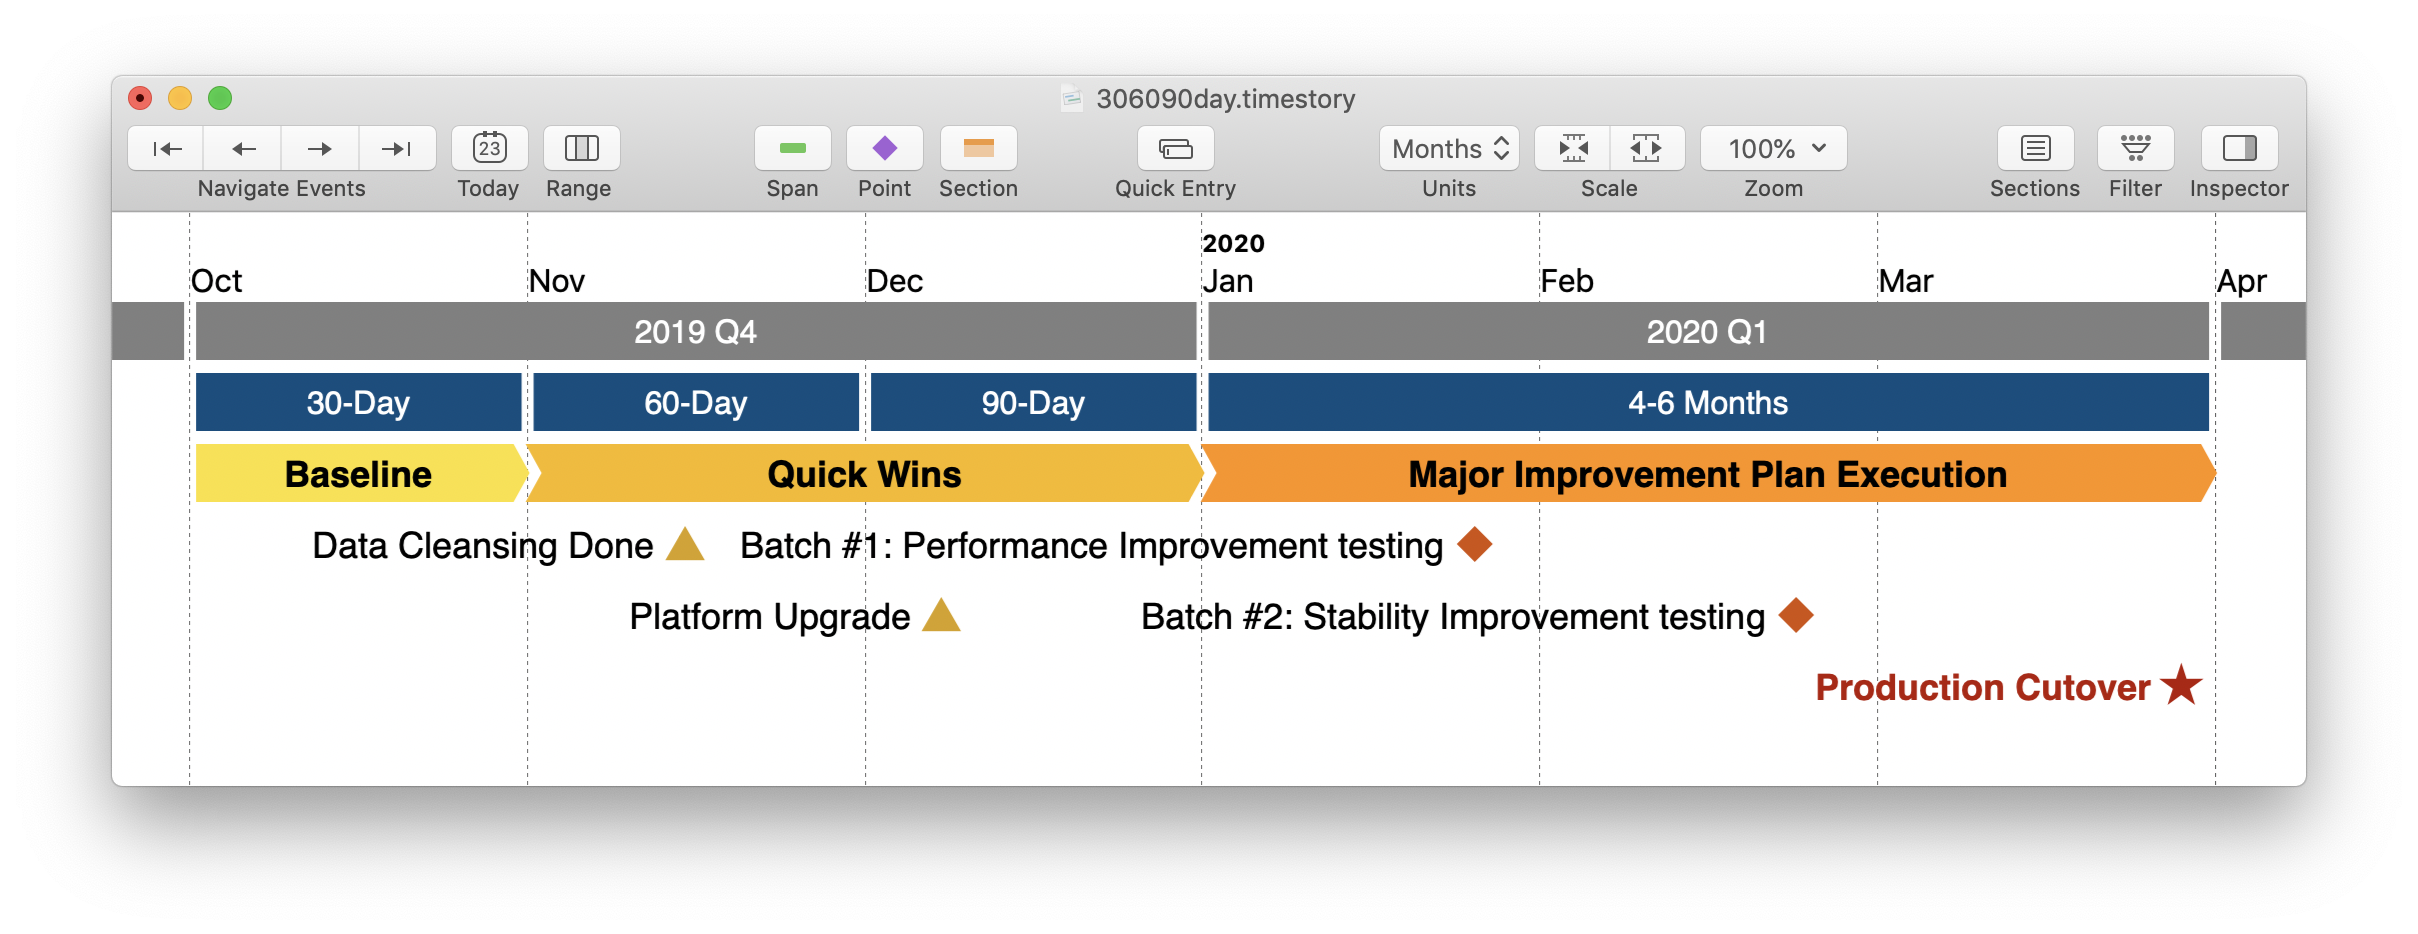
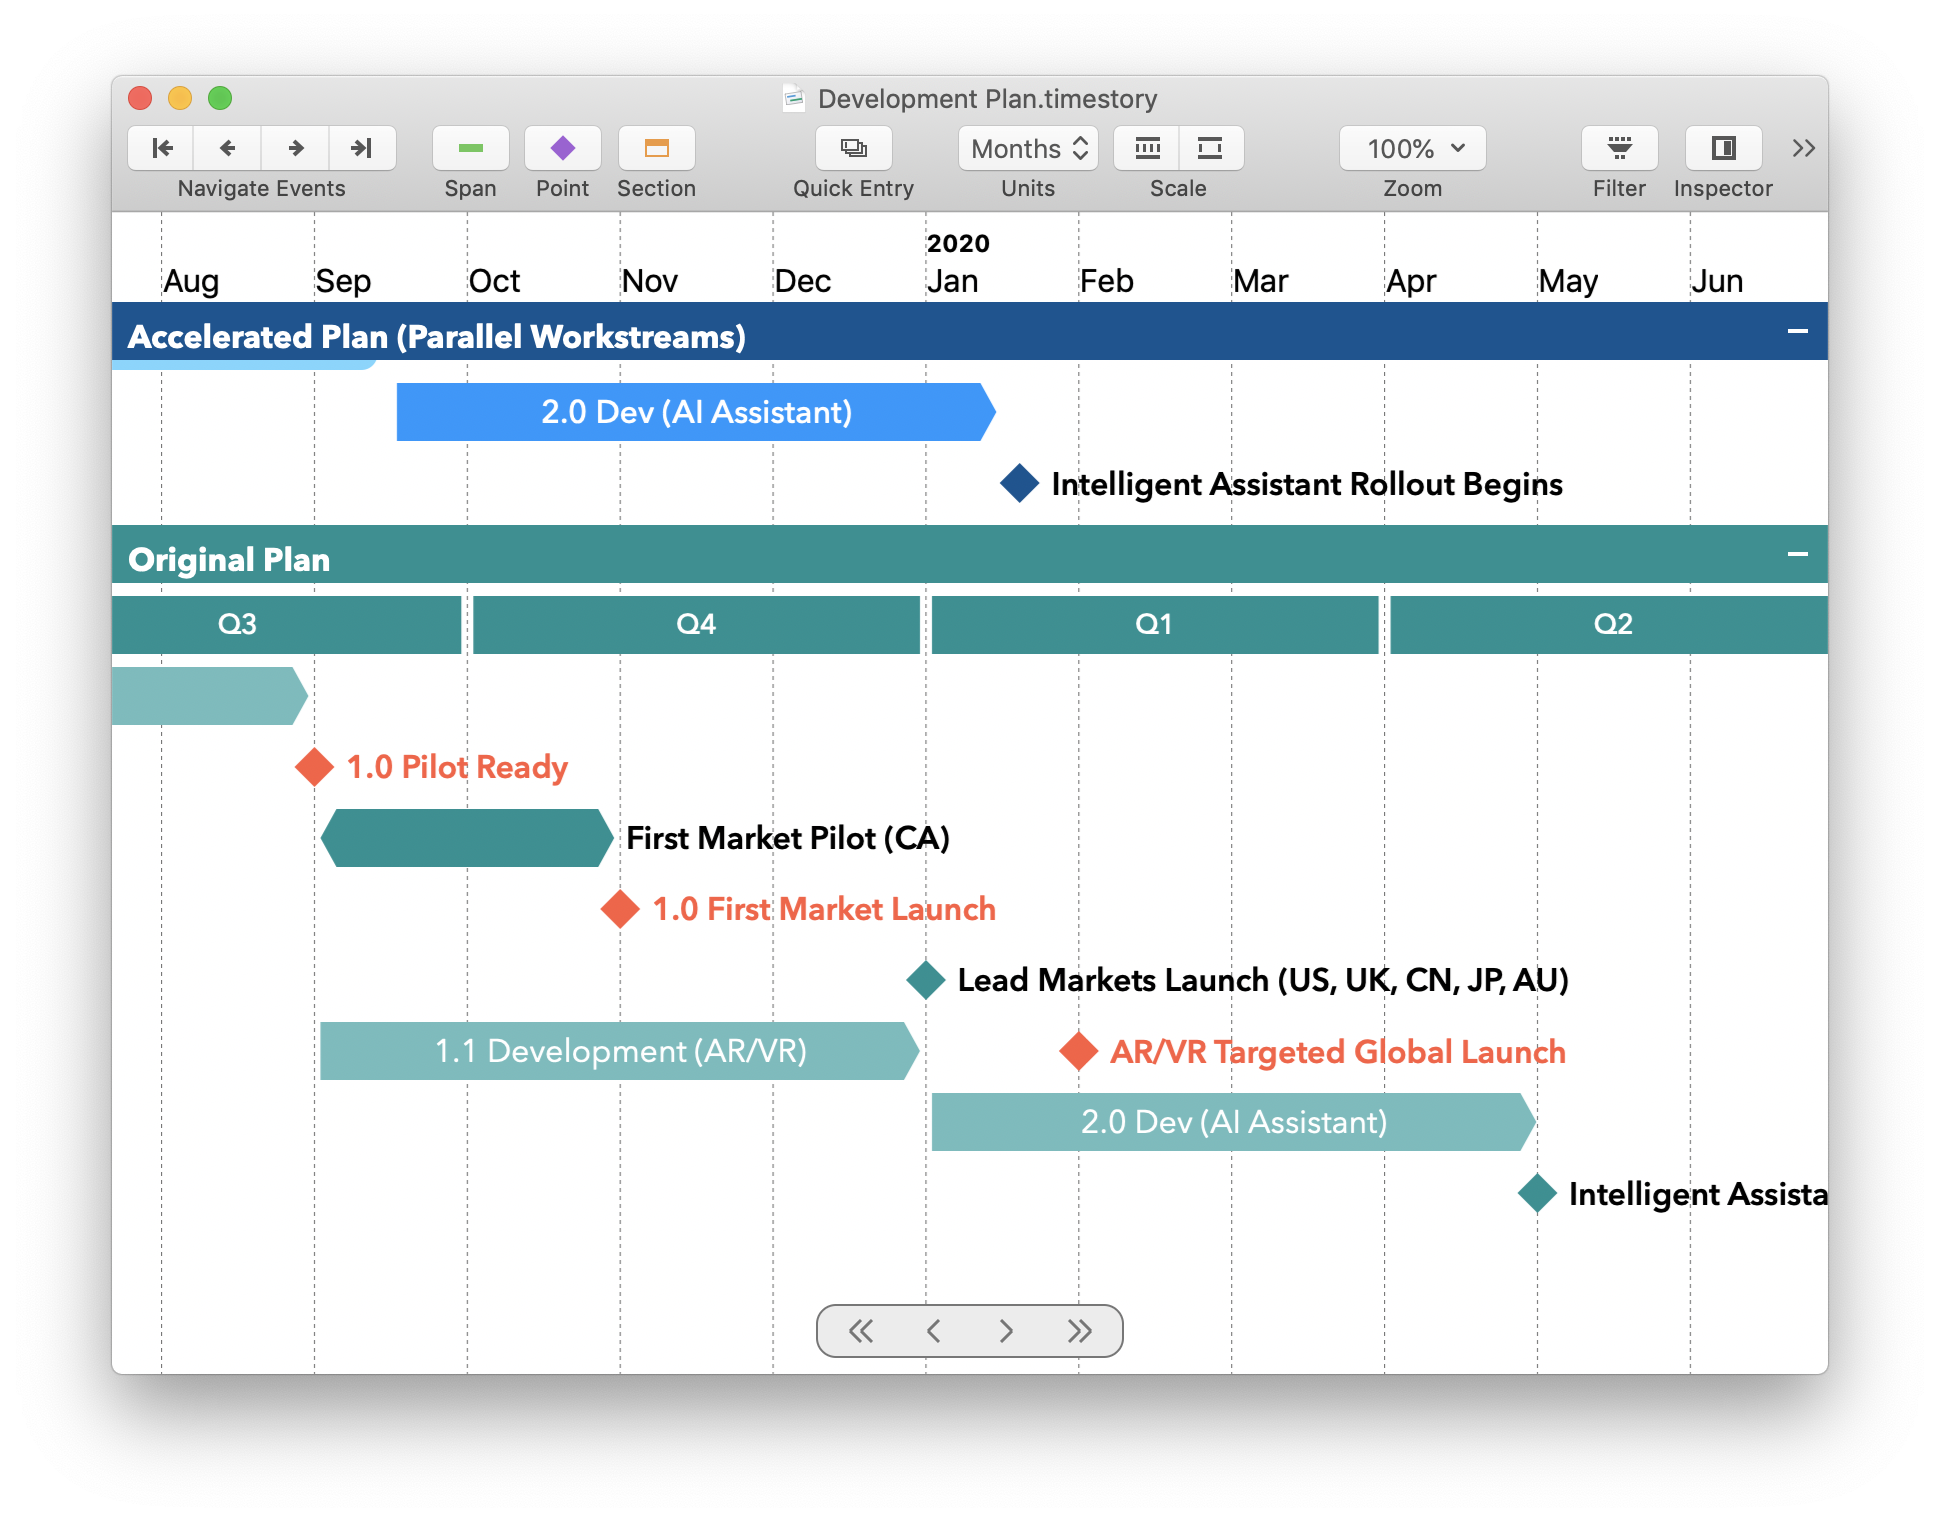
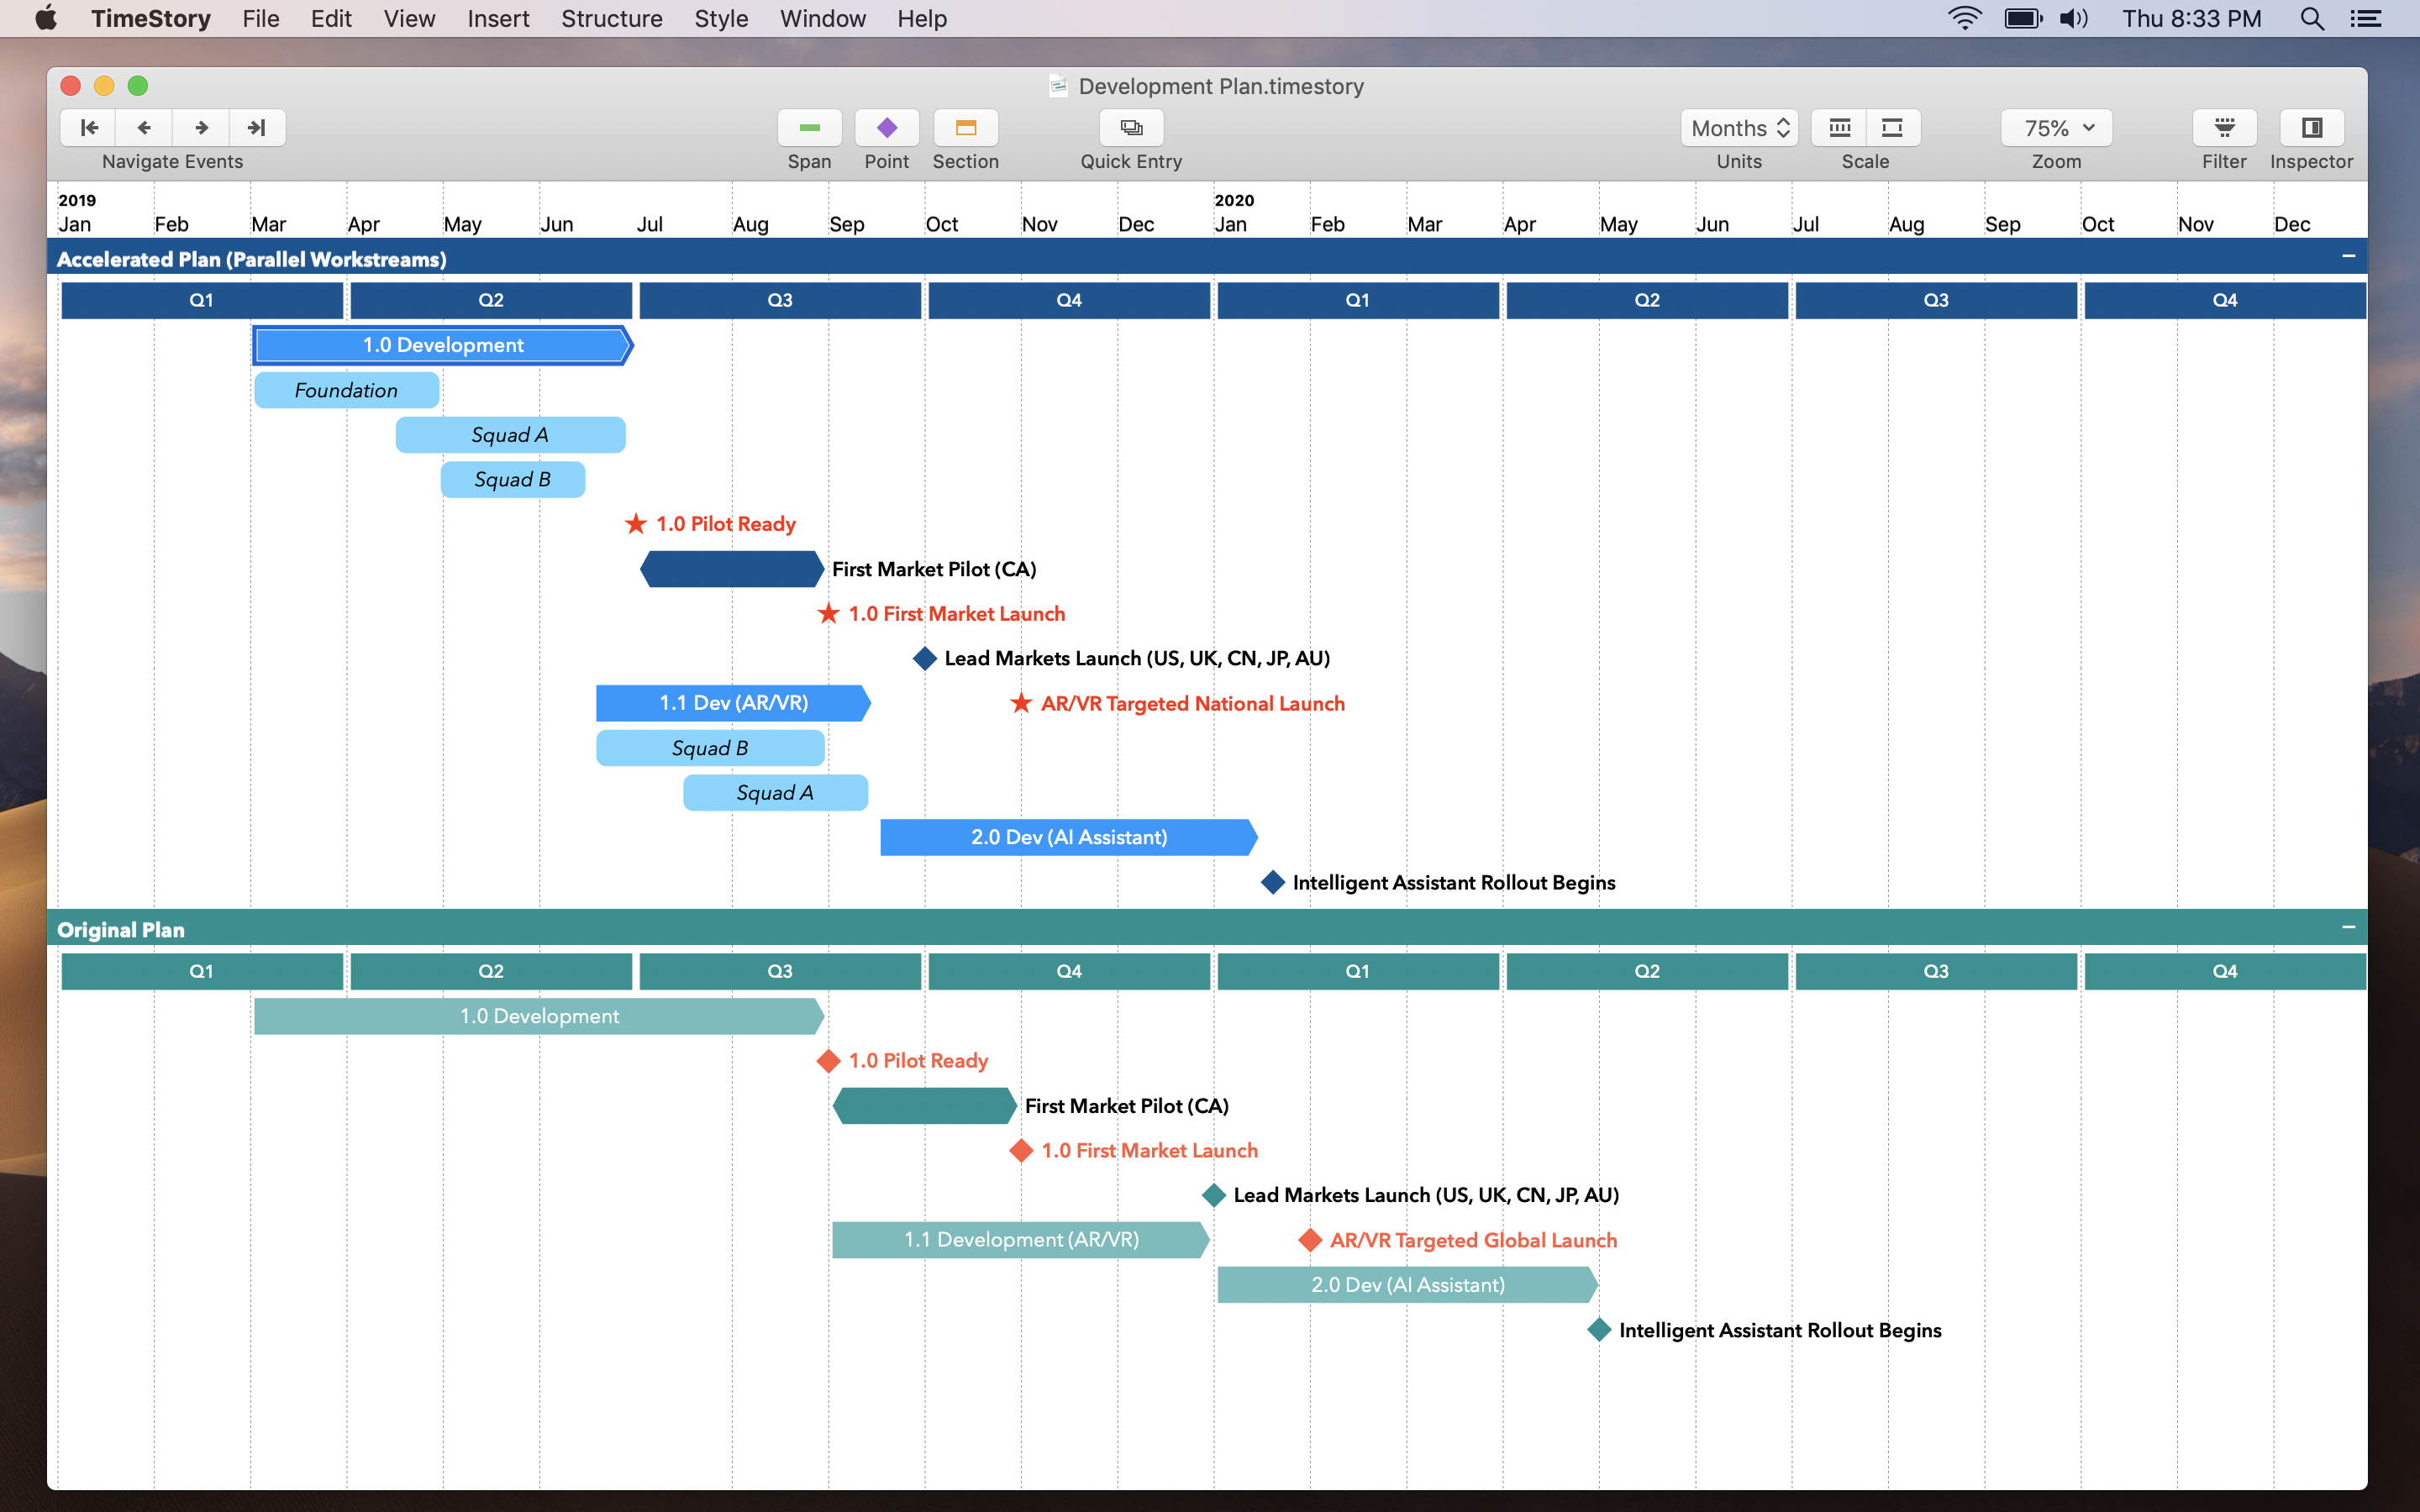
The built-in example documents now include a new imaginary product development and launch plan, to show off the kind of high-level product planning that TimeStory was built to support. (This plan is purely fictional; any resemblance to any real project plans, current or historical, is unintentional and coincidental.)
You can now select multiple events and drag them around as a group, instead of being limited to one at a time. In 1.0, there were also some bugs in how events dealt with being moved by the mouse or the cursor keys, which are now fixed.
Version 1.0 was released to the Mac App Store after six months of development. There were no release notes, as this was the first version, and there were no changes to report!