TimeStory can import events from, and write events to, comma-separated value (CSV) files. These plain-text files can be created, viewed, and edited by spreadsheets, text editors, and other apps, and can also be imported and exported by many project-management and calendar tools.
Importing from CSV
CSV Import adds events, and possibly sections, to an existing document. Start by either creating a new, empty document, or by opening a document to which you want to add the new content. Then, either drag your CSV file from Finder into the timeline window, or use to choose your CSV file. Once a file has been loaded, you’ll see the CSV Import dialog.
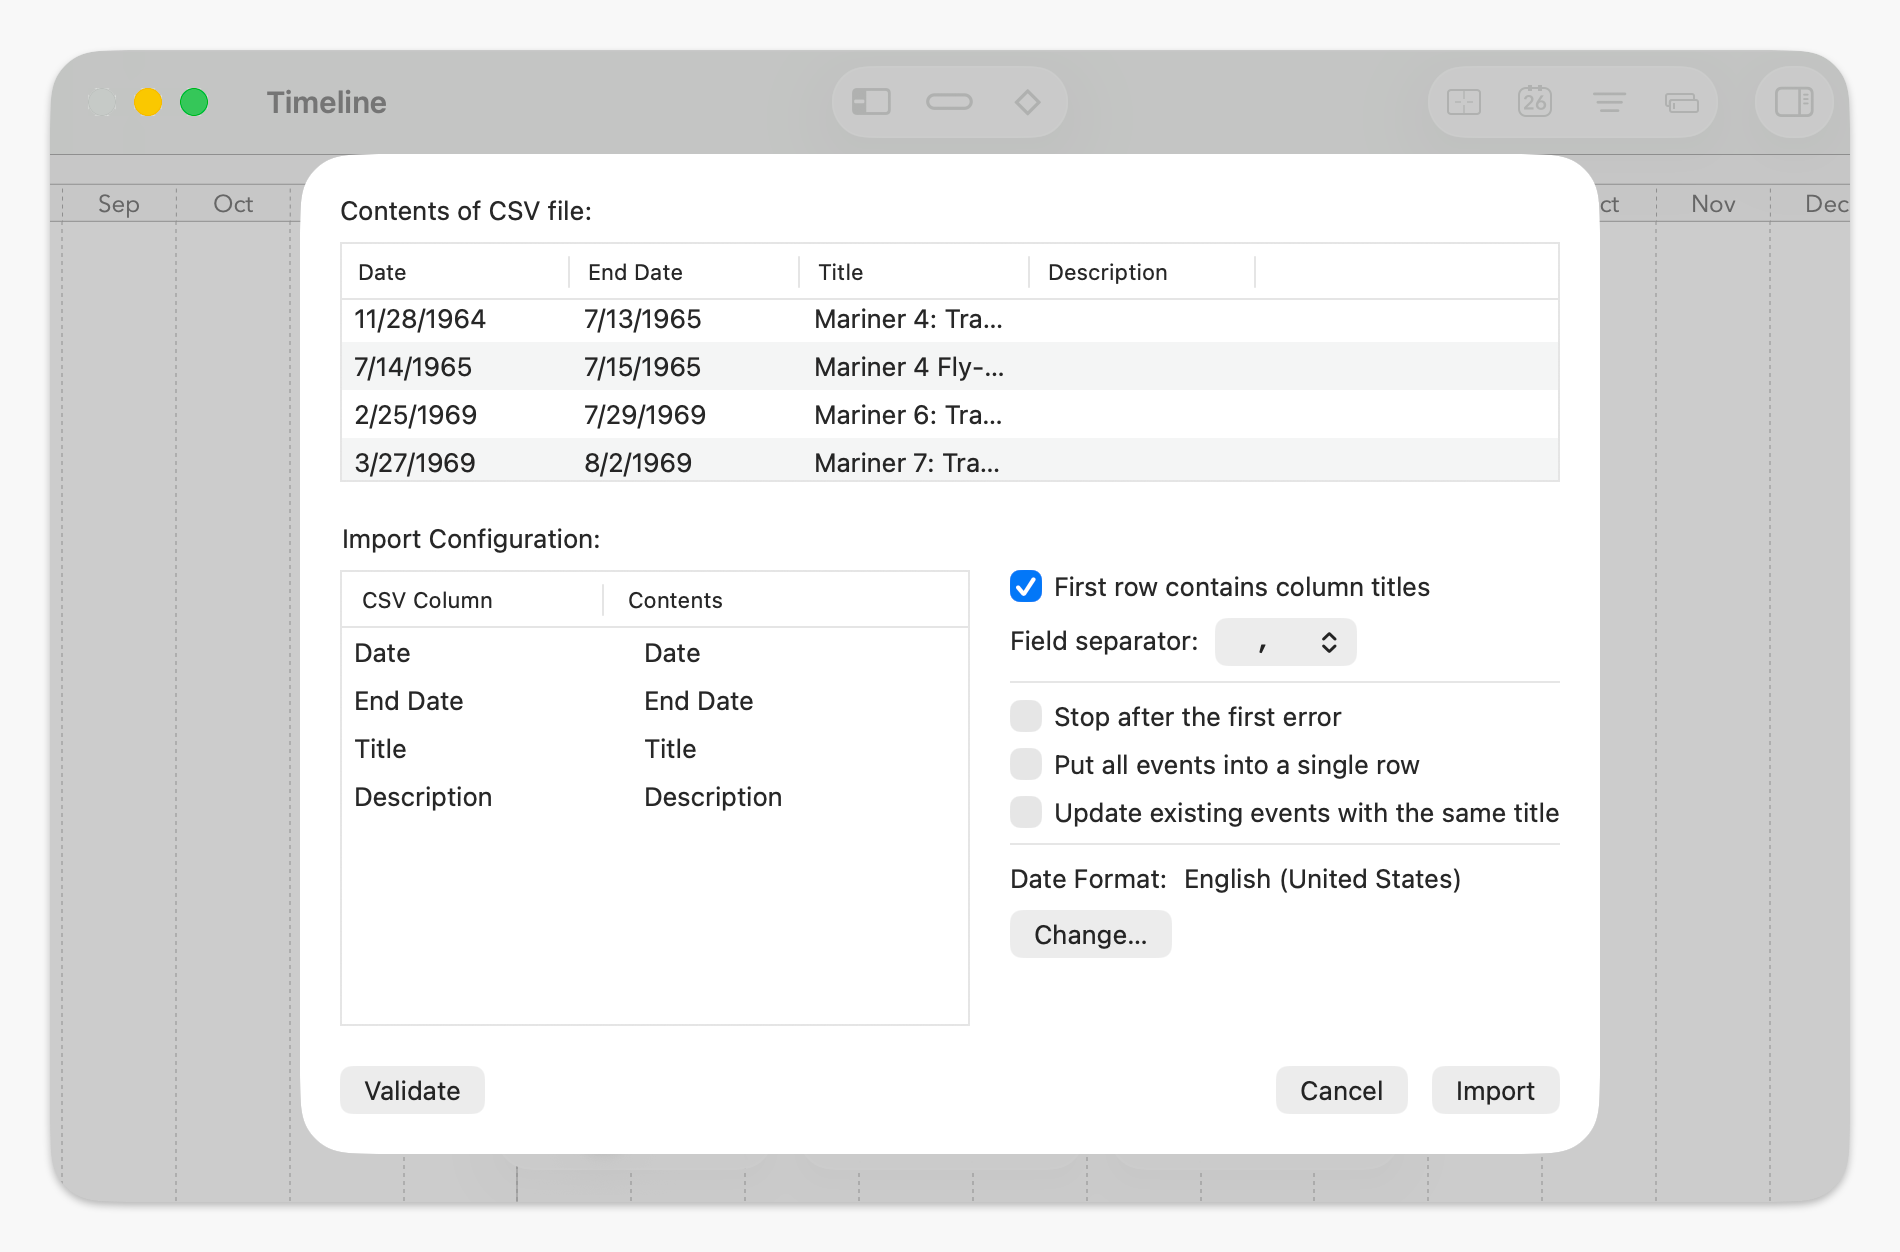
At the top of this dialog, you’ll see a preview of up to 100 rows of data from the file; below that are the settings to use to do the import. The preview will automatically update as you change those settings.
TimeStory will attempt to automatically detect the correct configuration from the contents of the file. If the file came from a TimeStory export, then this detection should normally be perfect, and you just have to click the Import button. For other sources, TimeStory will automatically detect the basics, but you’ll often need to make some changes.
- The field separator is the character used to delimit fields in the input file. TimeStory allows both comma and tab characters, which are both commonly used.
- First row contains column titles tells TimeStory that the first row of the CSV contains column titles, not a valid event.
- Stop after the first error causes TimeStory to fail to import if there are any rows of data it can’t import. Use this if you want all or nothing; normally, it tries to import everything it can, and tell you about what it couldn’t.
- Put all events in a single row does what it says. Normally, each event goes into its own row. Note that if your import includes section titles, this really means all events in a single row per section.
- Update events matching treats this CSV file as an update to your document; see below for details.
- Date Format lets you request a specific language and regional date format for reading dates. By default, it uses your current system settings; the screenshot above was taken on my Mac, hence US. Note that TimeStory also always recognizes dates of the form YYYY-MM-DD, regardless of your settings, as those are commonly produced by other programs and are fairly universal.
Finally, for each column in the CSV, you can choose where it goes: the event title, description, tag list, color, shape, and so on. Some fields have variations; for example, the end date can be inclusive (the last day of the event) or exclusive (the day after the last day of the event), and the section title can be just the immediate containing section or the sequence of section/subsection titles in a more complex document.
Any custom properties you’ve defined for this document will also appear as options. (For number properties, the import will automatically apply minimum or maximum values if you’ve set them, and will empty out any values which aren’t numbers.)
Updating Existing Events
You may sometimes need to use a CSV file to update the events in your timeline, rather than just add to them. This lets you use something like a spreadsheet to collect updated dates, descriptions, or other properties for an existing timeline, making it easier to collaborate with others who don’t have TimeStory themselves.
To perform an updating import, choose a column in the “Update events matching” setting in the CSV Import sheet. This tells the importer how to match up rows in the CSV file with existing events. This setting is automatically populated from your current set of import columns; only these column types are allowed:
- Title: titles are matched case-insensitively.
- Any custom properties you’ve defined: text properties are matched case-insensitively, number properties are matched according to their specified precision (i.e. if you specified one digit after the decimal point, then 4.5 and 4.51 will match).
- TimeStory ID: This must match exactly, including letter case. If TimeStory ID is a column in your import, this option will be pre-selected and cannot be changed; you are not allowed to import TimeStory IDs into your document except when using them to match for updates. This should normally only be used when the CSV file started in TimeStory and was exported and edited for re-insertion.
During the import, whenever a row is found with no value in that column, or when the column value does not match an existing event, that row is treated as new and added to your timeline. (Note that an unmatched TimeStory ID will be replaced by a new ID; TimeStory ID values can only be set by the app, not by inputs.)
Validating the Import Configuration
You can press the Validate button to ask TimeStory to attempt to read the entire CSV according to your current settings, without importing anything yet. It will tell you how many valid events it found, and let you view any errors or unrecognized fields.
Performing the Import
When you’re ready, press Import. The events will be imported and added to your document, and they will all be selected, so that you can easily adjust styling or position.
TimeStory can import quite large CSV files, containing tens of thousands of events. A large import or validation may take several seconds; as it runs, the dialog will continue to update the number of events found and the number of unusable rows it had to skip, and you can choose to stop at any time.
You can undo and redo a CSV import, just like any other document editing action.
Exporting to CSV
To export a document, choose . This brings up the CSV Export dialog, which shares many options with the Import dialog.
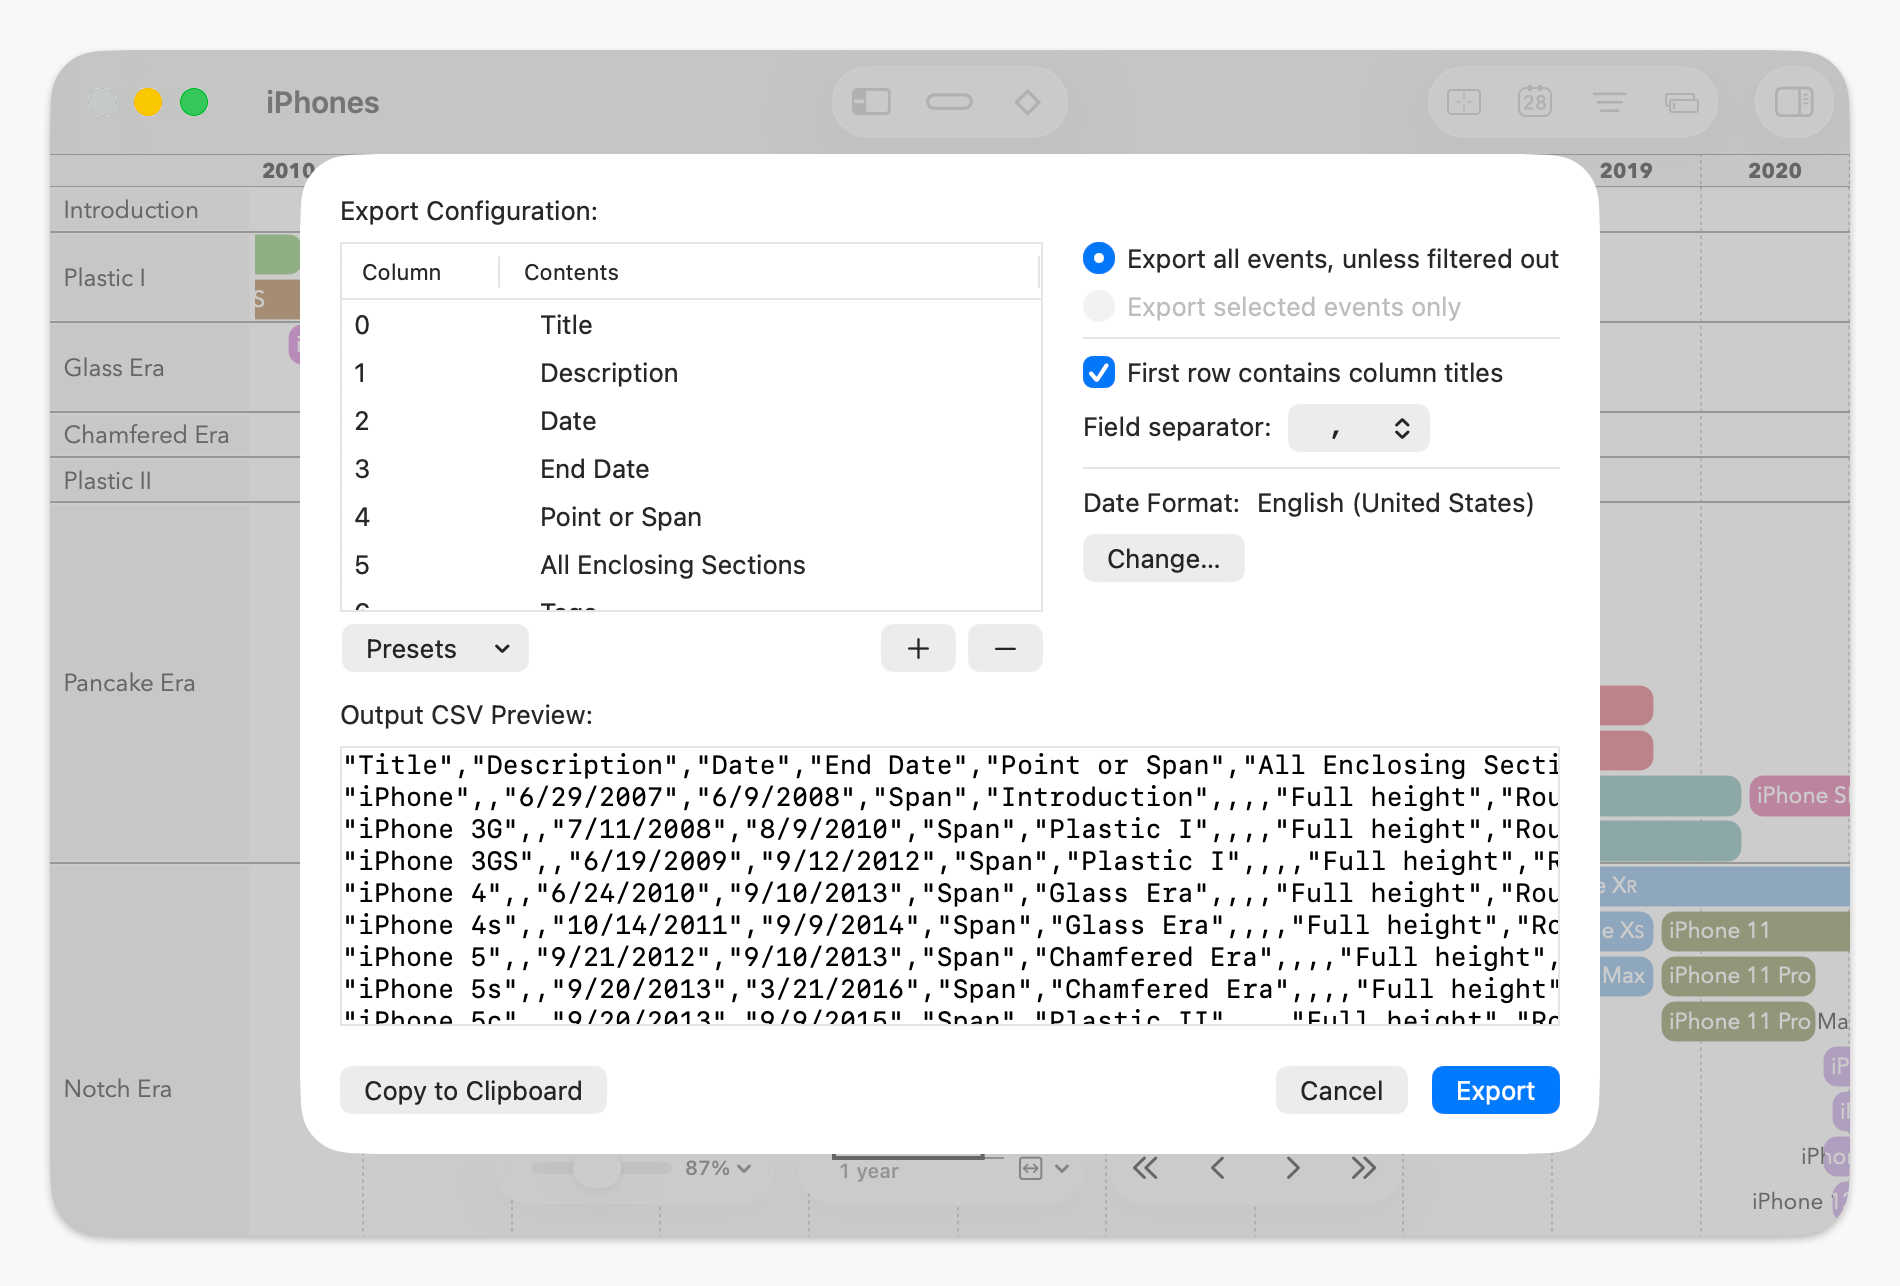
The main difference here is that you can add or remove columns. The set of available column types exactly matches those on the import dialog, with the same meaning.
Click Export to choose a file to save the output to, or click Copy to Clipboard to copy the data to the clipboard if you want to paste it into another editor, app, or spreadsheet.
If you make any changes to the configuration before exporting, those changes will be remembered the next time you open the Export dialog for the same document.
TimeStory ID Columns
In both import and export dialogs, one of the available column types is called “TimeStory ID”. This is an internal identifier, unique within the document, assigned by TimeStory to each event. Once created, an event’s ID never changes, no matter what other edits you do. You cannot choose an event’s ID. (When importing a new event from a CSV file, if that row contains an unknown ID, TimeStory ignores it and creates its own new identifier.)
If you need to use an ID that you choose, or that some other app or system chooses, create a custom property and put it in there. You can include any custom property in an export, and use any custom property for an updating import.
This lets you export events to CSV, including the TimeStory ID as a column, and then later re-import that same CSV file to update those same events with any changes to dates, titles, or any other field. You generally shouldn’t use this field for any other purpose.
(TimeStory event IDs normally contain an “E” followed by one or more digits, for example “E1234”, but you should not depend on this! Older versions of TimeStory used different IDs internally, so an older document’s event IDs may start with prefixes like “fe” and “ie”. Do not try to parse or interpret the meaning of these IDs.)